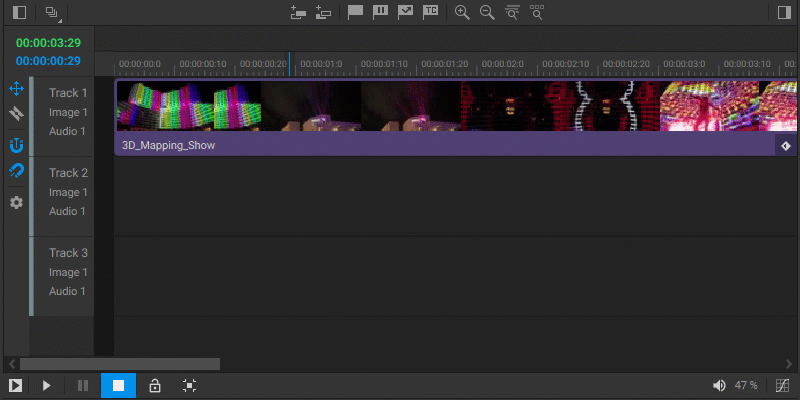
Timeline View and Navigation
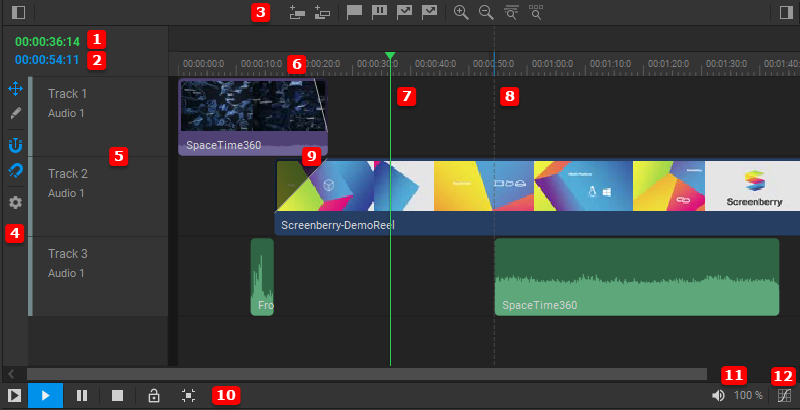
The timeline panel offers a range of tools and options for organizing your media and managing playback. These include the following:
- Current Time Display: Displays the current playhead’s time position on the timeline.
- Guide Position Display: Displays the time position of the guide on the timeline.
- Top Toolbar: Contains tools for adding timeline tracks, inserting various types of markers, and managing the zoom level of the timeline view.
- Side Toolbar: Contains the selectors for the Razor
 and Move
  tools, the Playhead Snapping toggle
  , the Snap On/Off switch
  for controlling the snapping of media items, and the timeline Preferences .
 - Tracks: Serve to organize and layer media items on the timeline.
- Time Ruler: Provides a time scale for precise media alignment.
- Playhead: Indicates the present playback position on the timeline.
- Guide: Serves as a reference for a specific time position on the timeline.
- Media Items: Individual media items positioned within the timeline tracks.
- Playback Controls Bar: Contains the Play Selected Item
 , Play
  , Pause
  , and Stop
  buttons for managing playback. Additionally, it includes the Lock/Unlock Playback Controls toggle
  and the Reveal Active Item button
  .
. - Media Player’s Volume Control: Adjusts the output volume of the media player (see Volume Control).
- Media Player’s Color Correction: Adjusts the color parameters of the media player’s video output (see Color Correction).
Positioning the playhead on a timeline
To position the playhead on a timeline, do any of the following:
- Click on the time ruler where you wish to position the playhead.
- Drag the playhead in the time ruler. If you want the playhead to snap to media item edges and markers, enable the Playhead Snapping toggle in the side toolbar.
- Use the arrow keys. Press the
Right ArroworLeft Arrowto move the playhead to the next or previous frame. Press theUp ArroworDown Arrowto move it to the next or previous media item edge or marker. - Press the
KorJkeys to move the playhead to the next or previous keyframe. - Press the
HomeorEndkeys to move the playhead to the beginning or end of a timeline.
Zooming in or out of a timeline
To zoom in or out of a timeline, do one of the following:
- With the mouse cursor over a timeline, use the mouse’s scroll wheel to zoom in or out based on the mouse cursor’s position.
- Press the plus
+key to zoom in and the minus–key to zoom out based on the playhead position. - Click the
 or
or  buttons in the top toolbar to zoom in or out based on the playhead position.
 - Click the
 button in the top toolbar or press the
 \(backslash) key to zoom out and reveal the entire timeline. - Click the
 button in the top toolbar or press the
 Shift+\(backslash) keys to zoom in to the frame level.
Scrolling a timeline horizontally
When parts of a timeline are out of view, you can scroll it horizontally by dragging the scroll bar at the bottom of the timeline window.