
3D Model
Adding 3D Models
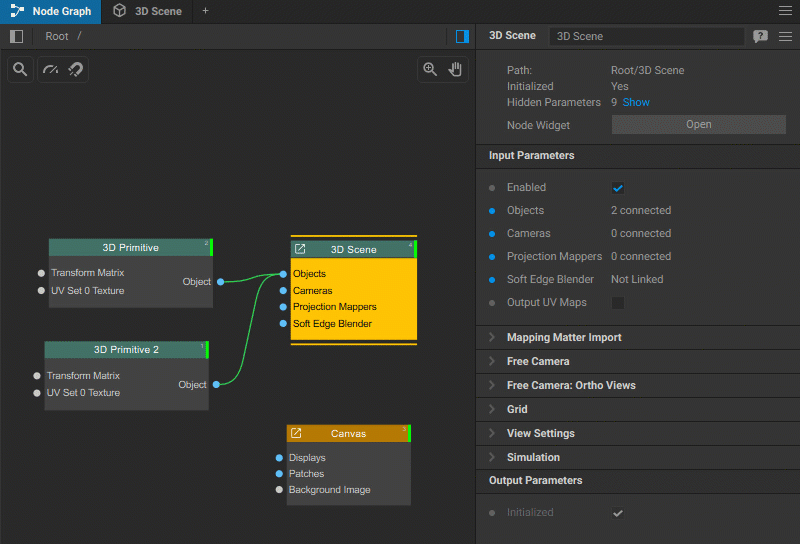
3D models can be added to the 3D scene using the 3D Model File node.
To add a 3D model, do the following:
- Navigate to the Node Graph widget.
- Add a 3D Model File node to your node graph.
- In the 3D Model File node settings, select your desired 3D model file using the Filename parameter.
- Connect the Object output parameter of the 3D Model File node to the Objects input parameter of the 3D Scene node.
- Switch to the 3D Scene widget to further adjust the position and dimensions of the 3D model, either using 3D scene tools or within the 3D Model File settings.
The 3D Model File settings include:
General settings
- Filename: Shows the path to the 3D model file.
Baked Texture
- Render Baked Texture: Toggle this option to enable or disable the rendering of the baked texture.
- Baked Texture Size: Set the resolution of the baked texture. Specify values for width (X) and height (Y), for example, 1920x1080 for full HD.
- Baked Texture Bits per Channel: Choose the color depth for the texture. Options include 8-bit and 32-bit (float).
- Baked Texture Wrap Mode: Select the method used for texture wrapping. Options include Clamp to Edge, which stretches the last row or column of pixels to the edge, ensuring no repetition, and Repeat Edge Pixels, which extends the edge pixels of the texture when it exceeds the original boundary.
Other parameters
- Current UV Set: Choose the UV set that determines how textures are applied to the 3D model.
- Color: Select the color of the 3D model's surface for previewing without a texture.
- Merge Points: Combines vertices or points that are within proximity to each other to reduce the complexity of the 3D model.
- Transform Matrix: Access transformation controls, including scale, rotation, and position.
- Transform Order: Choose the order in which transformations like scale, rotate, and translate are applied.
- Scale: Adjust the size of the primitive across the X, Y, and Z axes.
- Rotation Order: Indicate the sequence in which rotations are applied around the axes, for example, Y (Heading), X (Pitch), and Z (Bank).
- Rotation: Orient the 3D model within the 3D space by setting the rotation angles around the X, Y, and Z axes.
- Position: Set the location of the 3D model within the 3D space by entering coordinates for the X, Y, and Z axes.
- Projection Mapping: Enable or disable the application of projected textures onto the surface of the 3D model.
- Source Model Orientation: Specifies the initial orientation of the model when imported into the scene. The options include Y Up and Z Up.
- Show Subobjects: Toggles the display of the individual sub-parts of the model.
- Resources Folder: Specify the path to the resources folder where the 3D model’s data will be stored.
Saving 3D Models
You can save the current state of 3D models or 3D Primitives using the 3D Model Export node.
To export a 3D model, follow these steps:
- Navigate to the Node Graph widget.
- Add a 3D Model Export node to your node graph.
- Connect the Object output parameter from the 3D Model File and/or 3D Primitive nodes to the Source Object input parameter of the 3D Model Export node.
- In the settings of the 3D Model Export node, input the path and name for the 3D model file in the Filename parameter, then click the Save File button.