Media Item Properties
In Screenberry, a media item used in the Media Player widget is an instance (or reference) that points to a source file in the Media Library. Editing a media file, trimming it, or changing its settings in any way, does not affect the source file.
Renaming Media Items
There are two ways to rename a media item. Renaming a media item in the Media Library will change its name globally, i.e. in all existing playlists.
A media item’s name in a particular playlist can also be changed by assigning it a title – right-click on the media item, select Settings from the dropdown menu, and enter a new name in the Title field.
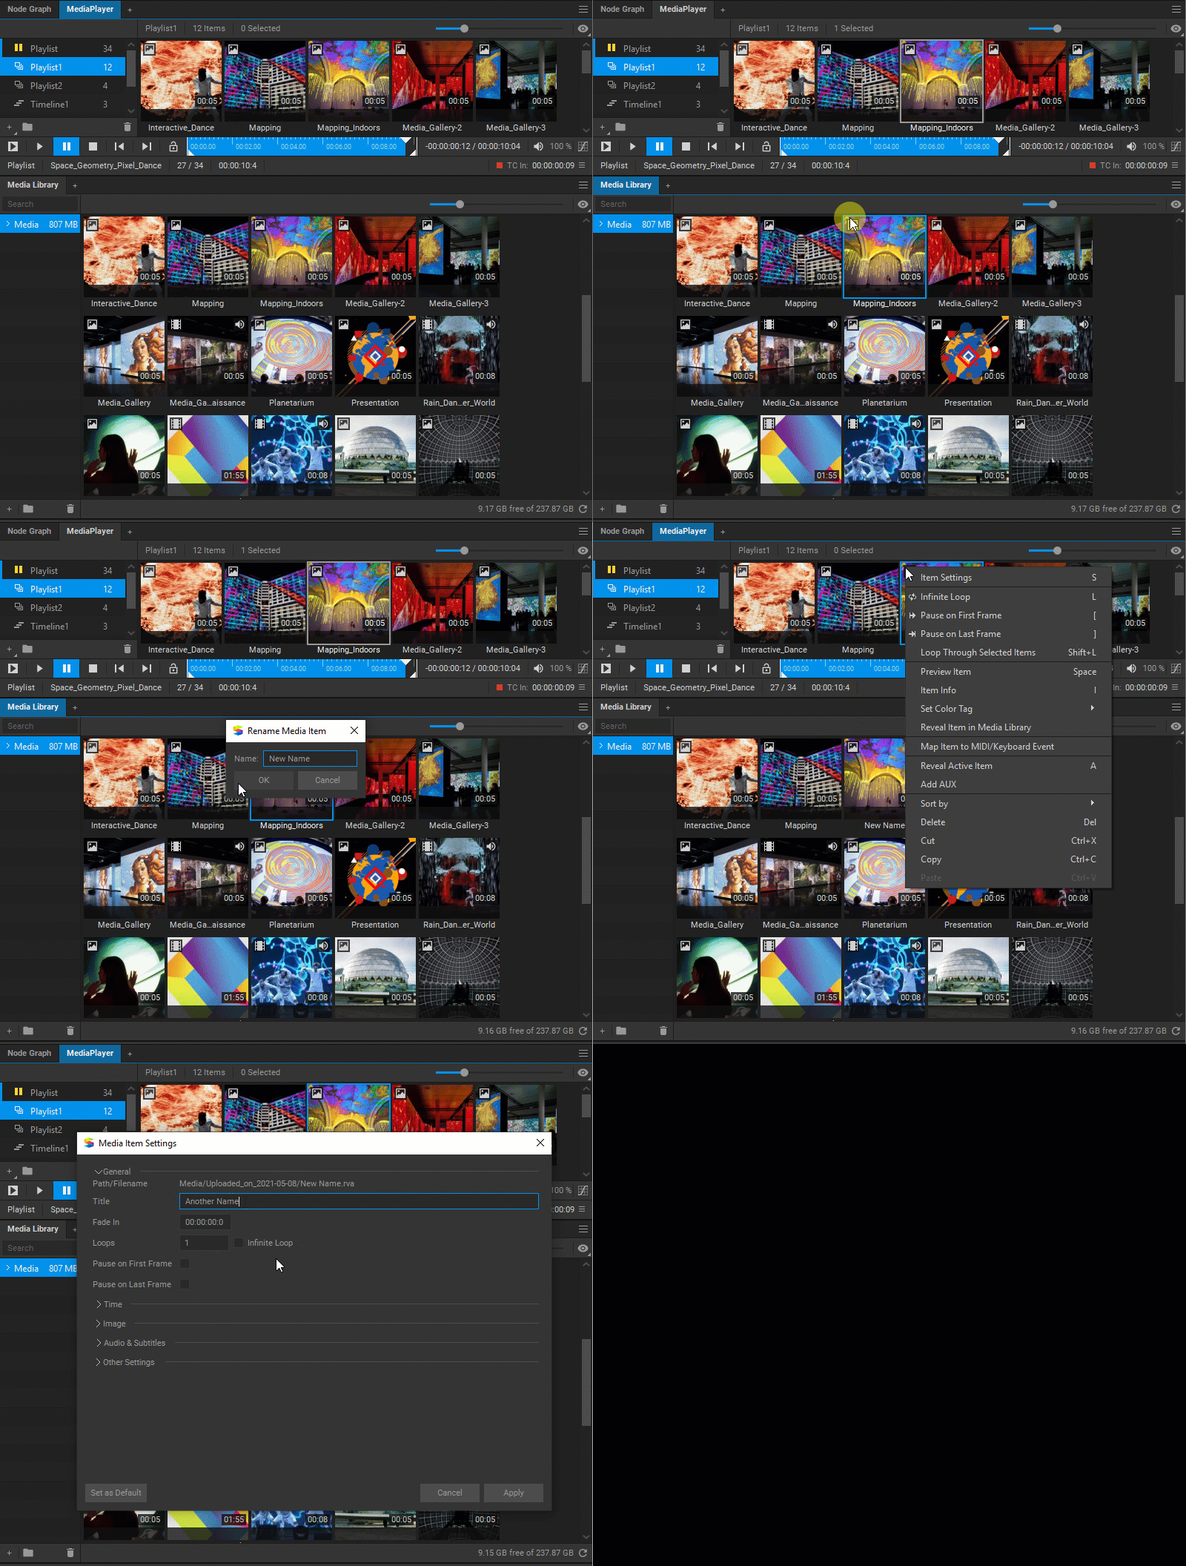
Note: Media items cannot be renamed if they are currently playing in any of the existing Media Player widgets.
Crossfading Media Items
To fade a media item in (to crossfade it with a previous one), right-click on it, select Settings from the dropdown menu, and enter a time or number of frames in the Fade In field in the opened window.
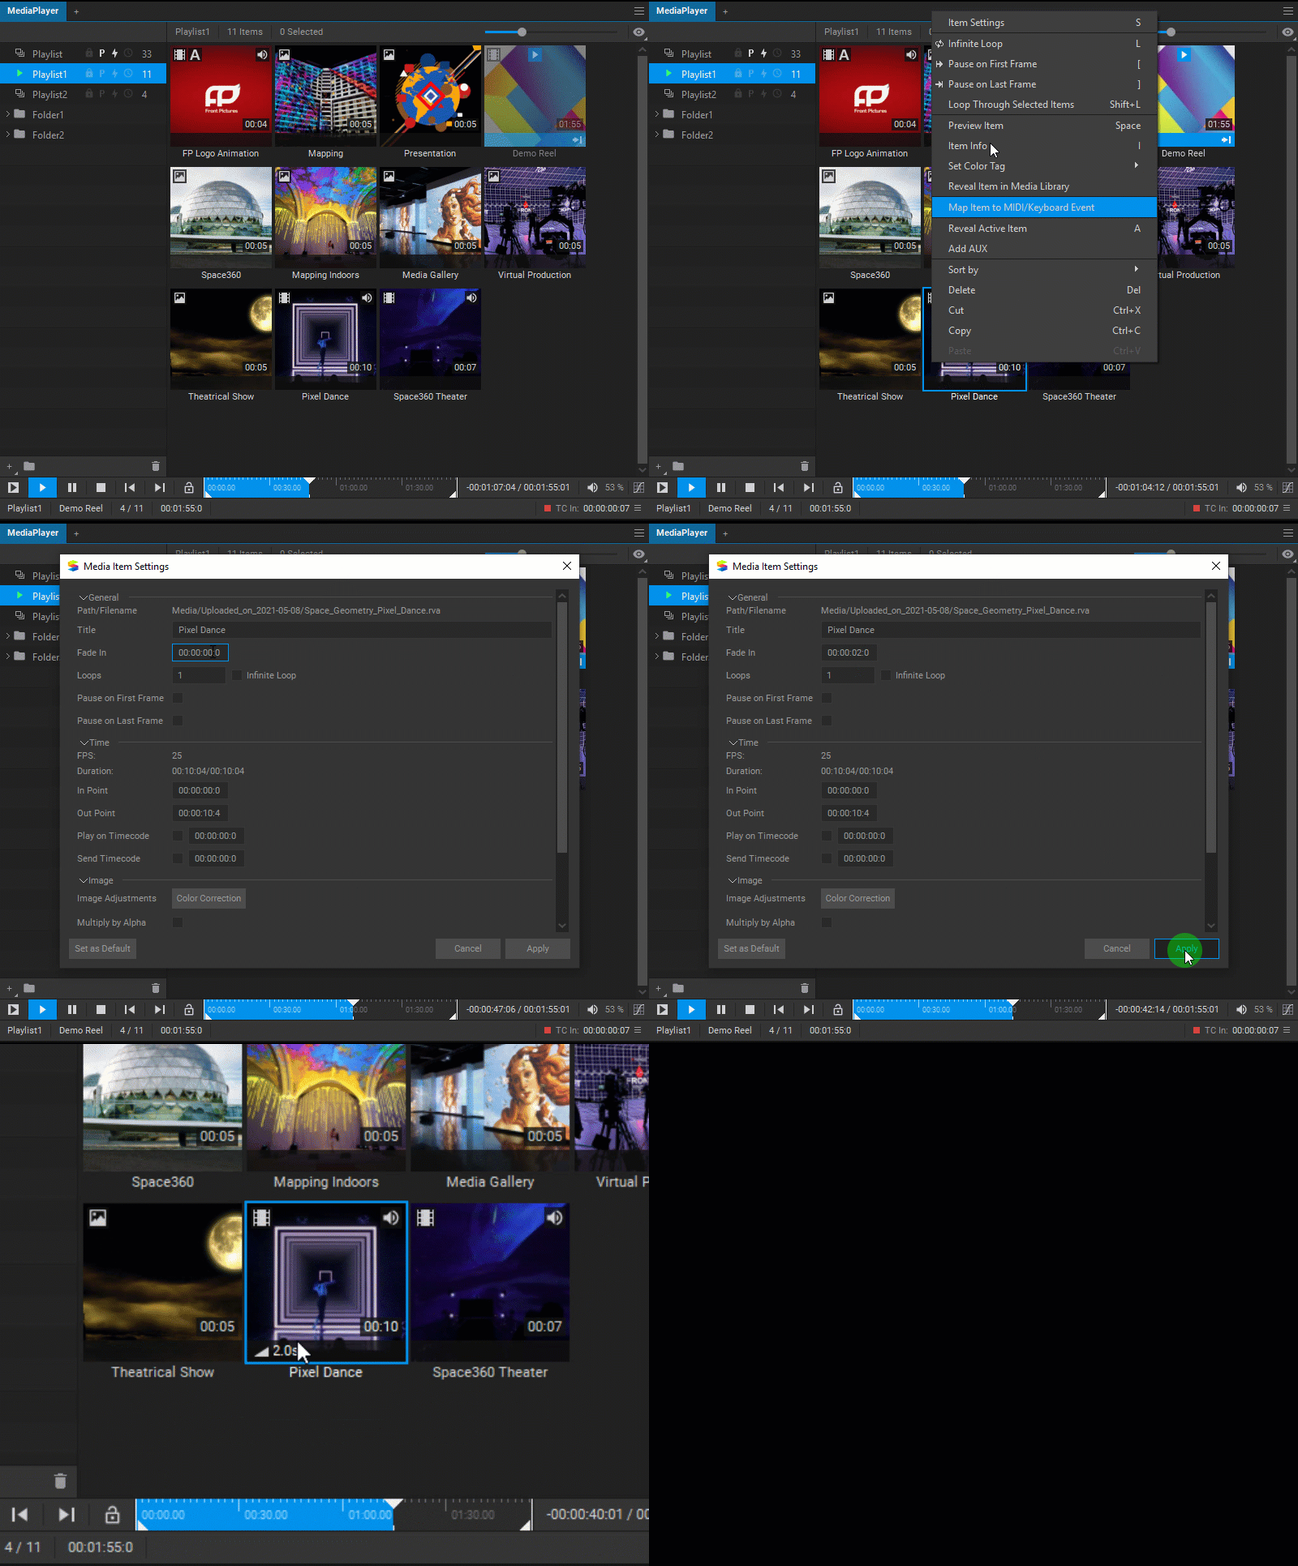
Note: When fade in is set for a media item, its content overlays the previous media item for the duration of the crossfade transition.
When fade in is set for a media item, it is indicated by the icon ![]() on the thumbnail of the media item in the playlist.
on the thumbnail of the media item in the playlist.
Playing a Media Item in a Loop
To play a media item in a loop, right-click on it, select Settings from the dropdown menu, and do one of the following:
- Enter the number of the loops in the Loops field.
- Select the Infinite Loop checkbox if you want to playback a media item in the loop continuously.
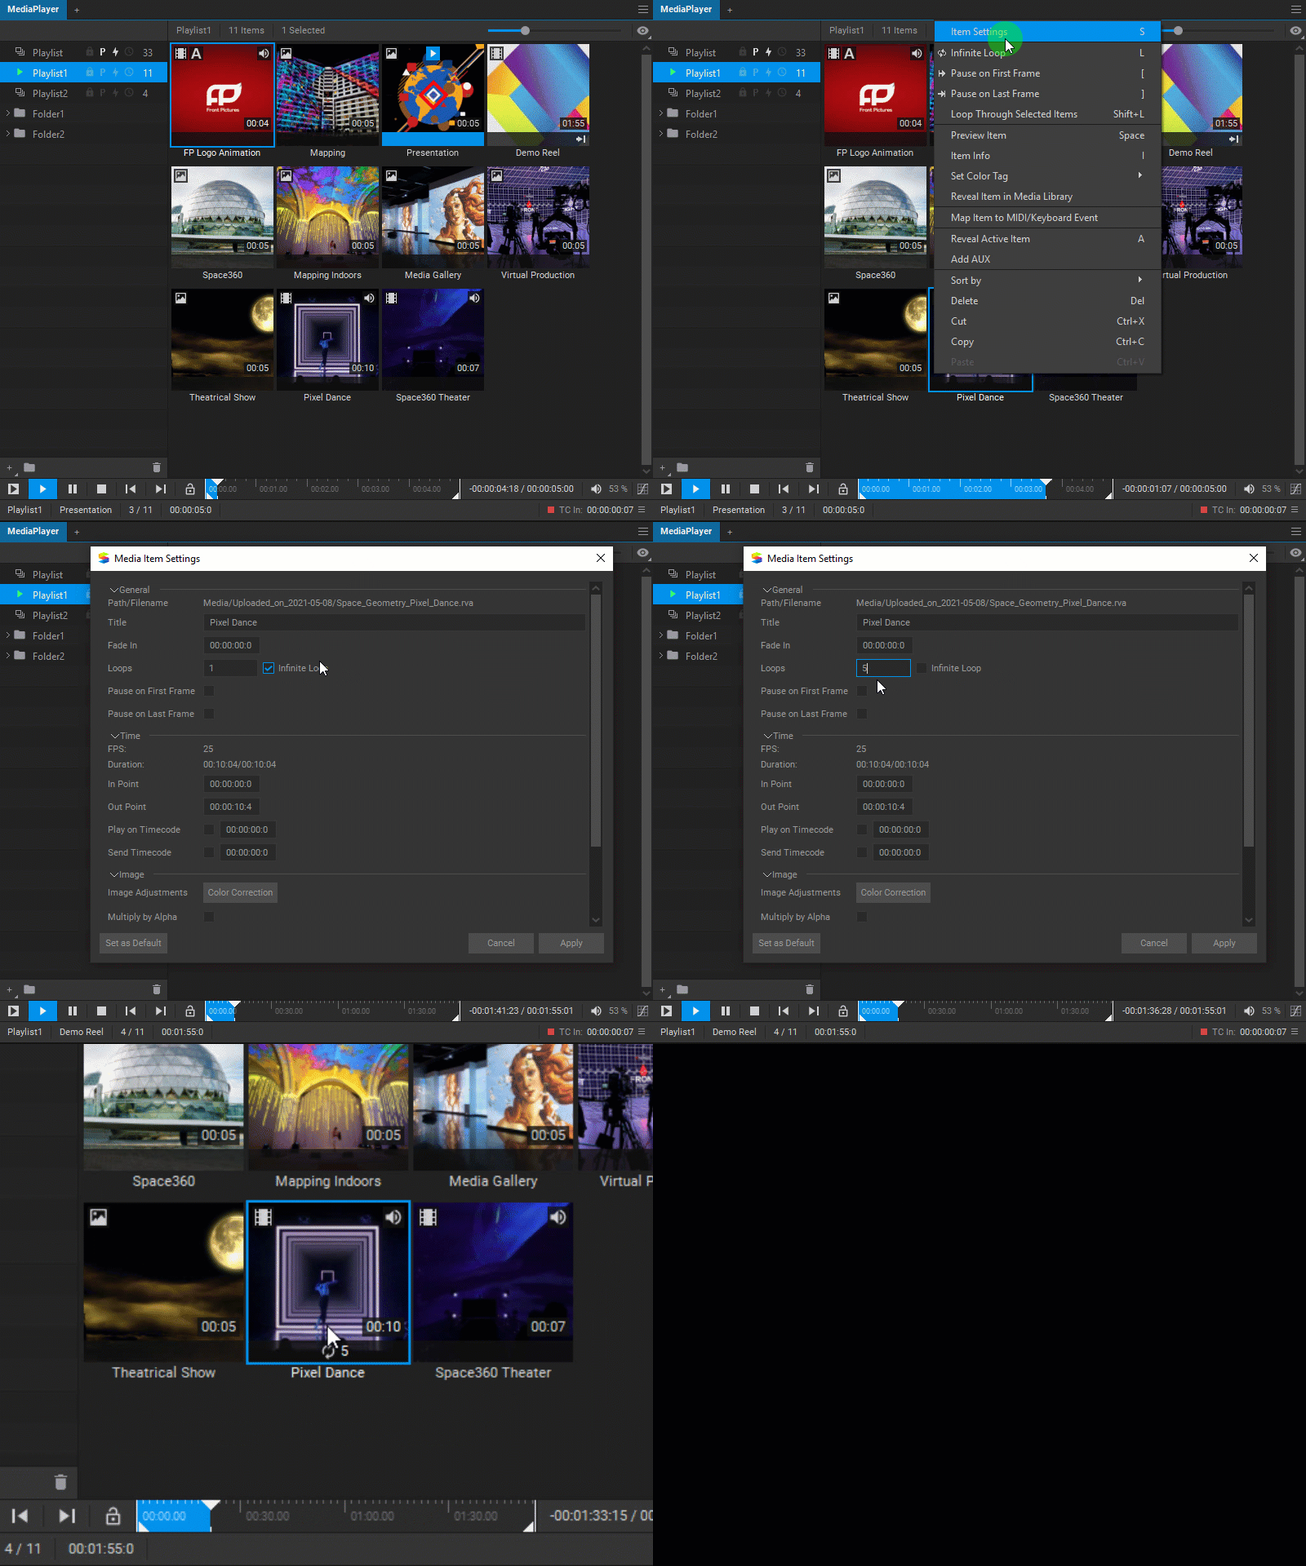
You can also set a media item to play in a loop continuously by right-clicking on it, and selecting Infinite Loop from the dropdown menu, or pressing the L key.
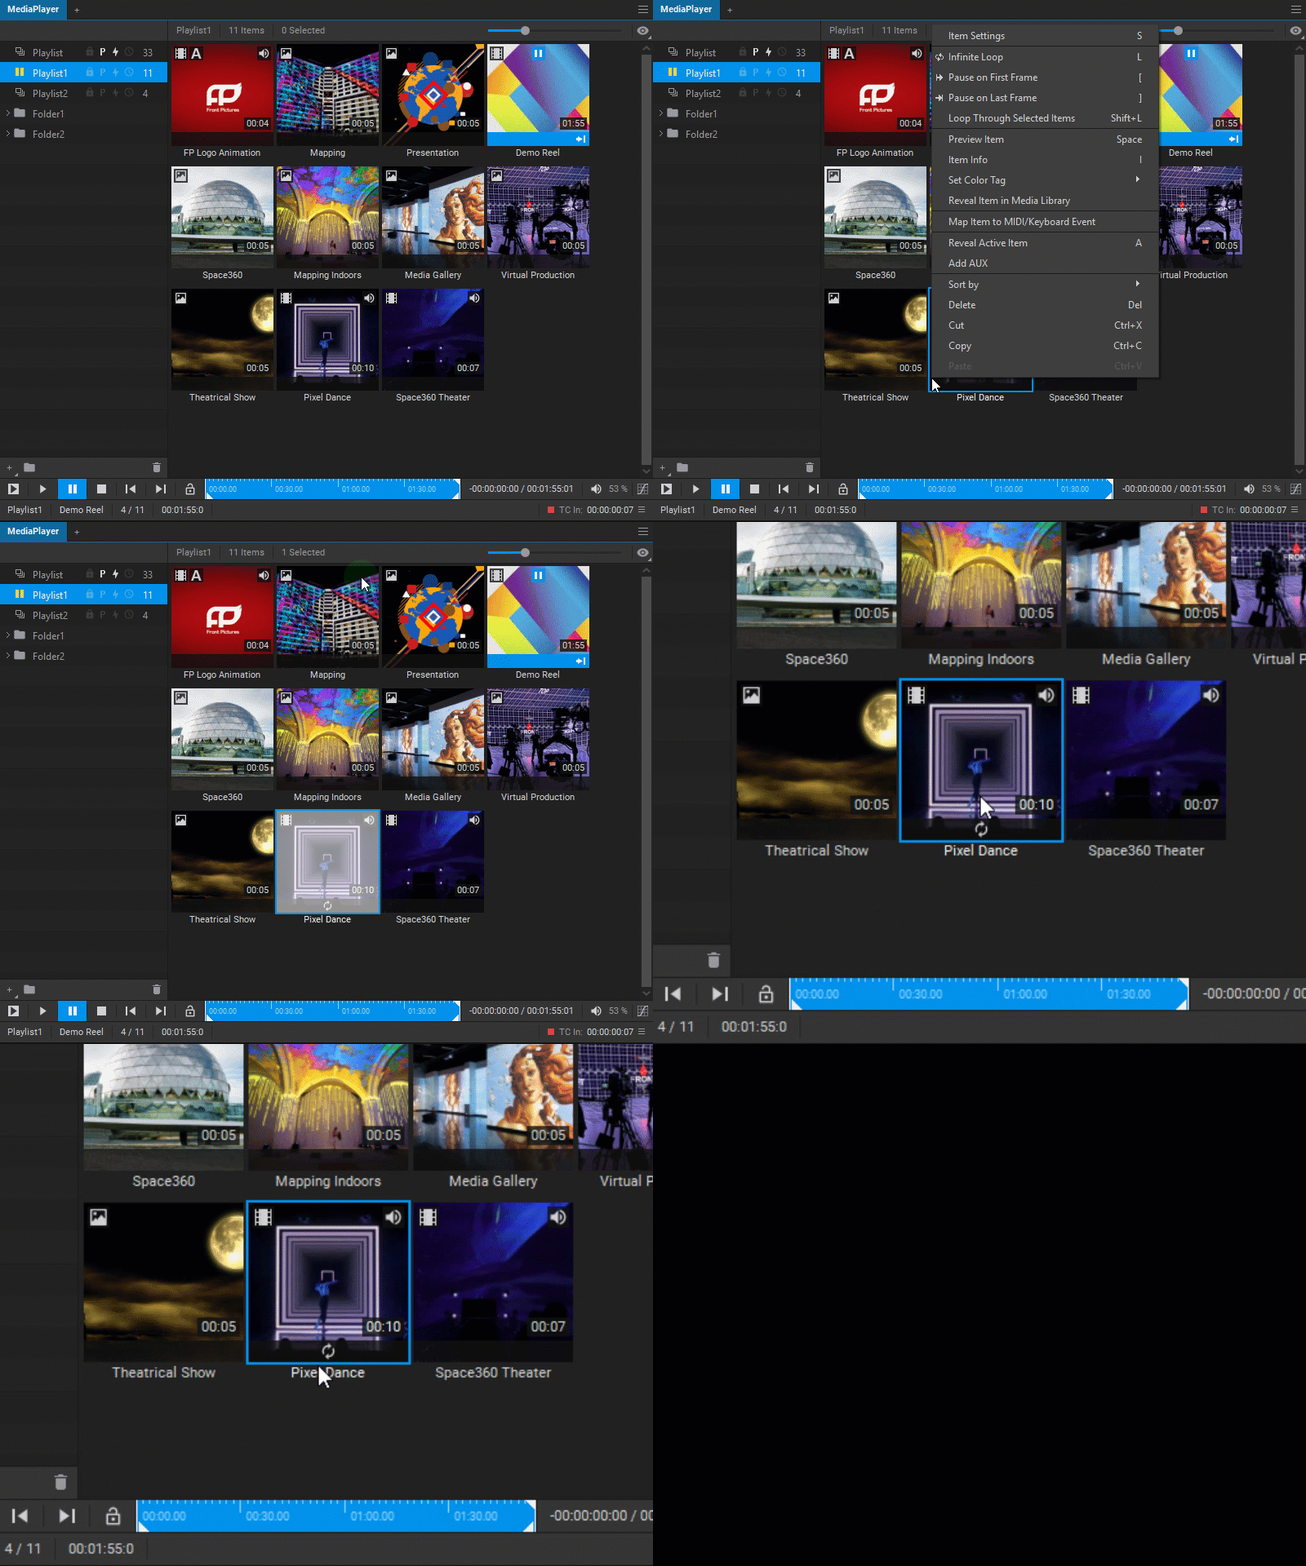
When loop playback is set for a media item, it is indicated by the icon ![]() on the thumbnail of the media item in the playlist.
on the thumbnail of the media item in the playlist.
Pausing Media Item Playback at the Start or End
To pause a media item’s playback on the first or last frame, right-click on a media item and do one of the following:
- Select Pause on First Frame (or press the
[key) / select Pause on Last Frame (or press the]key) from the dropdown menu. - Choose Settings from the dropdown menu, select the Pause on First Frame / Pause on Last Frame checkboxes.
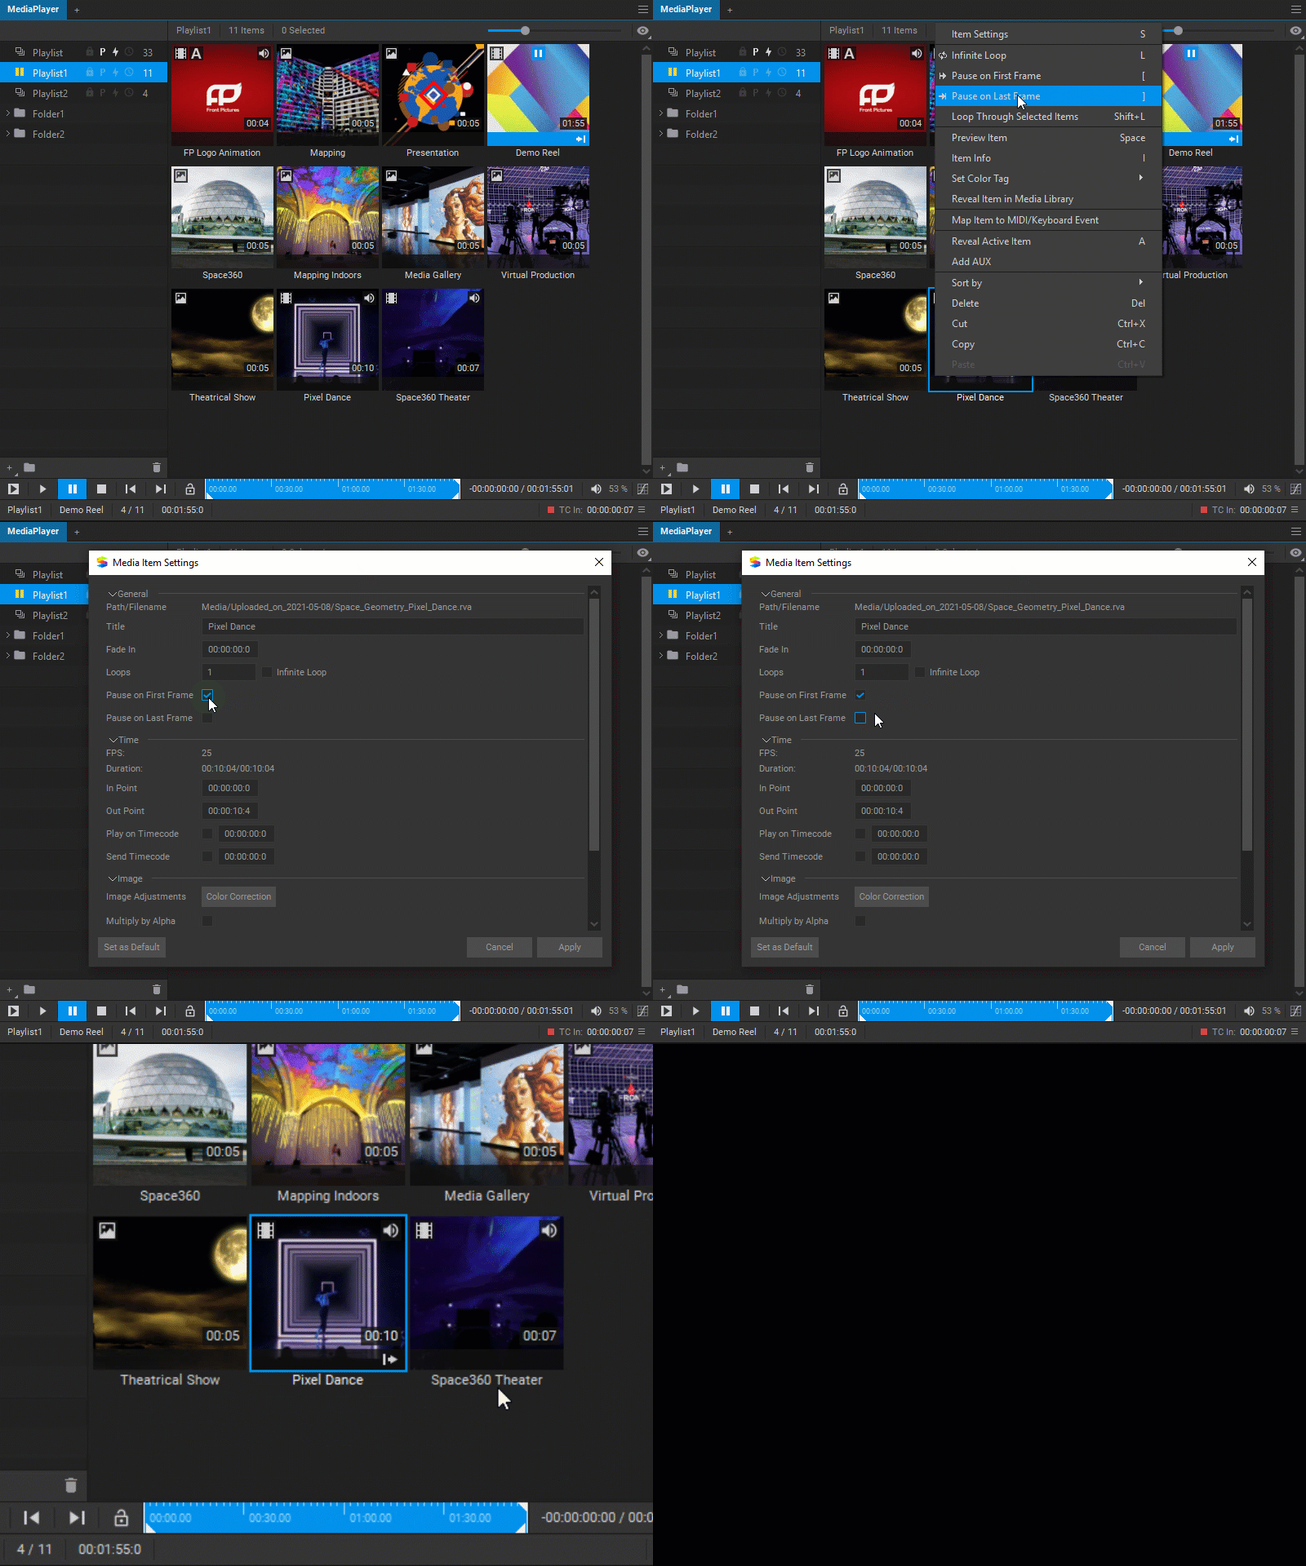
When a media item is set to pause at the start or end, it is indicated by the following icons on the thumbnail of the media item in the playlist:
![]() – Pause on First Frame.
– Pause on First Frame.
![]() – Pause on Last Frame.
– Pause on Last Frame.
![]() – Pause on First and Last Frame.
– Pause on First and Last Frame.
Trimming a Media Item
To trim a media item, you can set In and Out points. The In Point becomes the first frame of the media item to be played, and the Out Point becomes the last one.
To set the In Point and Out Point for a media item, do one of the following:
- Drag the In Point and Out Point sliders in the Media Player seek bar,
- Right-click on the Media Player seek bar and select Set In Point (Set Out Point) from the dropdown menu,
- Right-click a media item, select Settings from the dropdown menu, and enter the frame number in the In Point / Out Point fields.
- Right-click a media item, select Preview Item from the dropdown menu or press the spacebar to open the Media Item Preview window. Drag the In Point and Out Point sliders in the seek bar or right-click on the seek bar and select Set In Point (Set Out Point) from the dropdown menu.
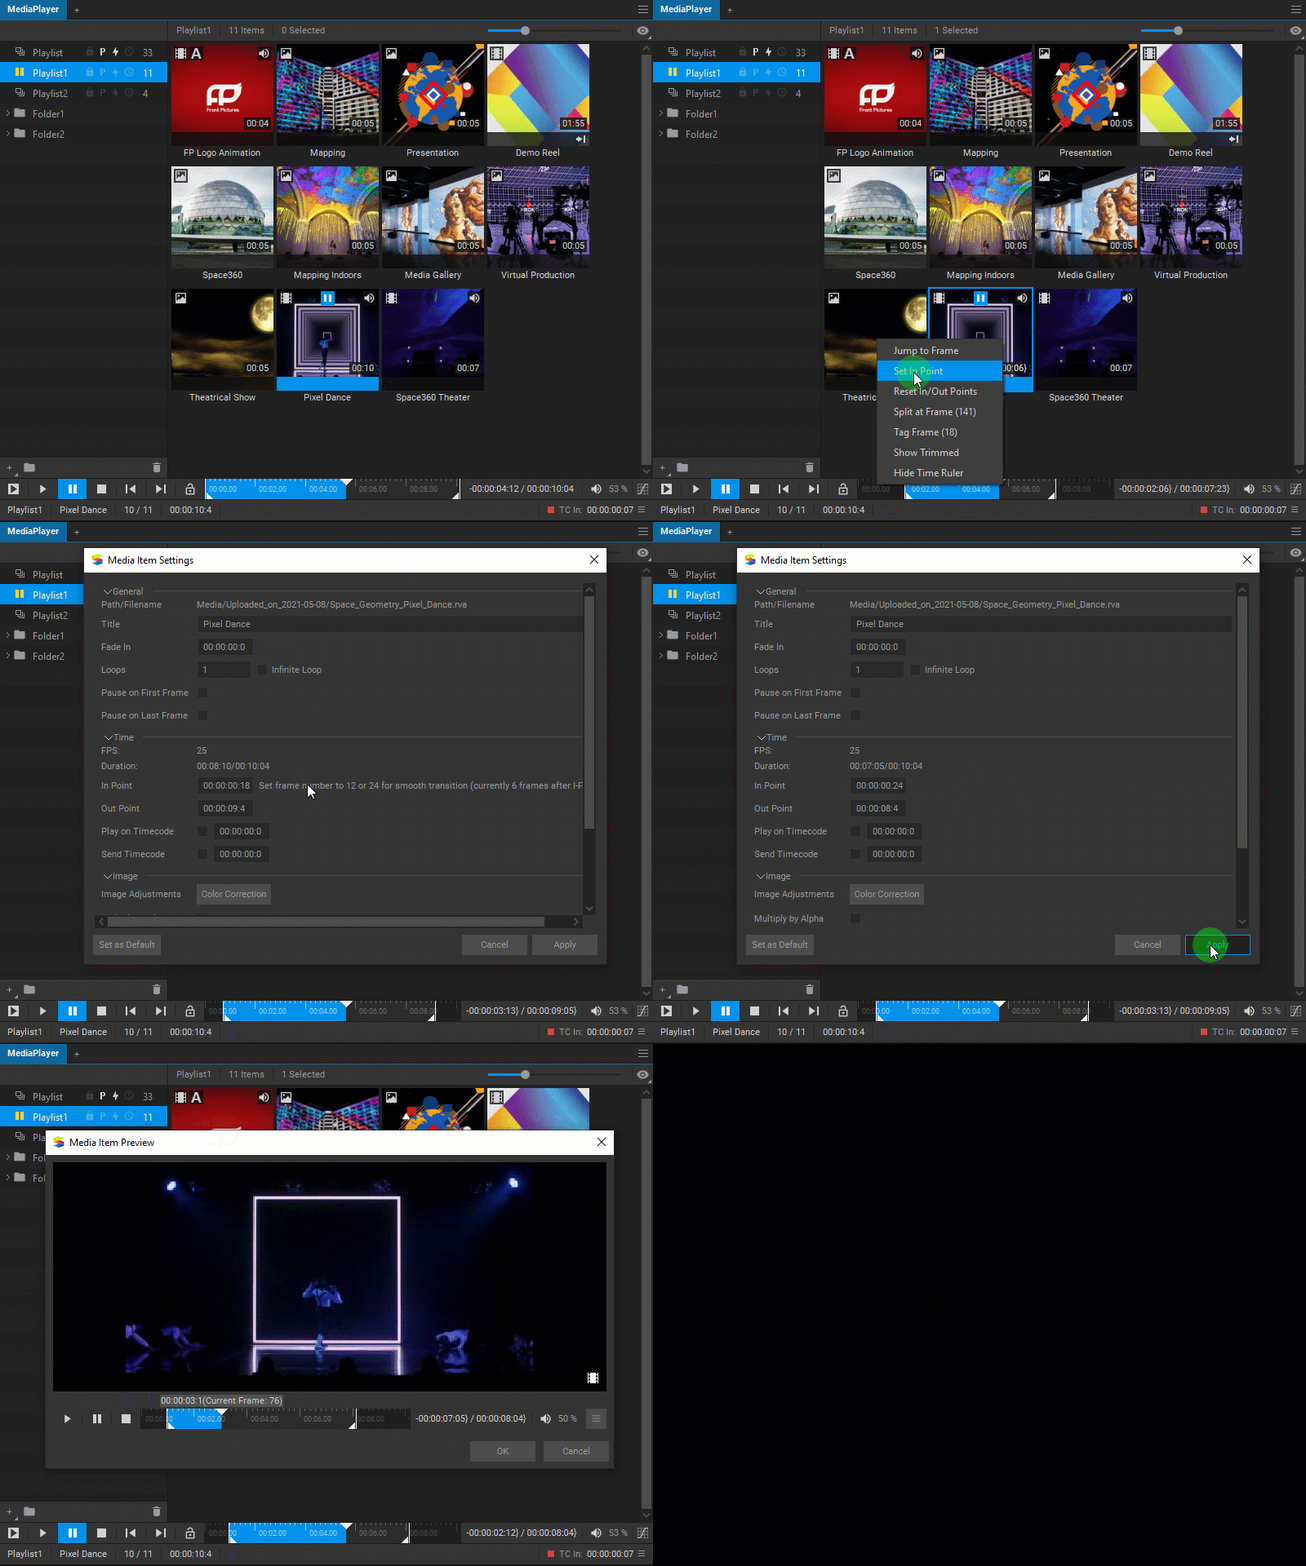
When either In Point or Out Point is set, only the trimmed part of the media item will be displayed in the Media Player seek bar. To see the full length of the media item, right-click on the seek bar and select Show Full Duration from the dropdown menu while selecting the Show Trimmed option will switch the viewing mode back to the trimmed one.
To reset the In Point and Out Point for a media item, right-click on the Media Player seek bar and select Reset In/Out Points from the dropdown menu.
Starting Media Item Playback at a Timecode
Playback of a media item can be initiated at a specific timecode. To set a media item playback to start at a specific timecode, right-click on a media item, choose Settings from the dropdown menu, select the Start at Timecode checkbox, and then input time or frame values in the Start at Timecode field.
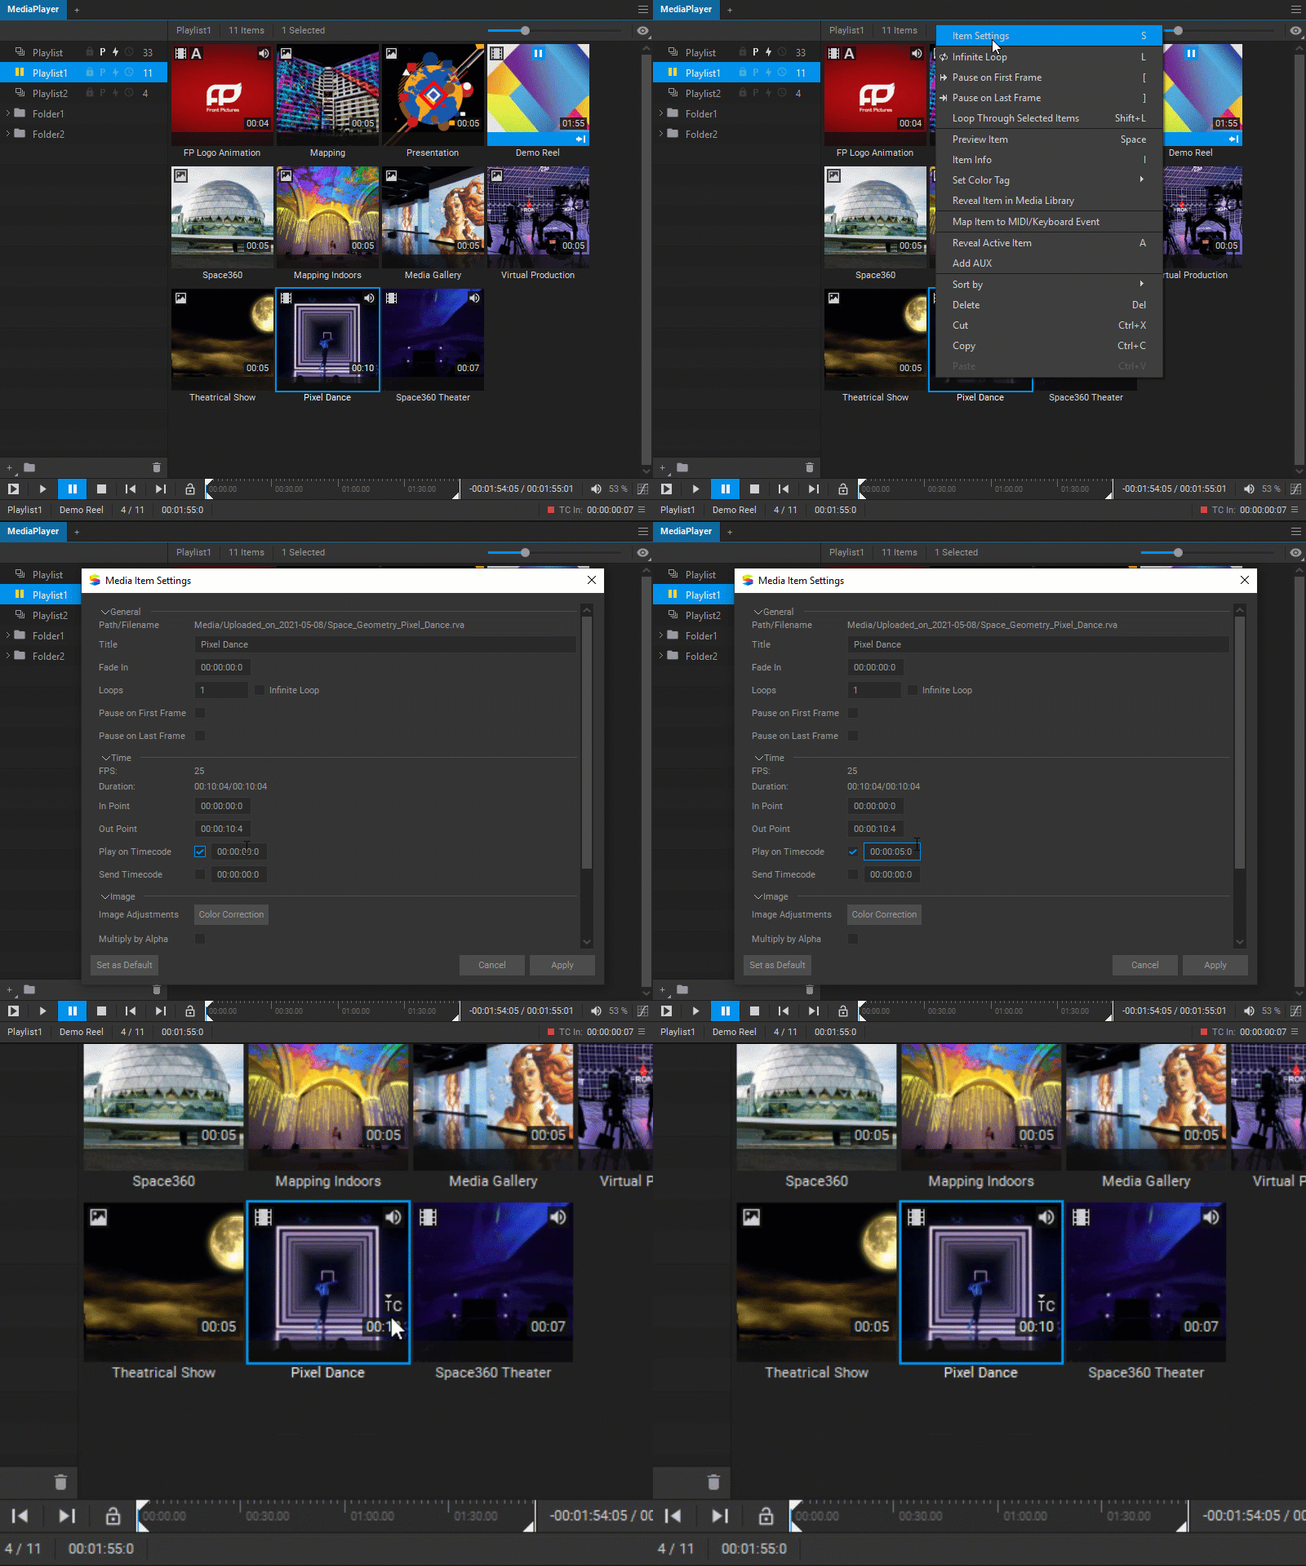
When a media item is set to start at a specific timecode, it is indicated by the icon ![]() on the thumbnail of the media item in the playlist.
on the thumbnail of the media item in the playlist.
Sending a Timecode
A media item can send a timecode to trigger internal and external software and hardware events. To set a media item to send a timecode, right-click on the media item, choose Settings from the dropdown menu, select the Send Timecode checkbox, and then input time and frame values in the Send Timecode field.
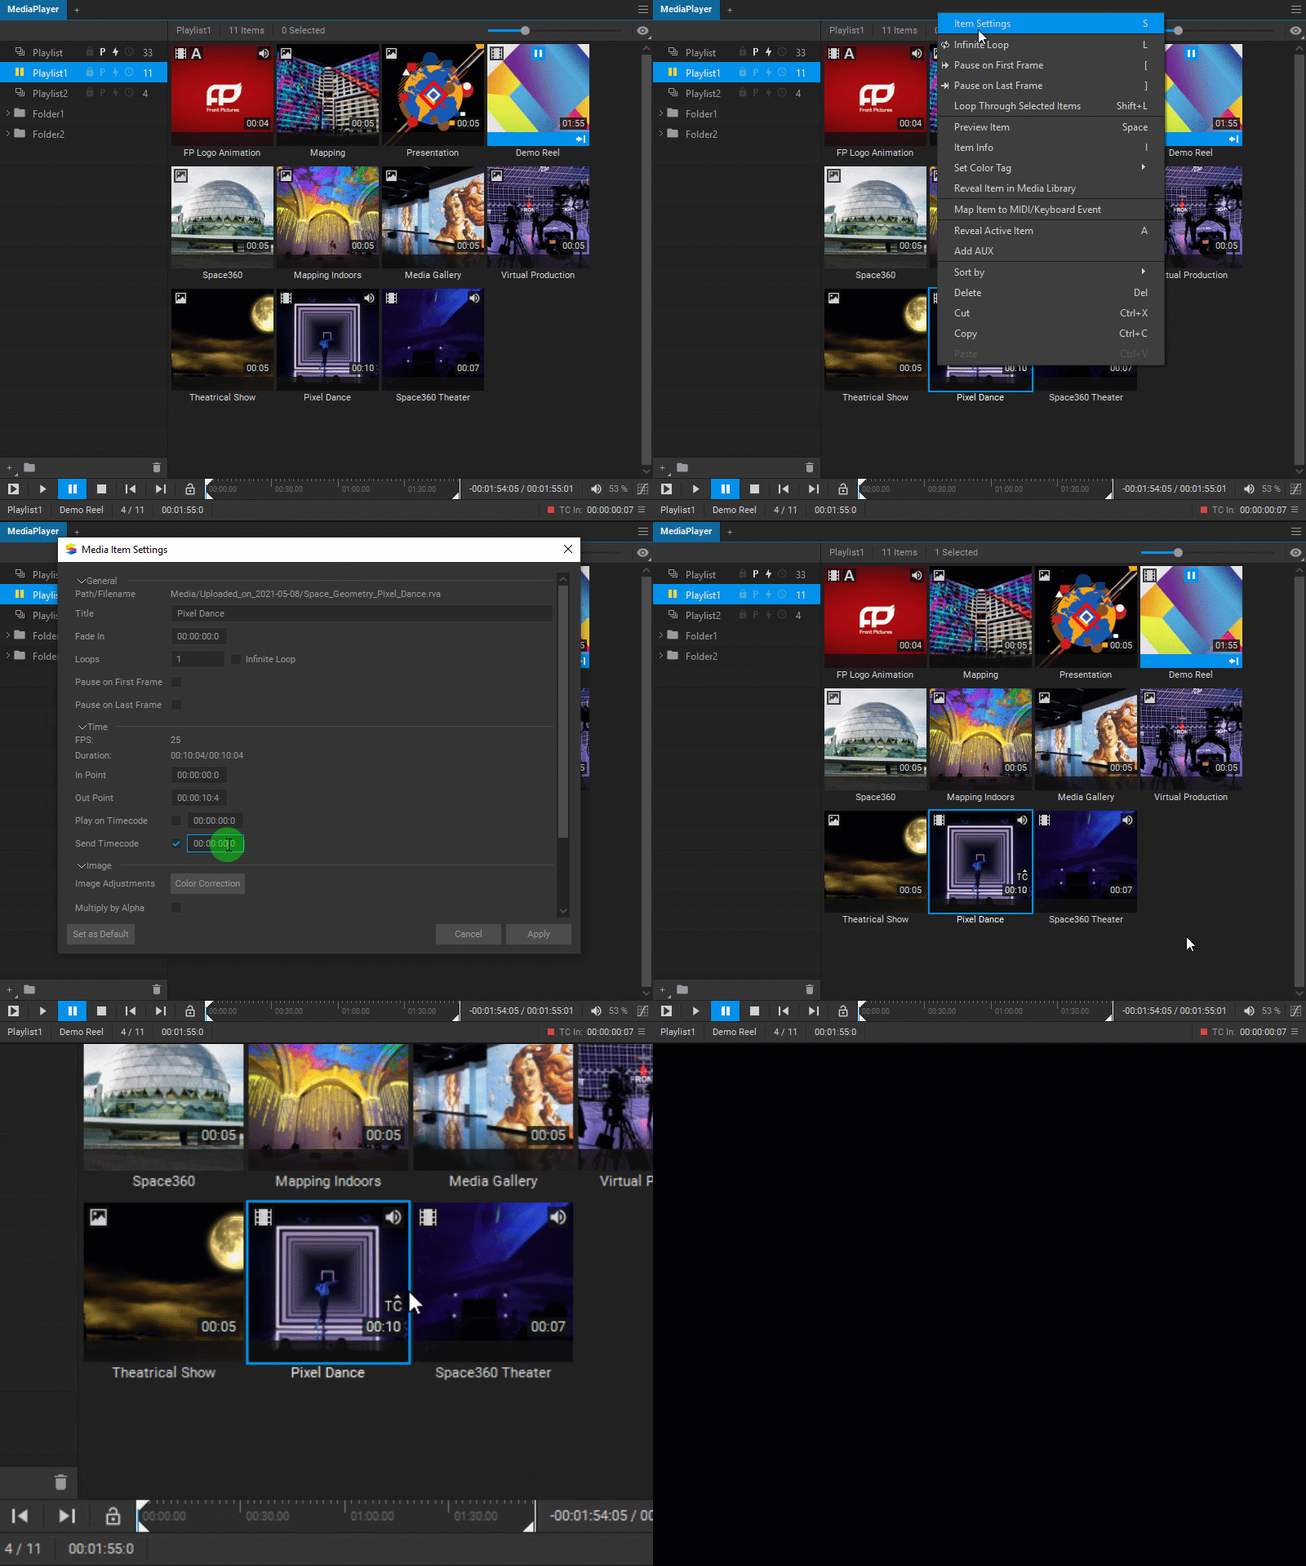
When a media item is set to send a timecode, it is indicated by the icon ![]() on the thumbnail of the media item in the playlist.
on the thumbnail of the media item in the playlist.
Media Item Color Correction
To access the color correction controls for a media item, right-click on a media item, select Settings from the dropdown menu, and click the Color Correction button in the Image Adjustment options section.
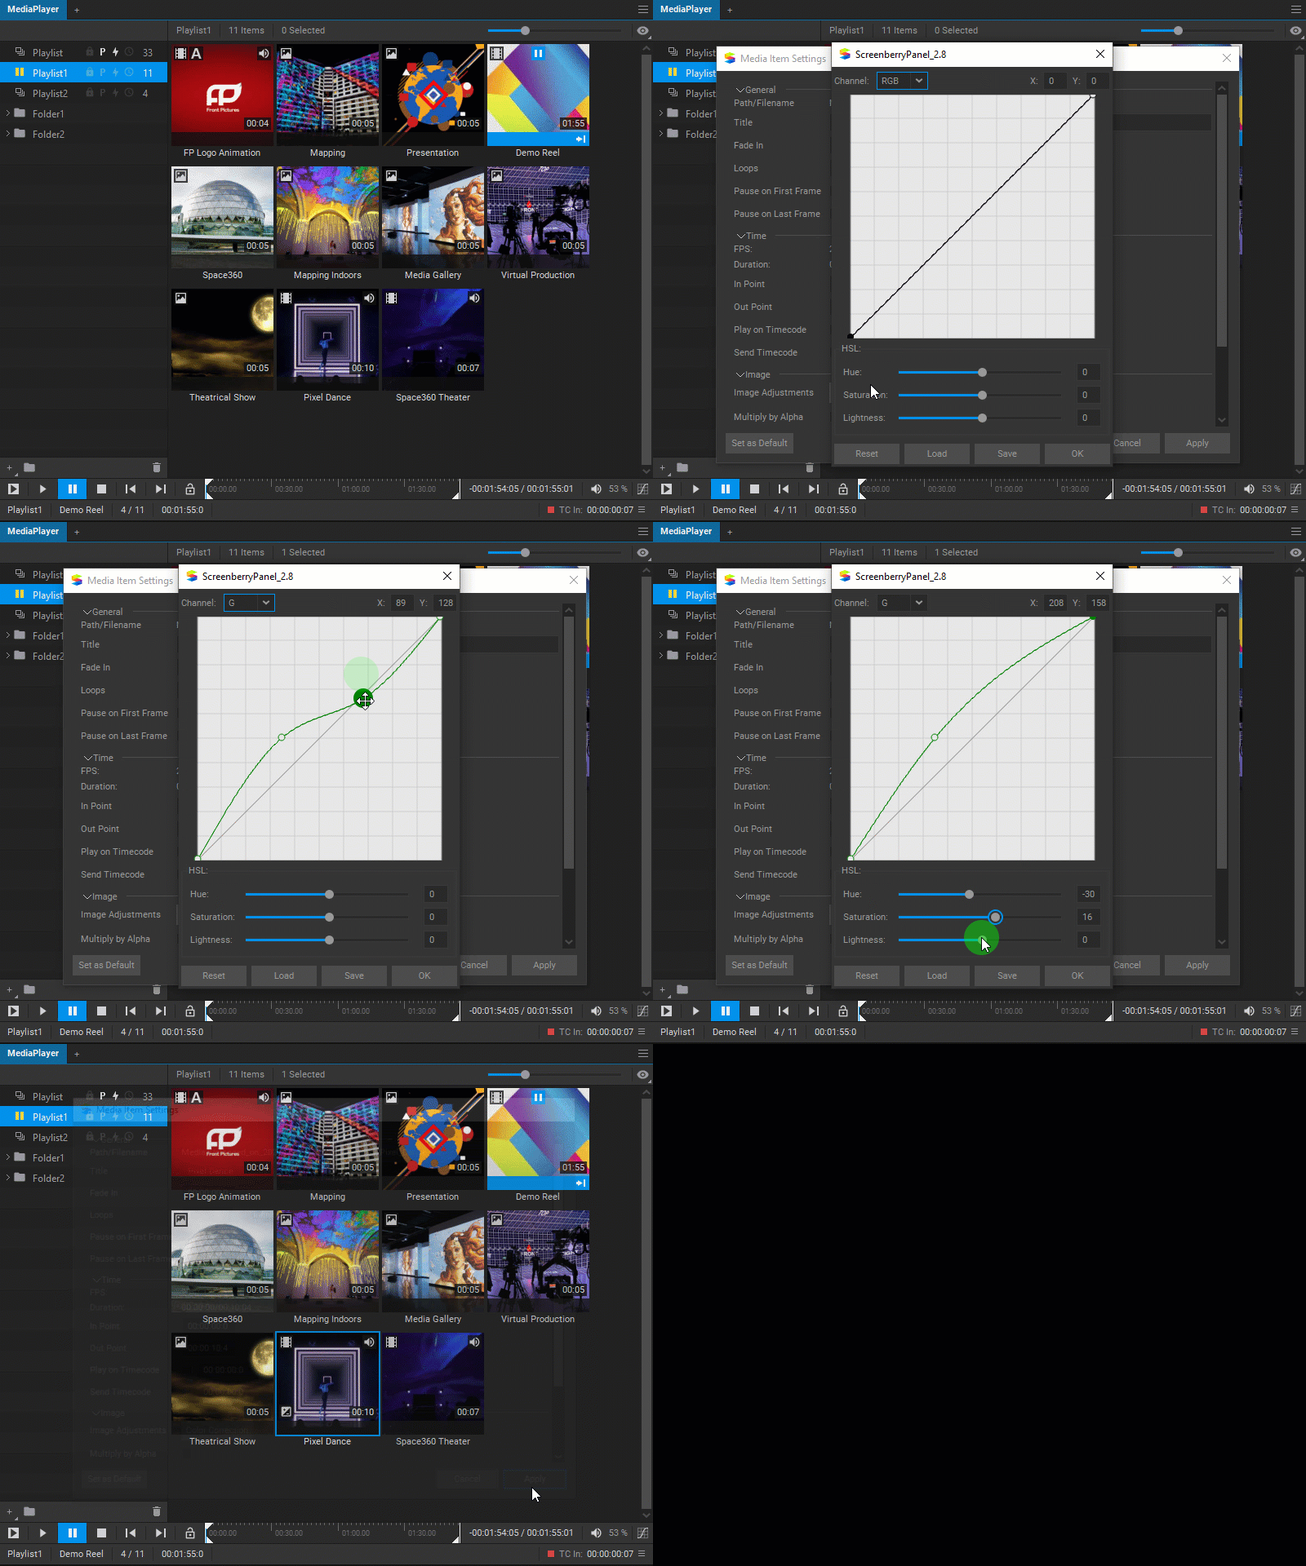
Note: Color corrections can be also applied globally to the Media Player output, and those are cumulative with the ones applied to the individual media items. See Media Player Color Correction.
Color Correction Controls
Channel Selector
Color corrections can be applied simultaneously to all channels or independently to Red, Green, or Blue channels. Select the channel you want to adjust using the Channel Selector.
Adjustment with Curves
To adjust image settings with curves:
- Click on the curve line to create a control point.
- Drag the control point or enter values in the X and Y input fields to change its coordinates.
Double-click the control point to remove it.
Hue, Saturation, and Lightness Sliders
To adjust the Hue, Saturation, and Lightness image settings, drag the respective sliders or enter a value in the corresponding input fields.
Restoring Default Color Correction Settings
To restore default color settings, press the Reset button.
Saving Color Correction Settings
To save color correction settings to a JSON file with a .cc extension, click the Save button.
Applying Saved Color Correction Settings
To load a previously saved JSON (*.cc) file with color correction settings, click the Load button.
When a media item has been color corrected, it is indicated by the icon ![]() on the thumbnail of the media item in the playlist.
on the thumbnail of the media item in the playlist.
Setting Premultiplied Alpha Blending
To set Multiply by Alpha for a media item, right-click on a media item, select Settings from the dropdown menu, and check the Multiply by Alpha box.
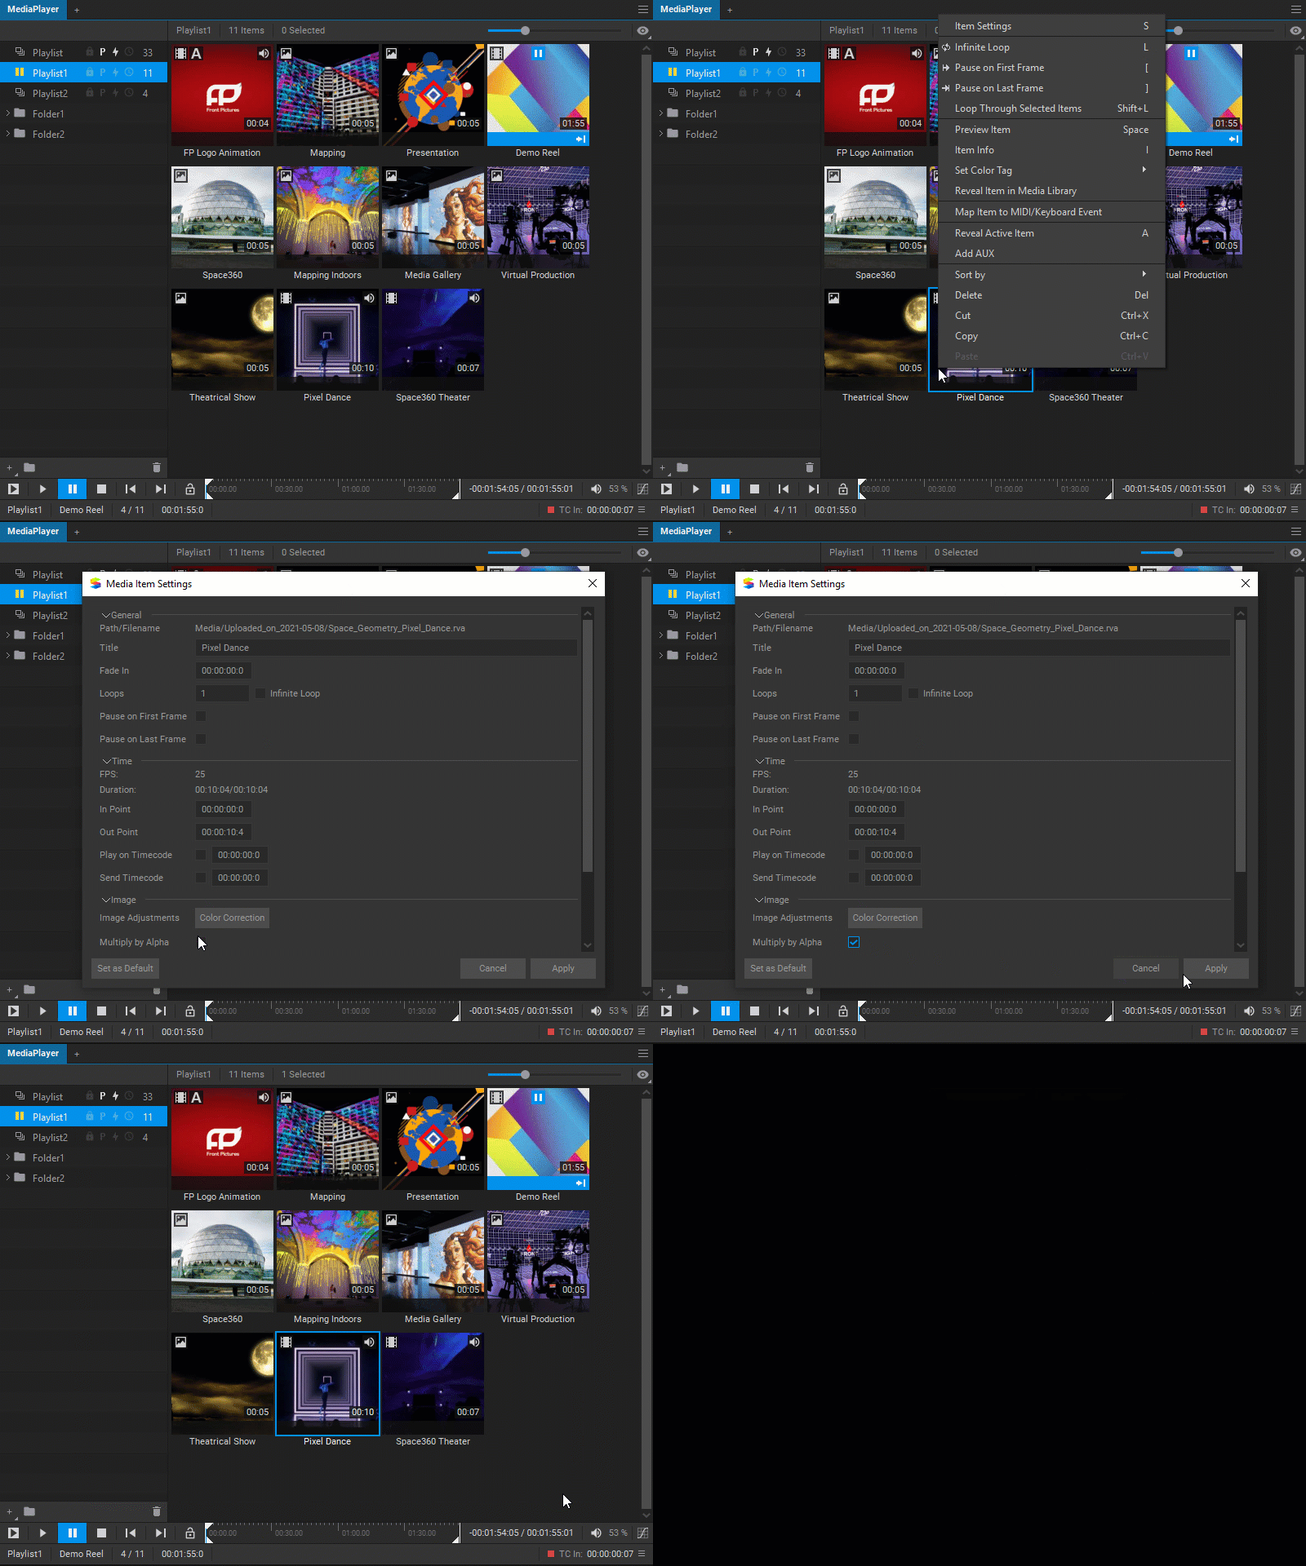
When a media item contains the alpha channel, it is indicated by the alpha channel icon ![]() on a media item thumbnail in the playlist.
on a media item thumbnail in the playlist.
Disabling Video Track of a Media Item
To disable the video track of a media item, right-click on a media item, choose Settings from the dropdown menu, and select the Disable Video checkbox.
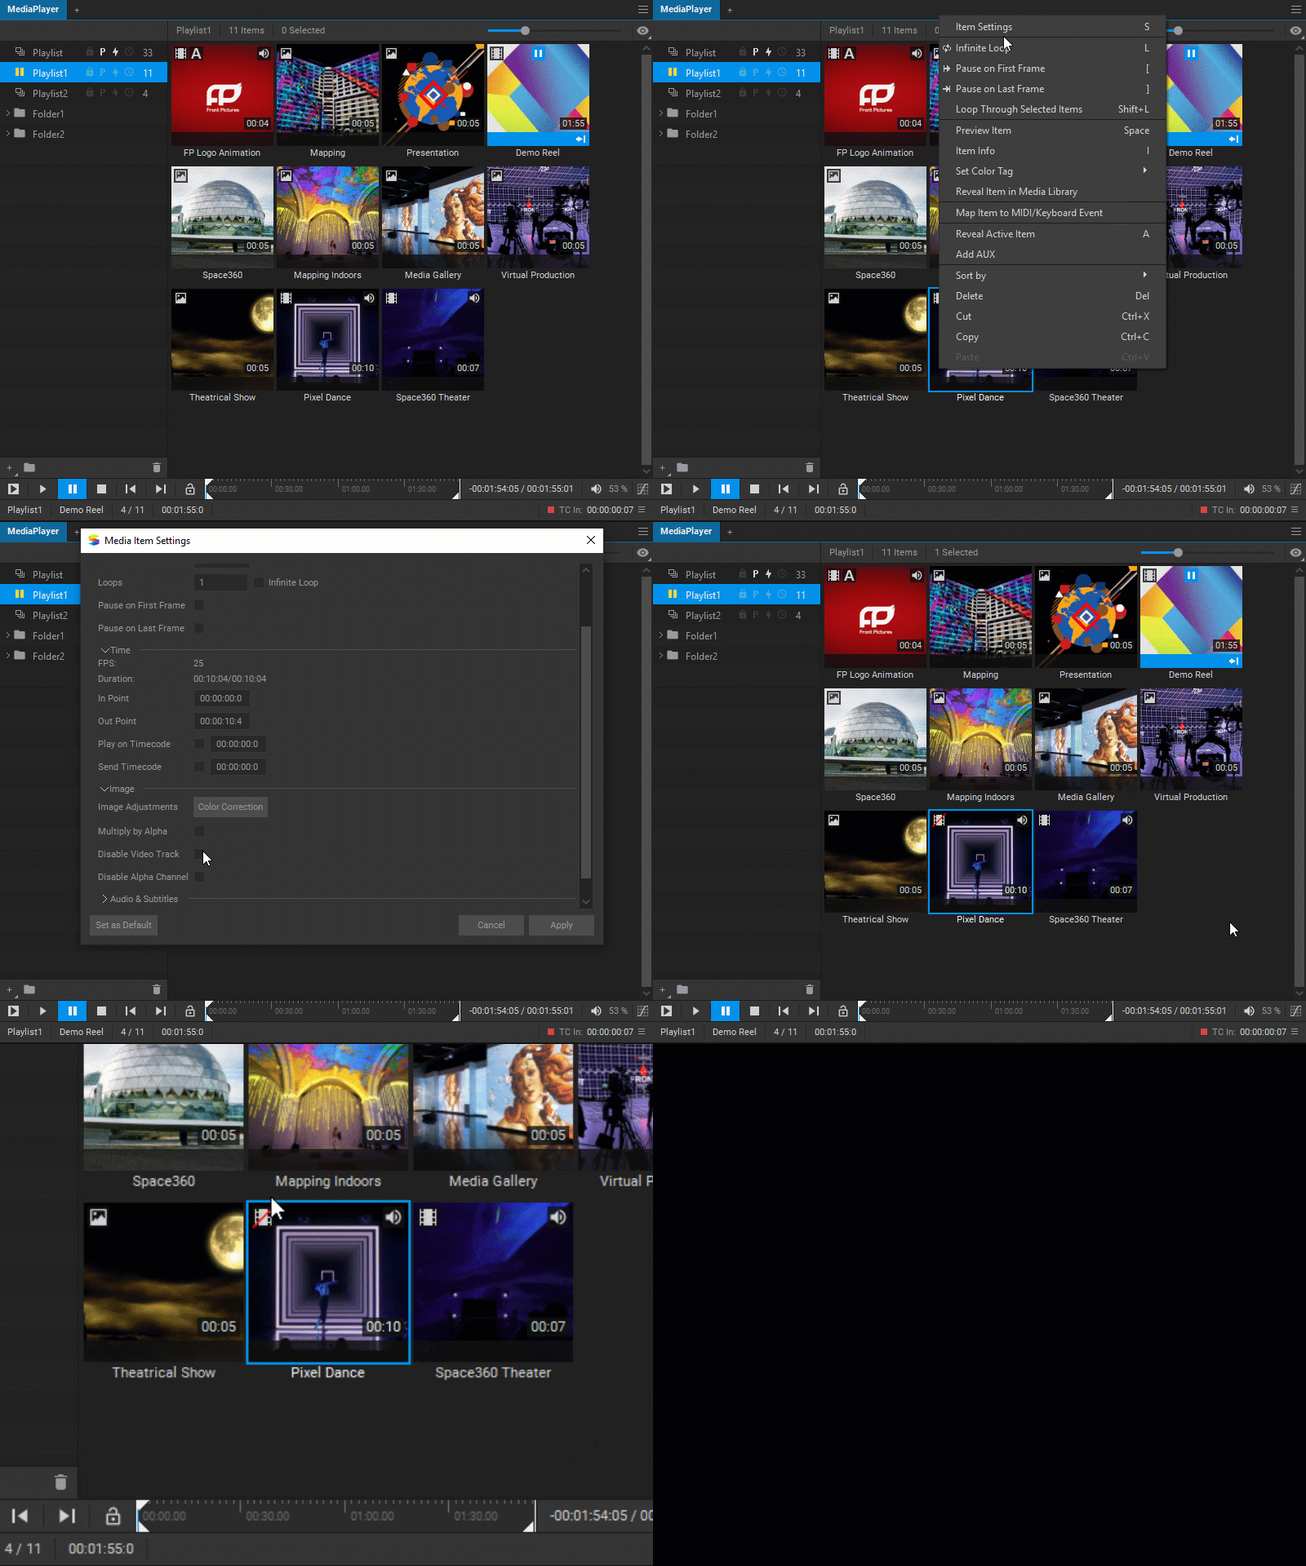
Note: When the video output of a media item is disabled, the audio track of the media item is still being played during playback.
When the video output of a media item has been disabled, it is indicated by the icon ![]() on its thumbnail in the playlist.
on its thumbnail in the playlist.
Disabling the Alpha Channel of a Media Item
To disable the alpha channel of a media item, right-click on a media item, choose Settings from the dropdown menu, and select the Disable Alpha Channel checkbox.
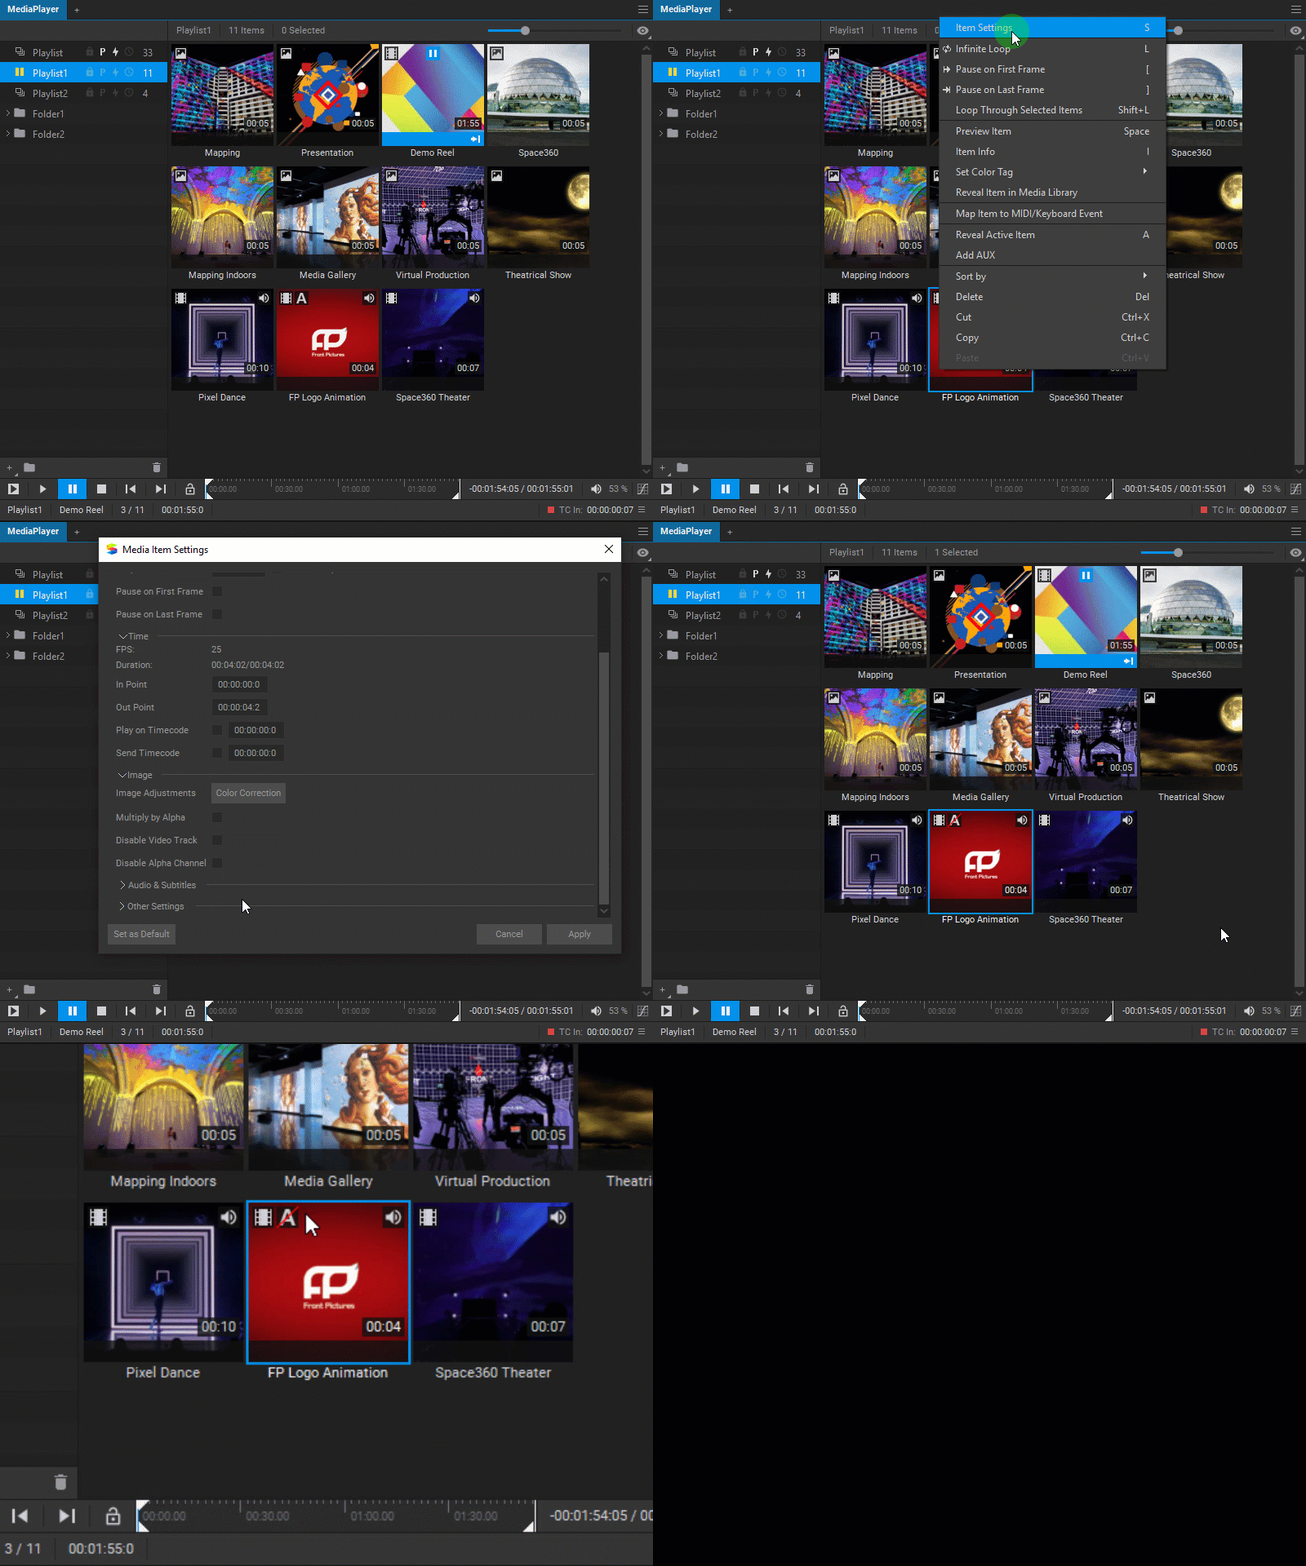
When the alpha channel of a media item has been disabled, it is indicated by the icon ![]() on a media item thumbnail in the playlist.
on a media item thumbnail in the playlist.
Adjusting the Audio Level of a Media Item
To adjust the volume of a media item’s audio output, right-click on a media item, choose Settings from the dropdown menu, and in the Volume section, drag the slider to set the volume level or enter a percentage value in the corresponding input field. In addition, there you can mute the audio of a media item by selecting the Mute checkbox, and double the sound level scale by selecting the Boost checkbox.
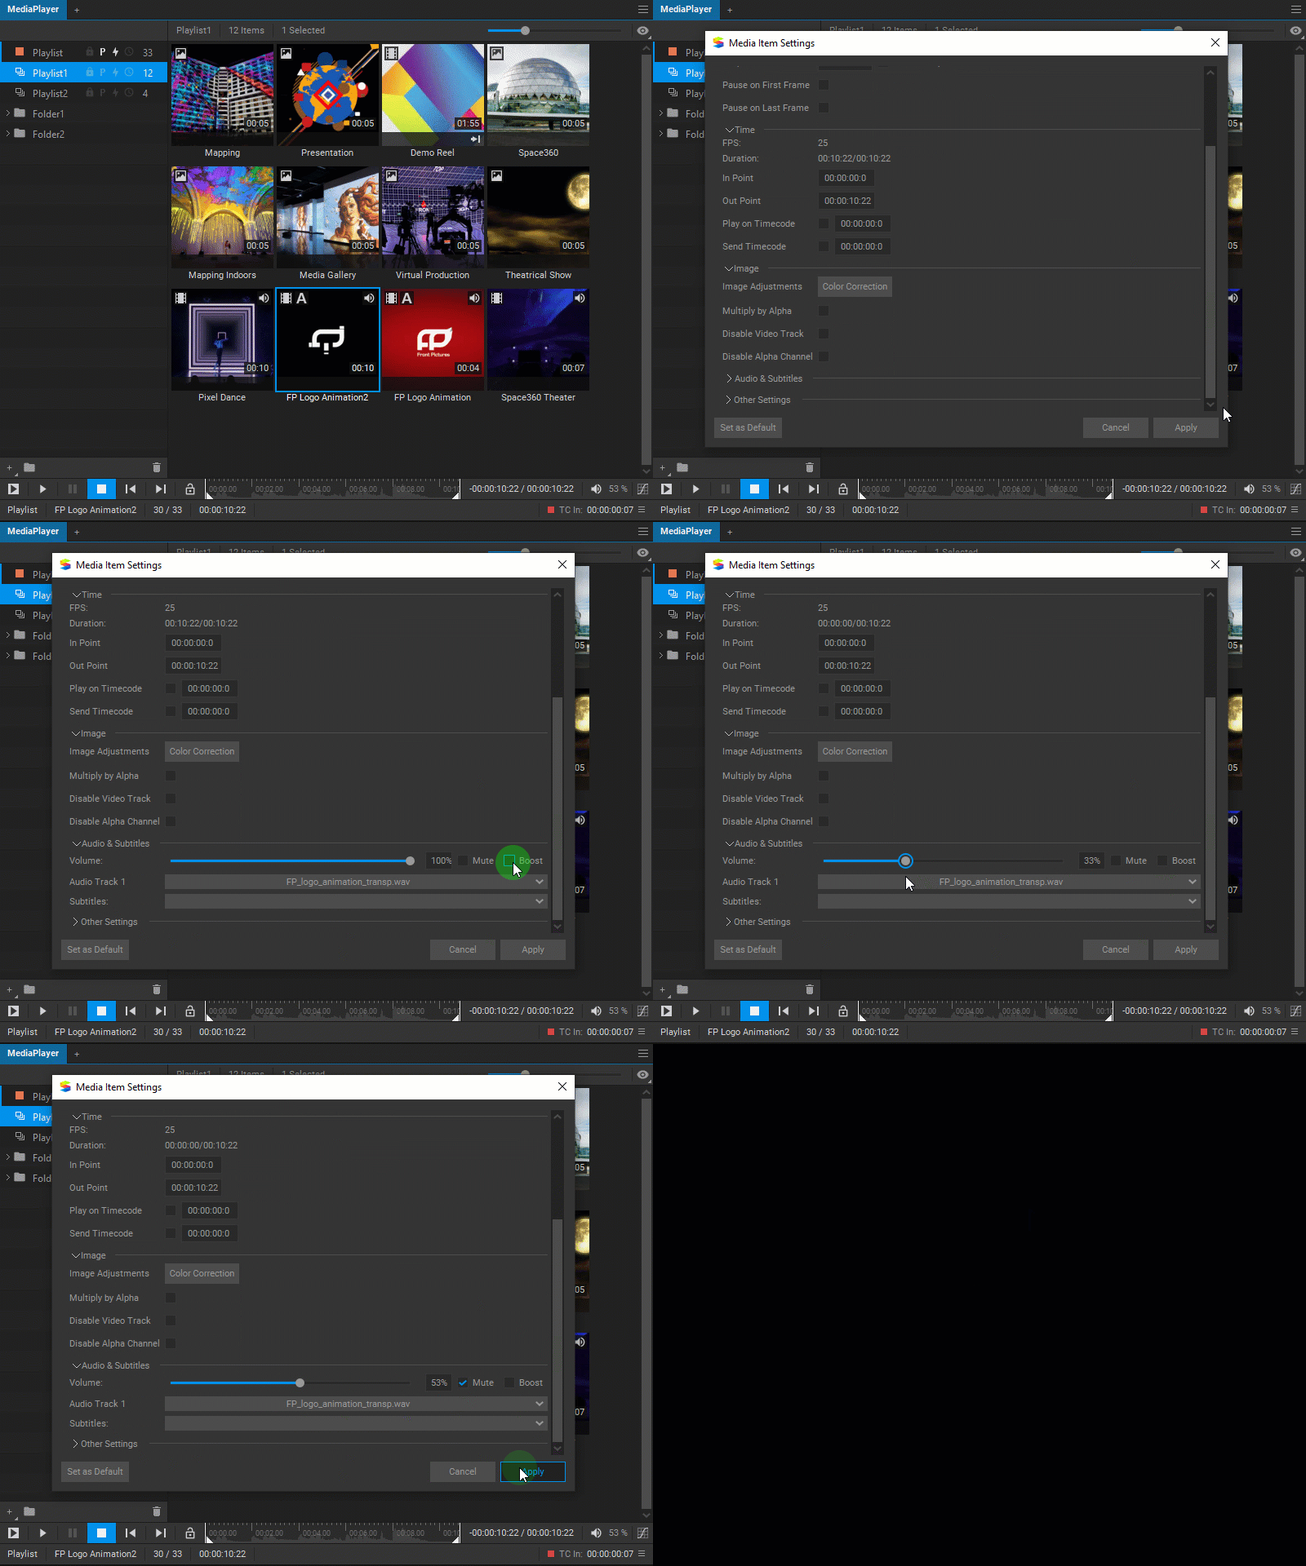
Also, it is possible to adjust the audio volume of the Media Player output, and those changes will be combined with media item audio level adjustments. See Media Player Global Volume Control.
When the audio of a media has been muted, it is indicated by the icon ![]() on the thumbnail of the media item in the playlist.
on the thumbnail of the media item in the playlist.
Adding and Switching the Audio Tracks of a Media Item
A media item can have several audio tracks.
To add an audio track to a media item, drag and drop the audio file from a system folder over a media item thumbnail in the Media Player playlist (or in the Media Library) and click the Add Audio button in the pop-up dialog window. If the duration of the added media item doesn’t match the duration of the audio file, in the next pop-up dialog window, you can choose to update the duration of the media item to match the audio file or leave it intact.
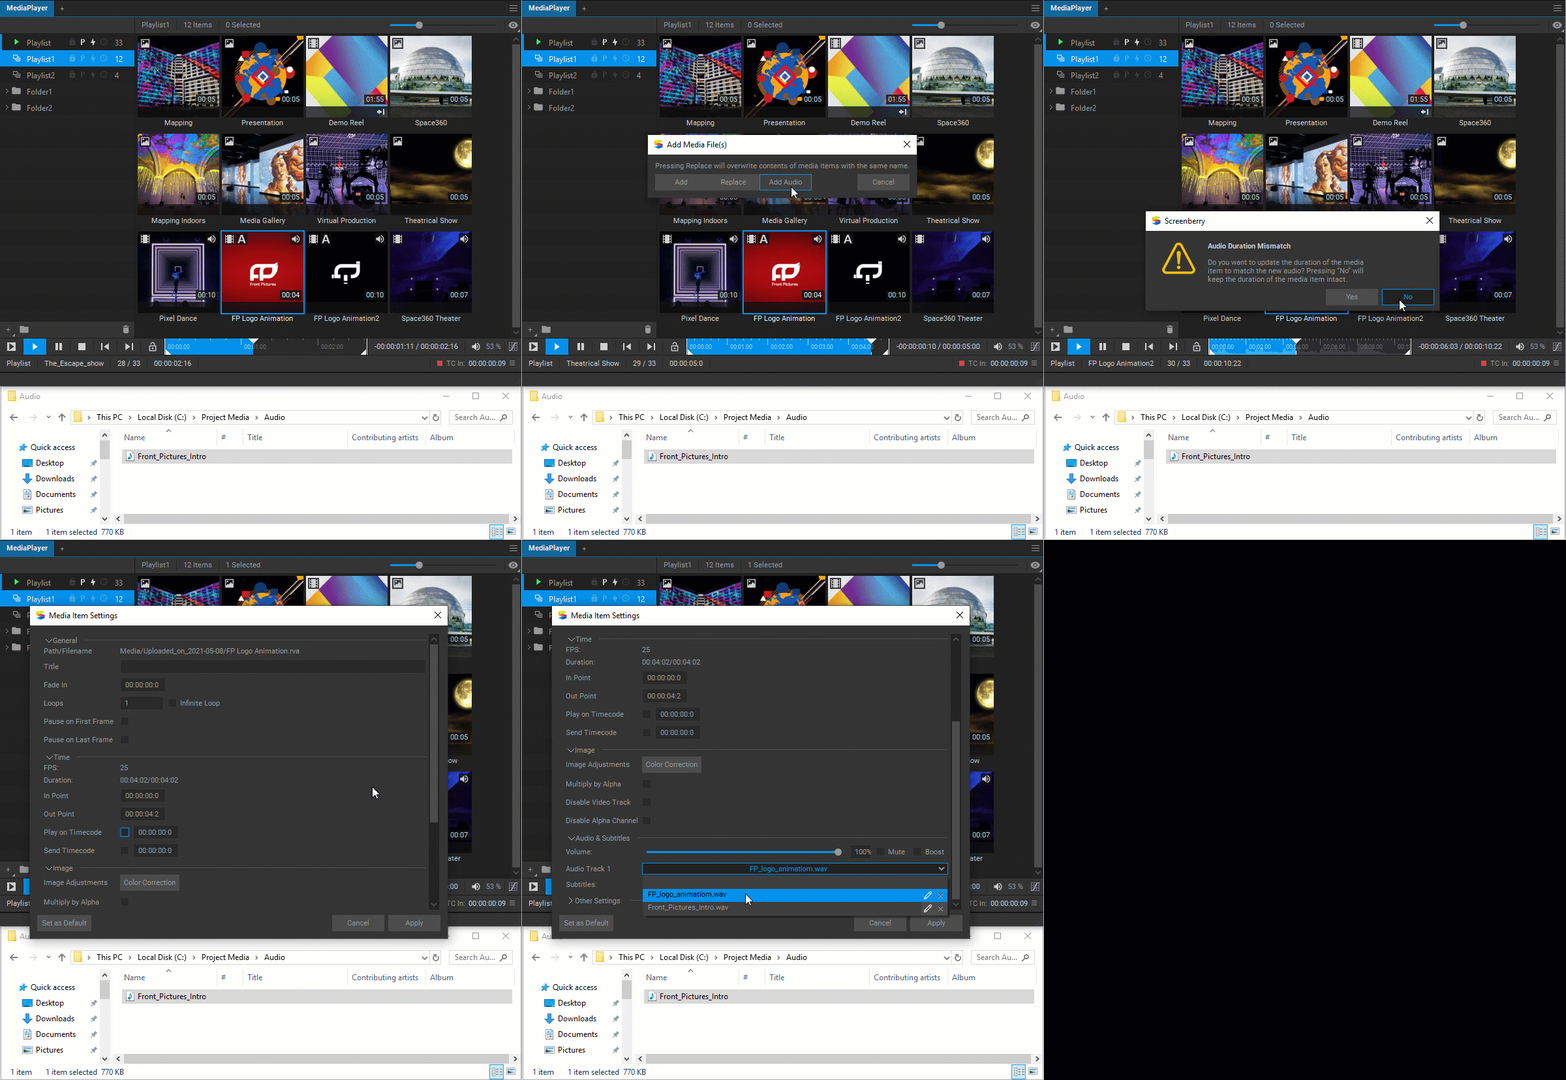
To choose and switch an audio track for a media item, right-click on a media item, choose Settings from the dropdown menu, and select a track from the Audio Track [N] drop-down list.
Adding Subtitles to Media Item
Media items can contain subtitles, which can be displayed during playback.
To add subtitles to a media item, drag and drop the subtitle file (.srt format) from a system folder over a media item thumbnail in the Media Player playlist (or in the Media Library) and click the Add Subtitles button in the pop-up dialog window.
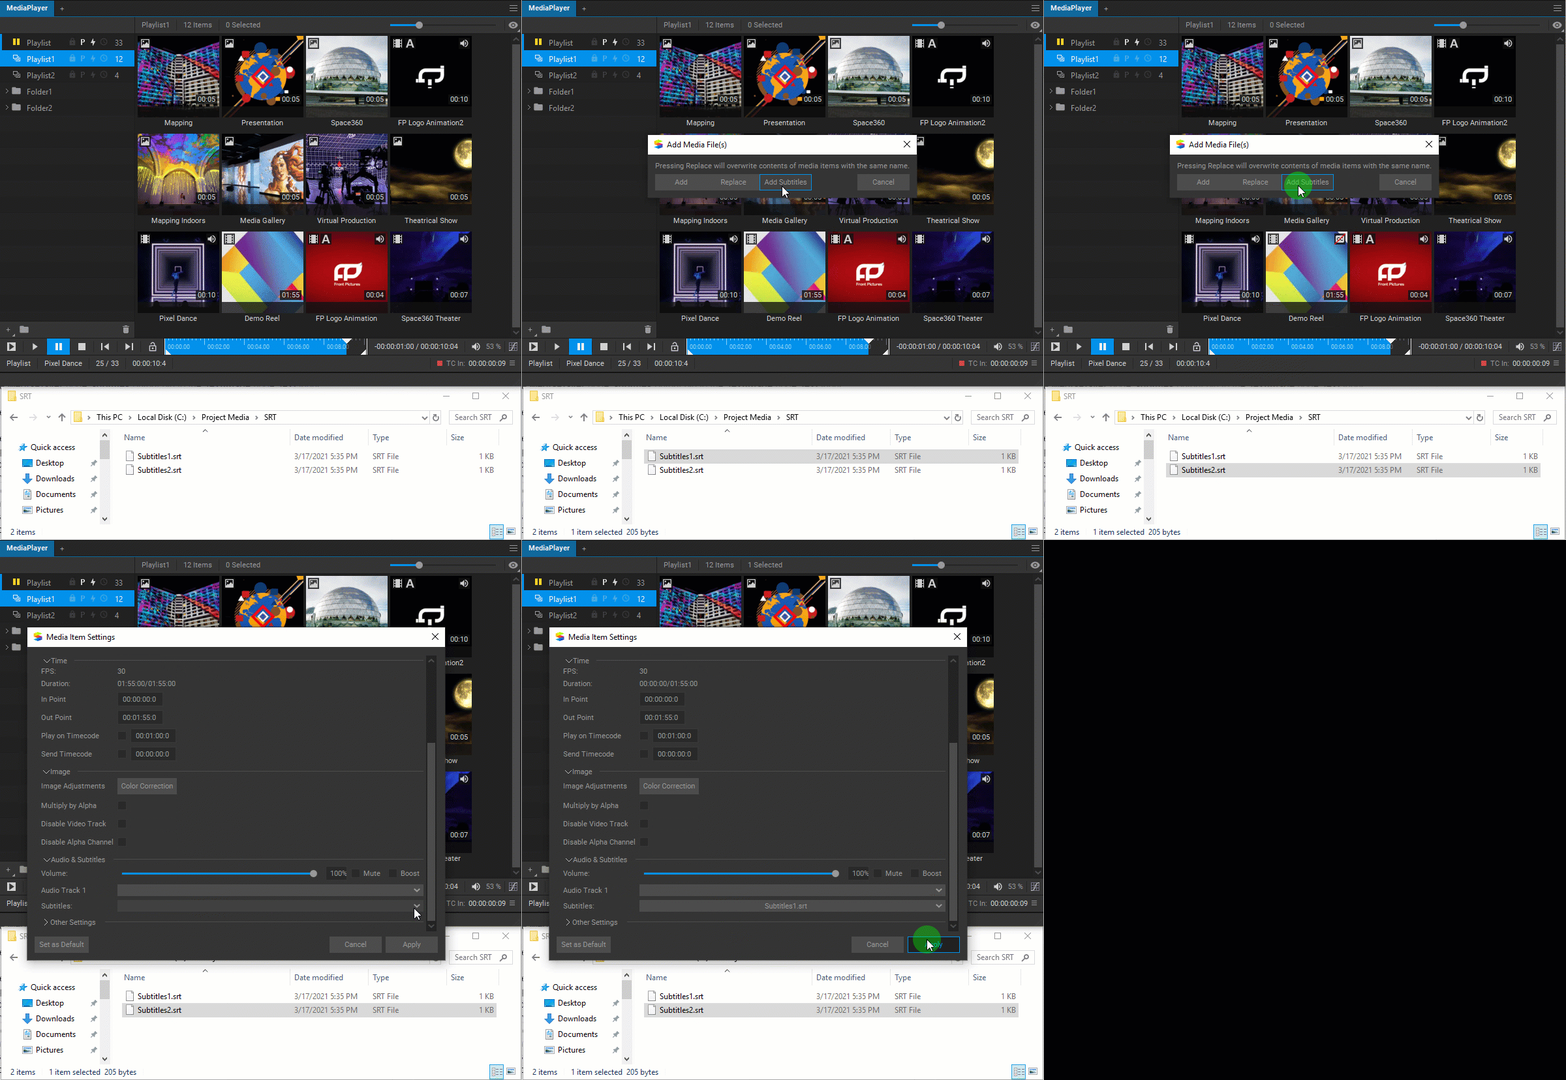
Several subtitle tracks can be added to a media item. To select what subtitle track to display during a media item’s playback, right-click on the media item, choose Settings from the dropdown menu**,** and select a subtitle file from the Subtitles drop-down list.
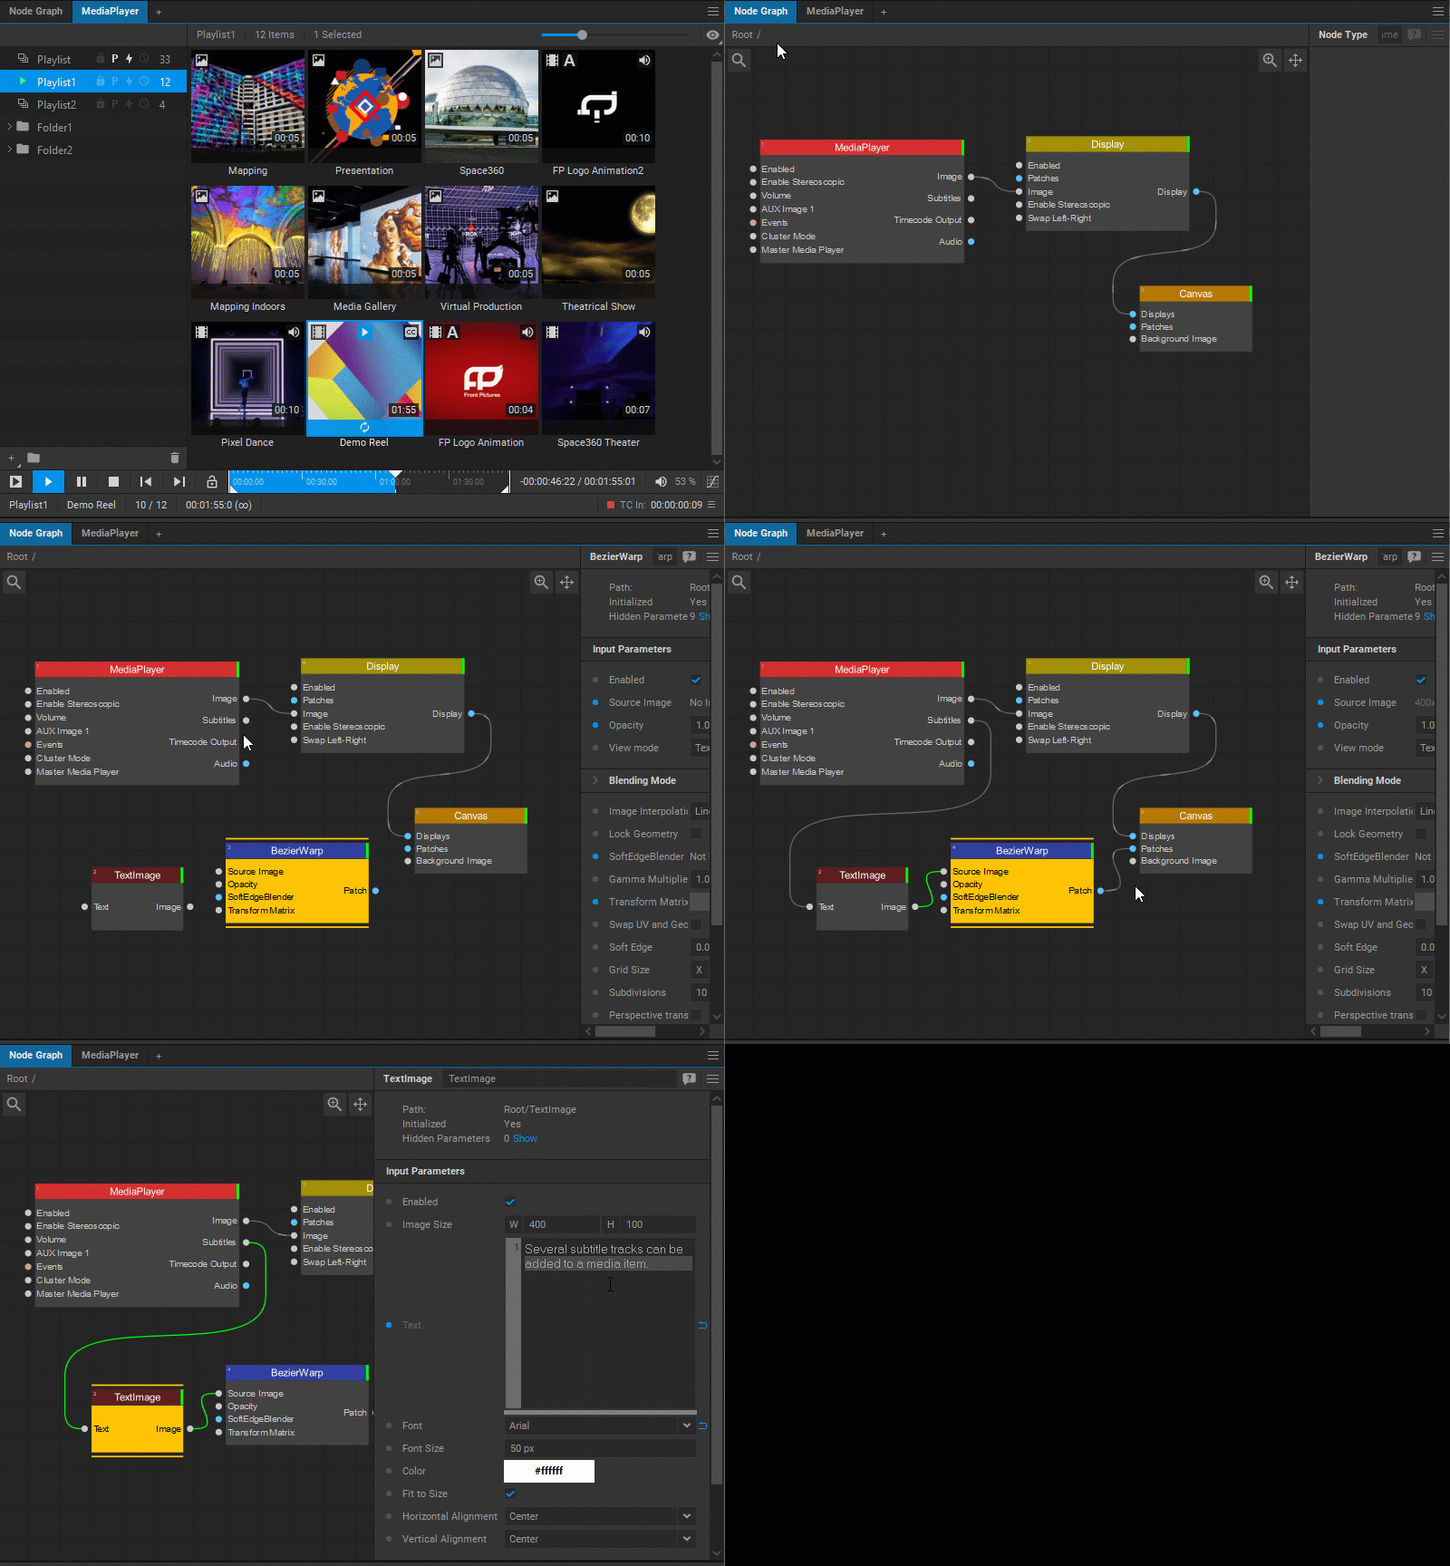
During playback, the Media Player node outputs subtitles associated with a media item as text. To display this text in the output, it needs to be rendered as an image using the TextImage node and placed over the current output, typically using one of the patch nodes, i.e. the BezierWarp node:
- Add TextImage and BezierWarp nodes to the node graph.
- Connect the MediaPlayer node Subtitles output pin to the TextImage node Text input pin.
- Connect the TextImage node Image output pin to the BezierWarp node Source Image input pin.
- Connect the BezierWarp node Patch output pin to the Display (or Canvas) node Patches input pin.
- Start a media item with subtitles playback, and check that subtitles are displayed in the Screenberry Server output.
- Adjust the look and feel of the subtitles output:
- Font, font size, color, etc. in the Settings panel of the TextImage node.
- Position, opacity, scaling algorithm, blending, etc. by editing the BezierWarp patch in the Patch Editor.
When a media item contains subtitles, it is indicated by the icon ![]() on the thumbnail of the media item in the playlist.
on the thumbnail of the media item in the playlist.
Adding User Comments to a Media Item
Adding comments to a media item is convenient for live show control, in regard to certain actions being performed with the media item.
To add comments, right-click on a media item, select Settings from the dropdown menu, and enter comments in the Comments text area.
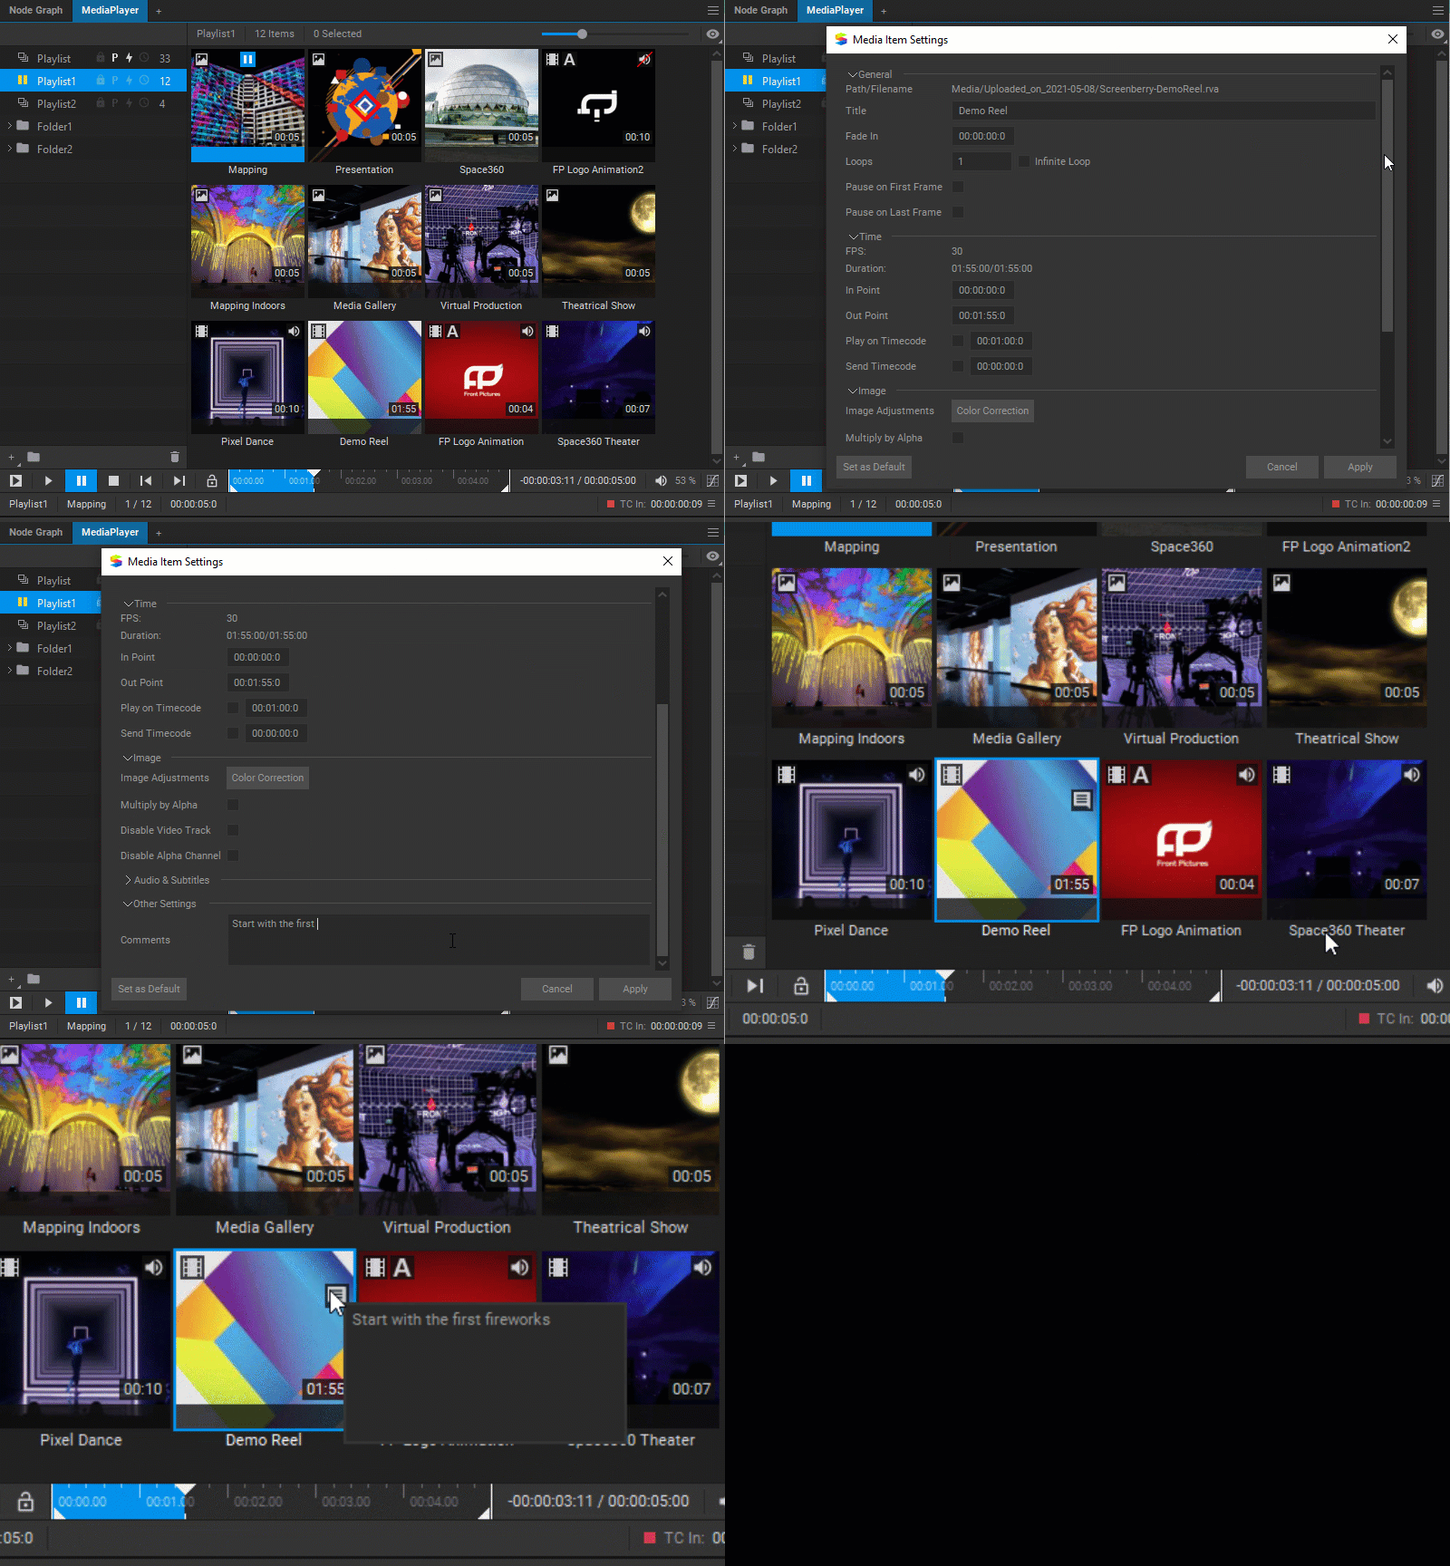
When comments are added to the media item, it is indicated by the icon ![]() on the thumbnail of the media item in the playlist. Hovering over this icon will bring a tooltip with the comments.
on the thumbnail of the media item in the playlist. Hovering over this icon will bring a tooltip with the comments.
Note: Comments are not displayed in the video output. Their purpose is only to inform the media server operator.
Changing the Frame Rate (FPS) of a Media Item
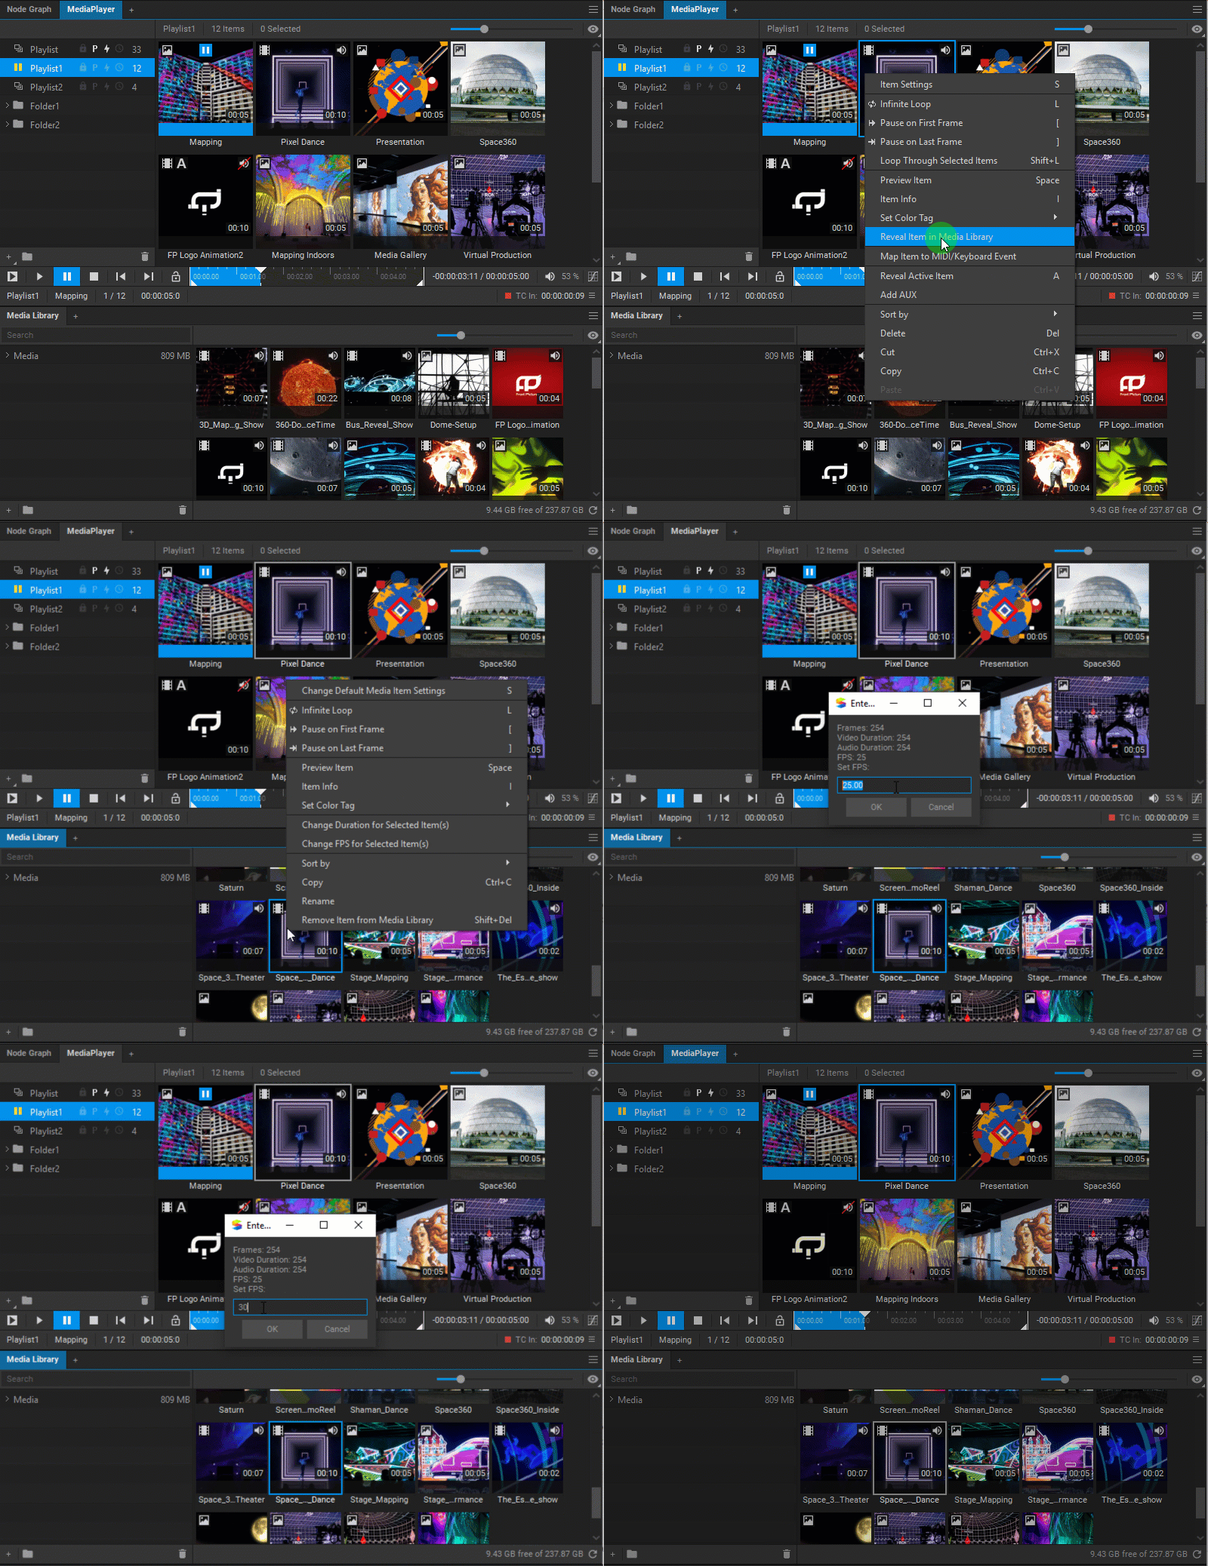
A media item’s playback frame rate can only be changed in the Media Library, and this change will affect all instances of this media item.
Right-click on a media item, select Reveal Item in Media Library from the dropdown menu, right-click on a media item in the Media Library window, select Change FPS for Selected items from the dropdown menu, and input the number in the Set FPS field in the opened dialog box.
Changing the Duration of a Media Item
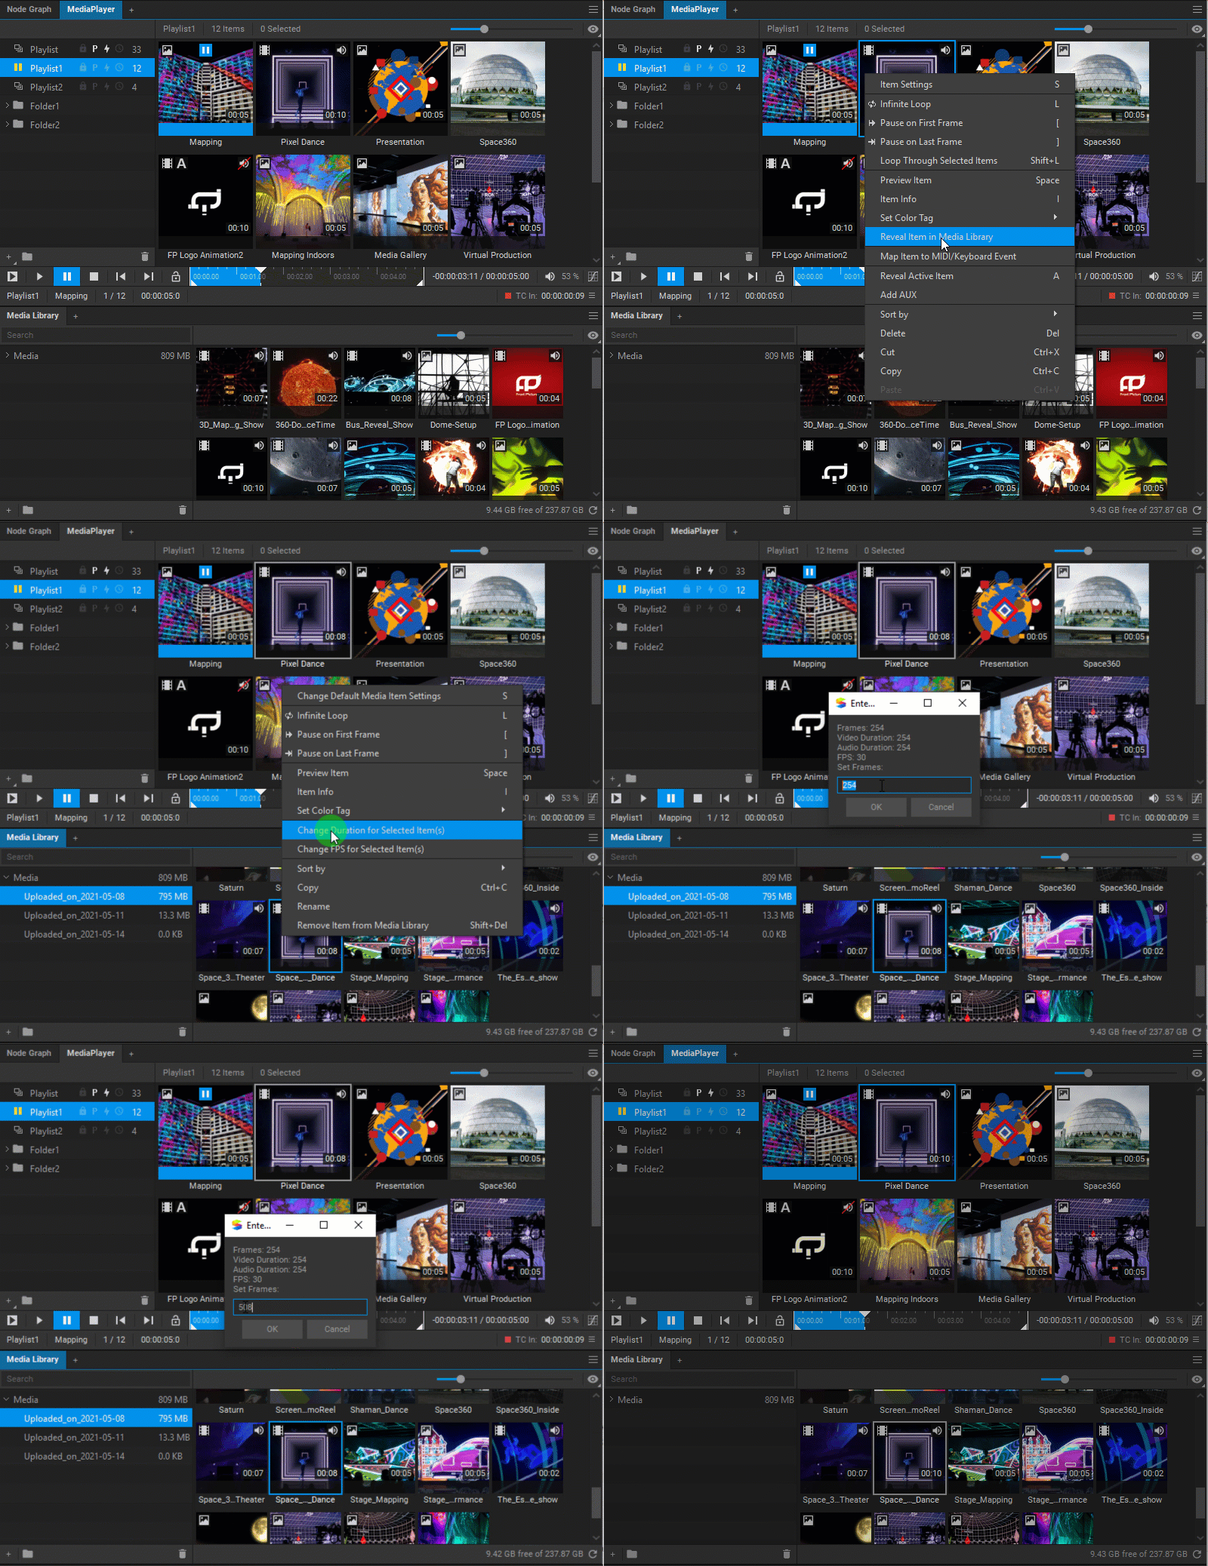
A media item’s playback duration can only be changed in the Media Library, and this change will affect all instances of this media item.
Right-click on a media item, select Reveal Item in Media Library from the dropdown menu, right-click on the media item in the Media Library window, select Change Duration for Selected items from the dropdown menu, and input the number of frames in the Set Frames field in the opened dialog box.
Mapping a Media Item to a MIDI/Keyboard Event
To map a media item to keyboard (or mouse) events:
- Right-click on a media item in the Media Player playlist and select Map Item to MIDI/Keyboard Event from the dropdown menu. A yellow overlay is added to the media item thumbnail to indicate that the mapping process has resumed.
- Switch to the Node Graph and add a Keyboard (or Mouse) node.
- Connect the Keyboard (or Mouse) node Messages output pin to the Media Player node Events input pin.
- Open the Server > Forward Keyboard and Mouse Events window.
- Press the key or combination of keys you want to map to, i.e.
Ctrl+M(or make a mouse click you want to map to, i.e. a left-click). - Switch back to the Media Player widget, and see that the media item mapping is complete, as indicated by the lettering Ctrl-M (or Mouse Left) in the top left corner of the media item thumbnail.
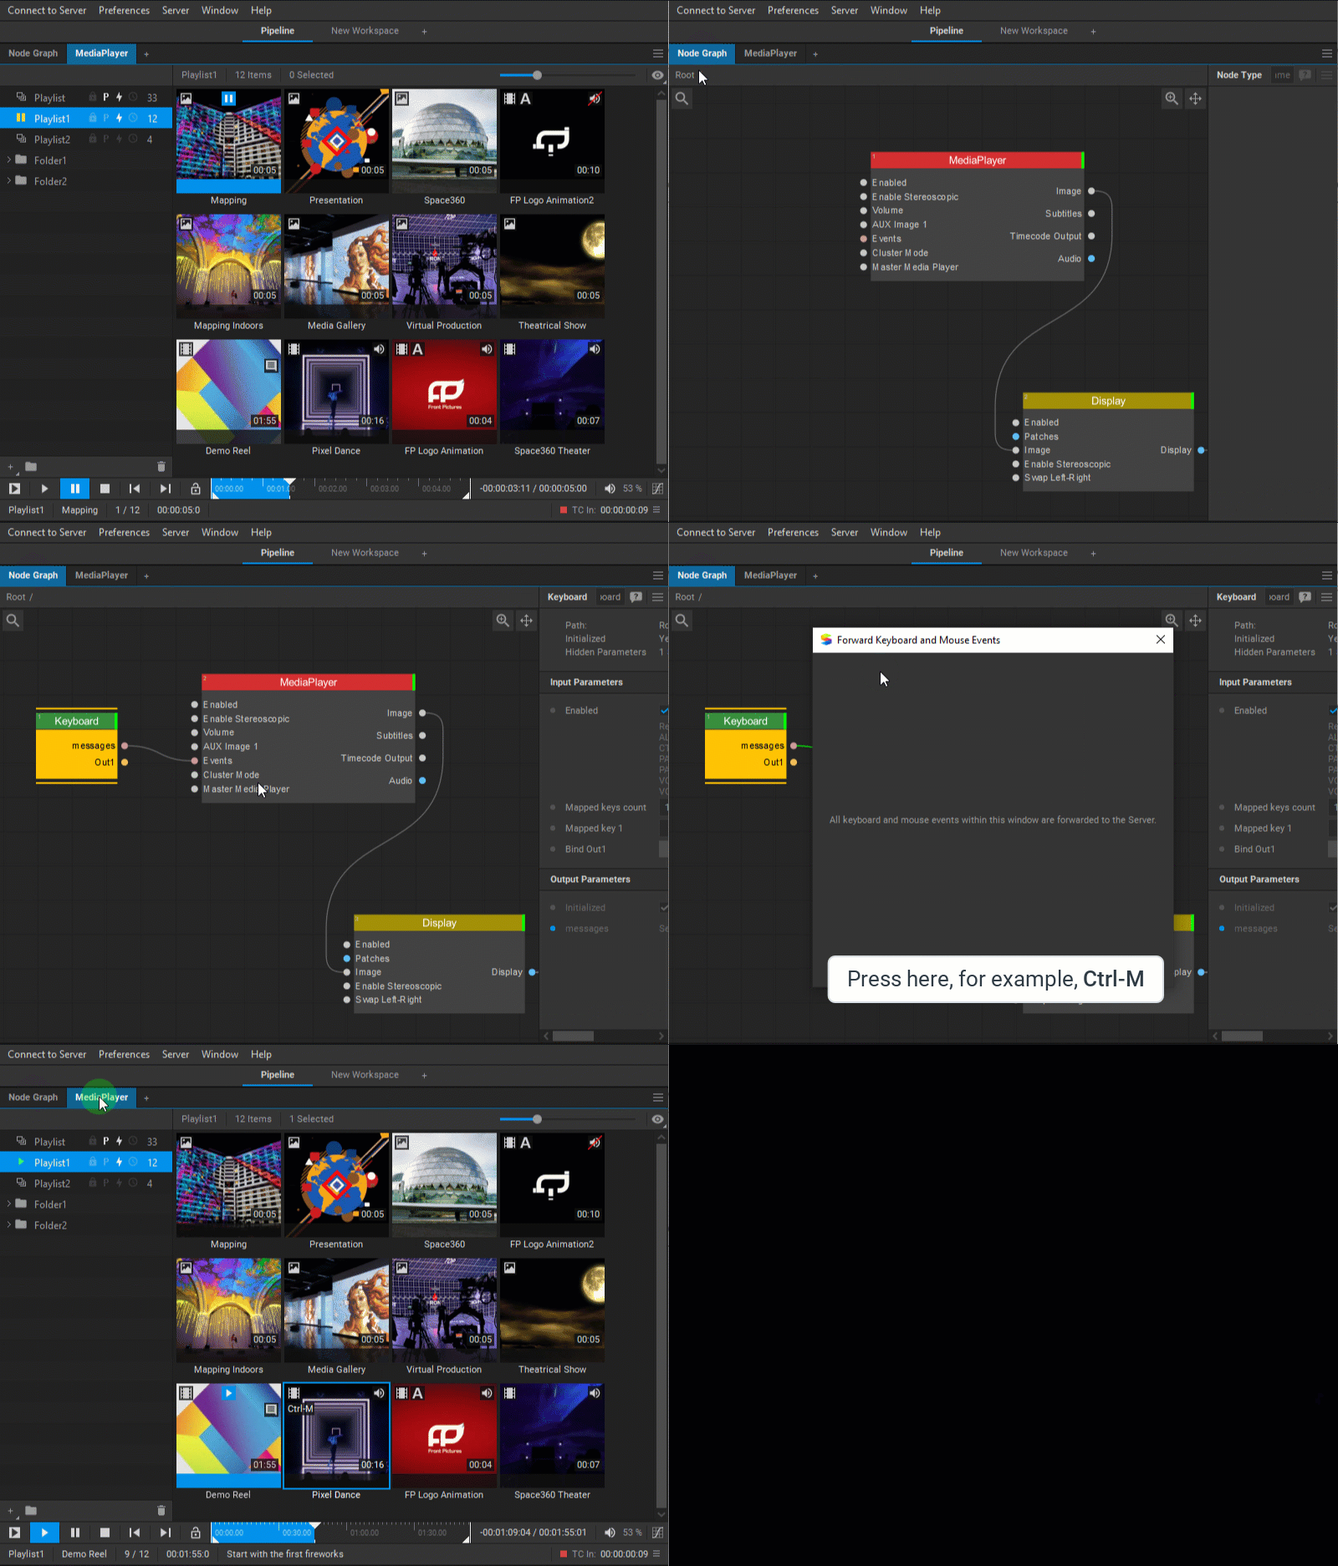
To see detailed information on the current mapping of a media item, right-click on it, select Settings from the dropdown menu, and review the MIDI/Keyboard Mappings section. There you can unmap individual events by pressing the Discard MIDI/Keyboard Mapping button next to the event description.
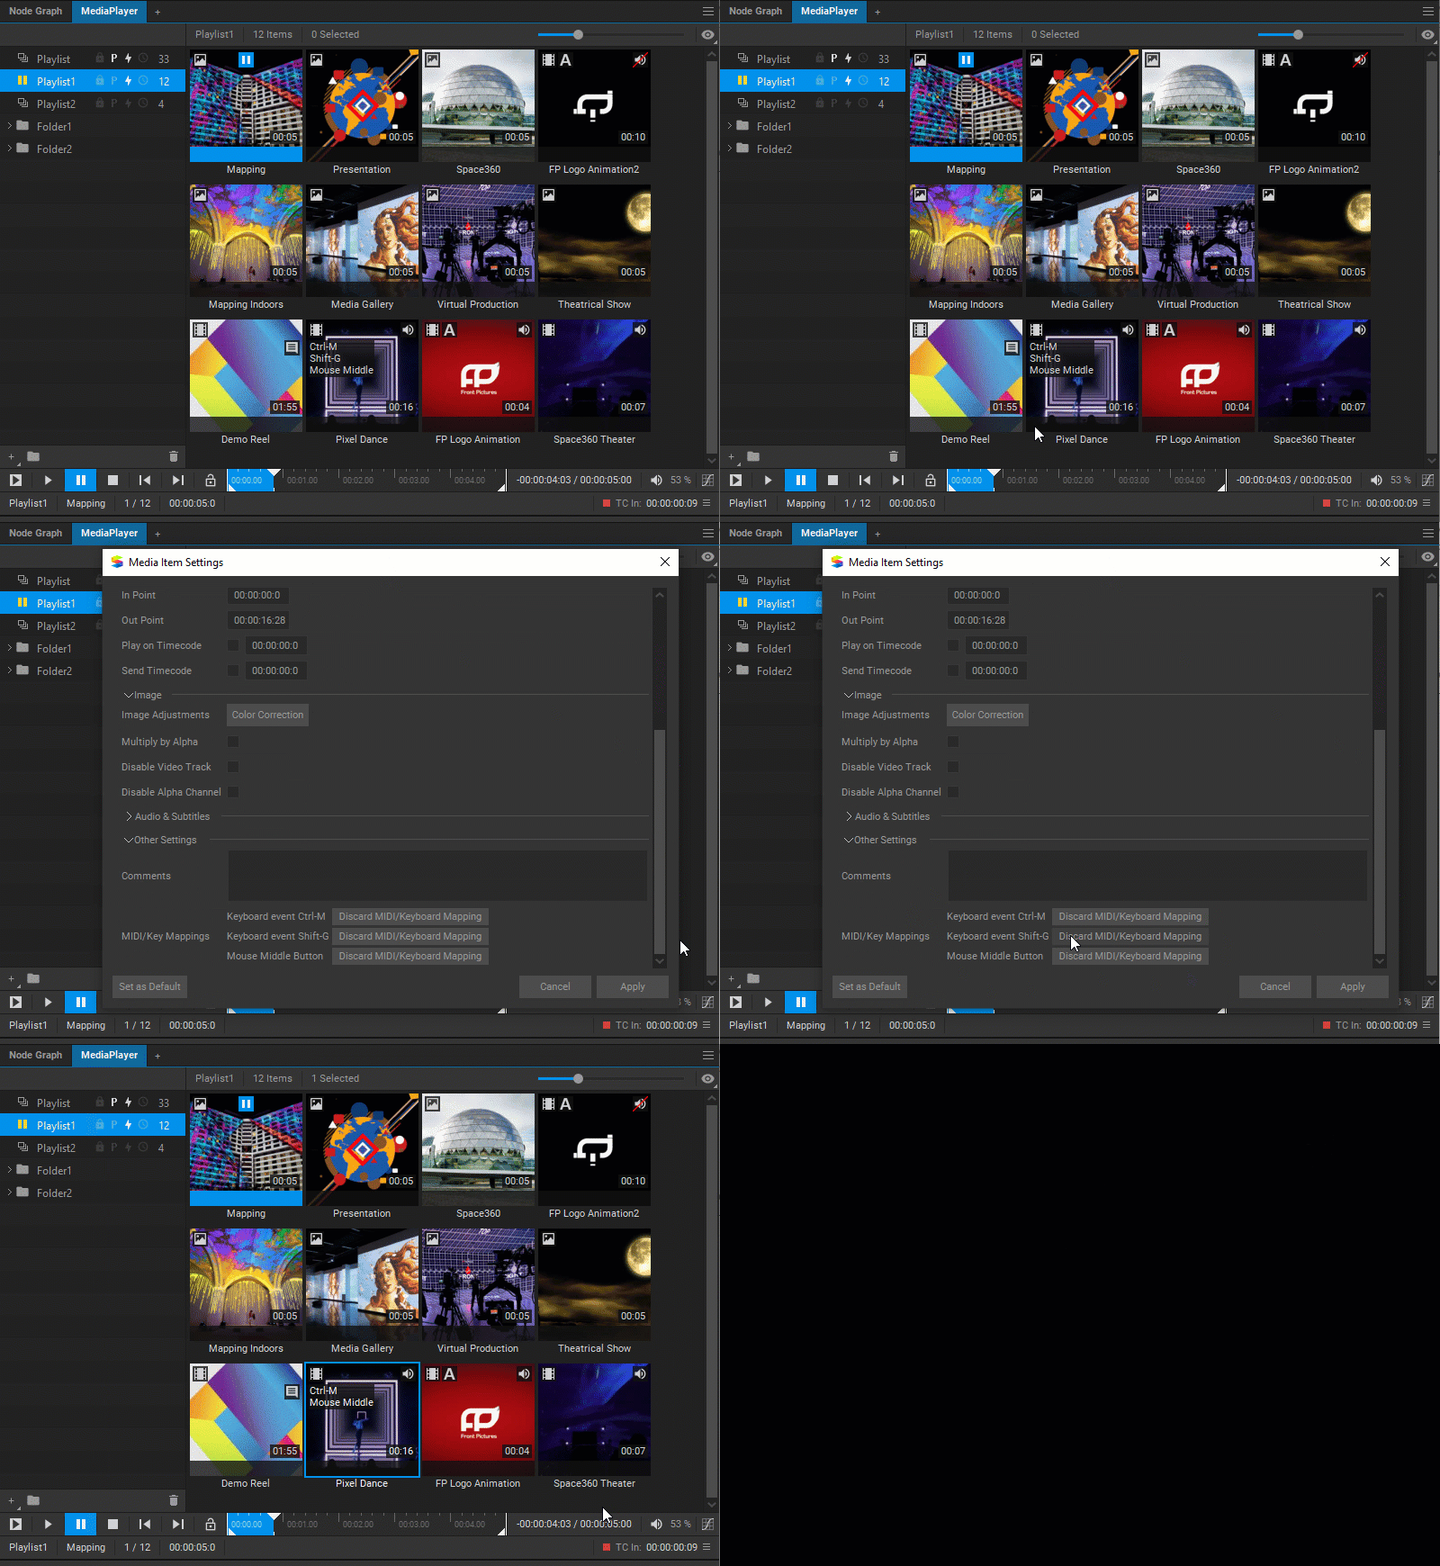
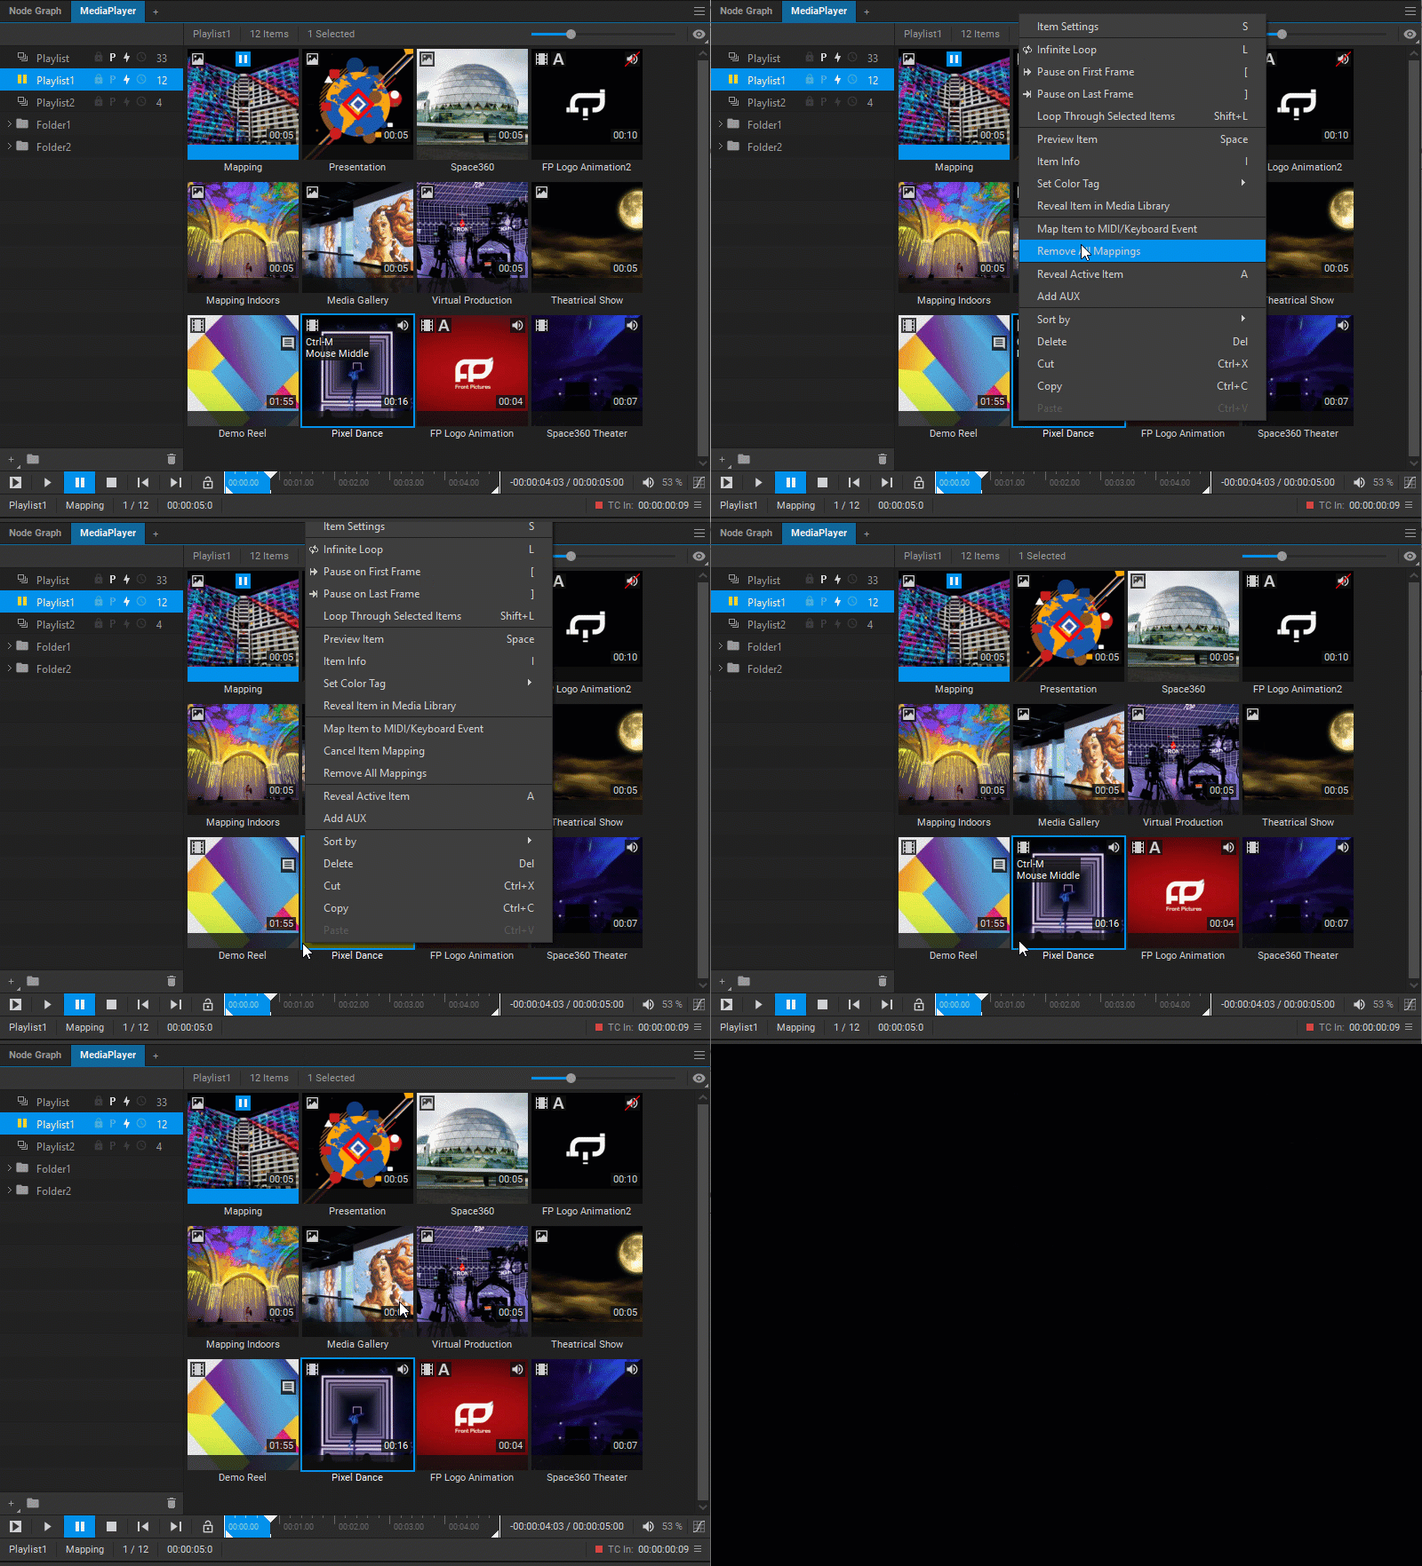
If you need to abort the mapping process after it has been initiated, right-click on a media item in the Media Player playlist and select Cancel Item Mapping from the dropdown menu.
If you need to remove the current mappings of a media item, right-click on it and select Remove All Mappings from the dropdown menu.
Viewing Media Item Information
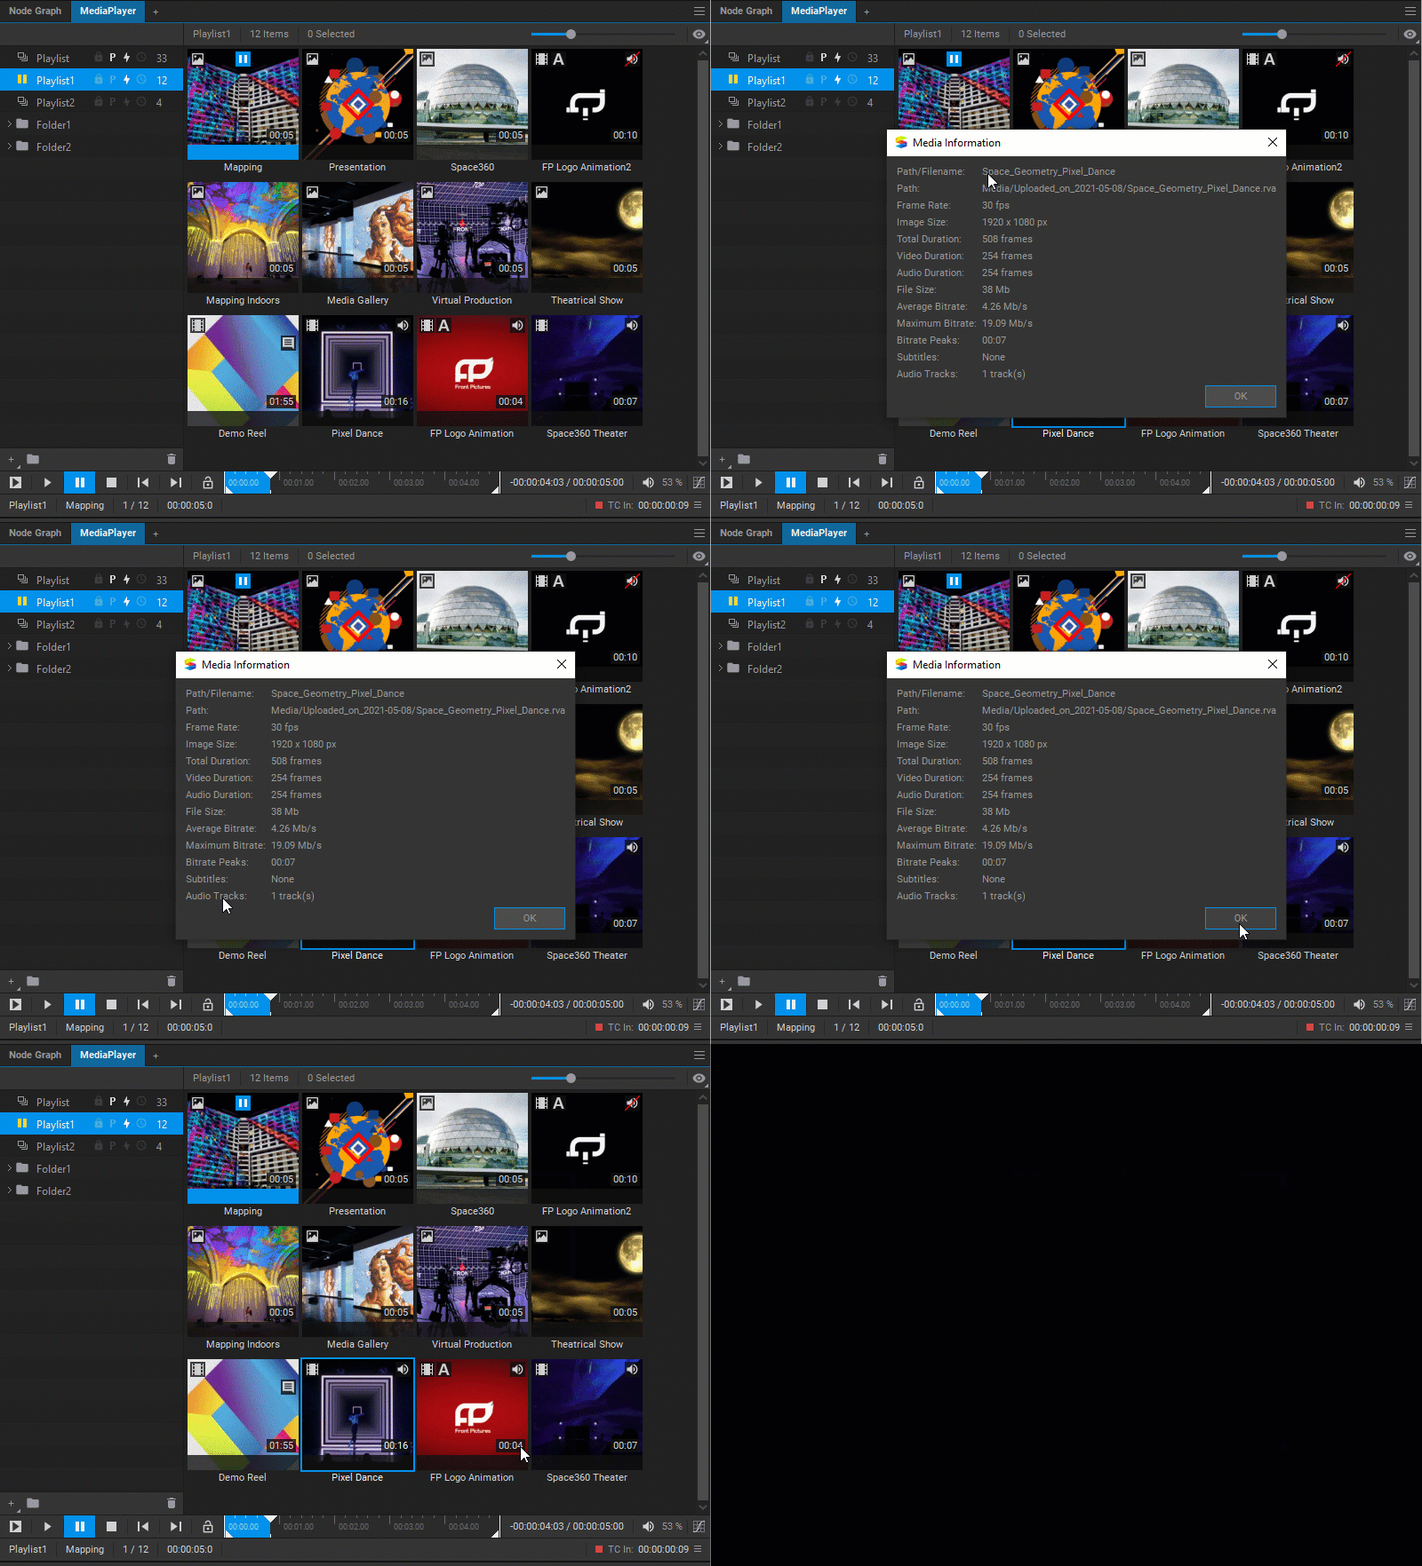
To access media item information, right-click on it and select Item Info from the dropdown menu or press the I key.
Changing Settings for Multiple Media Items
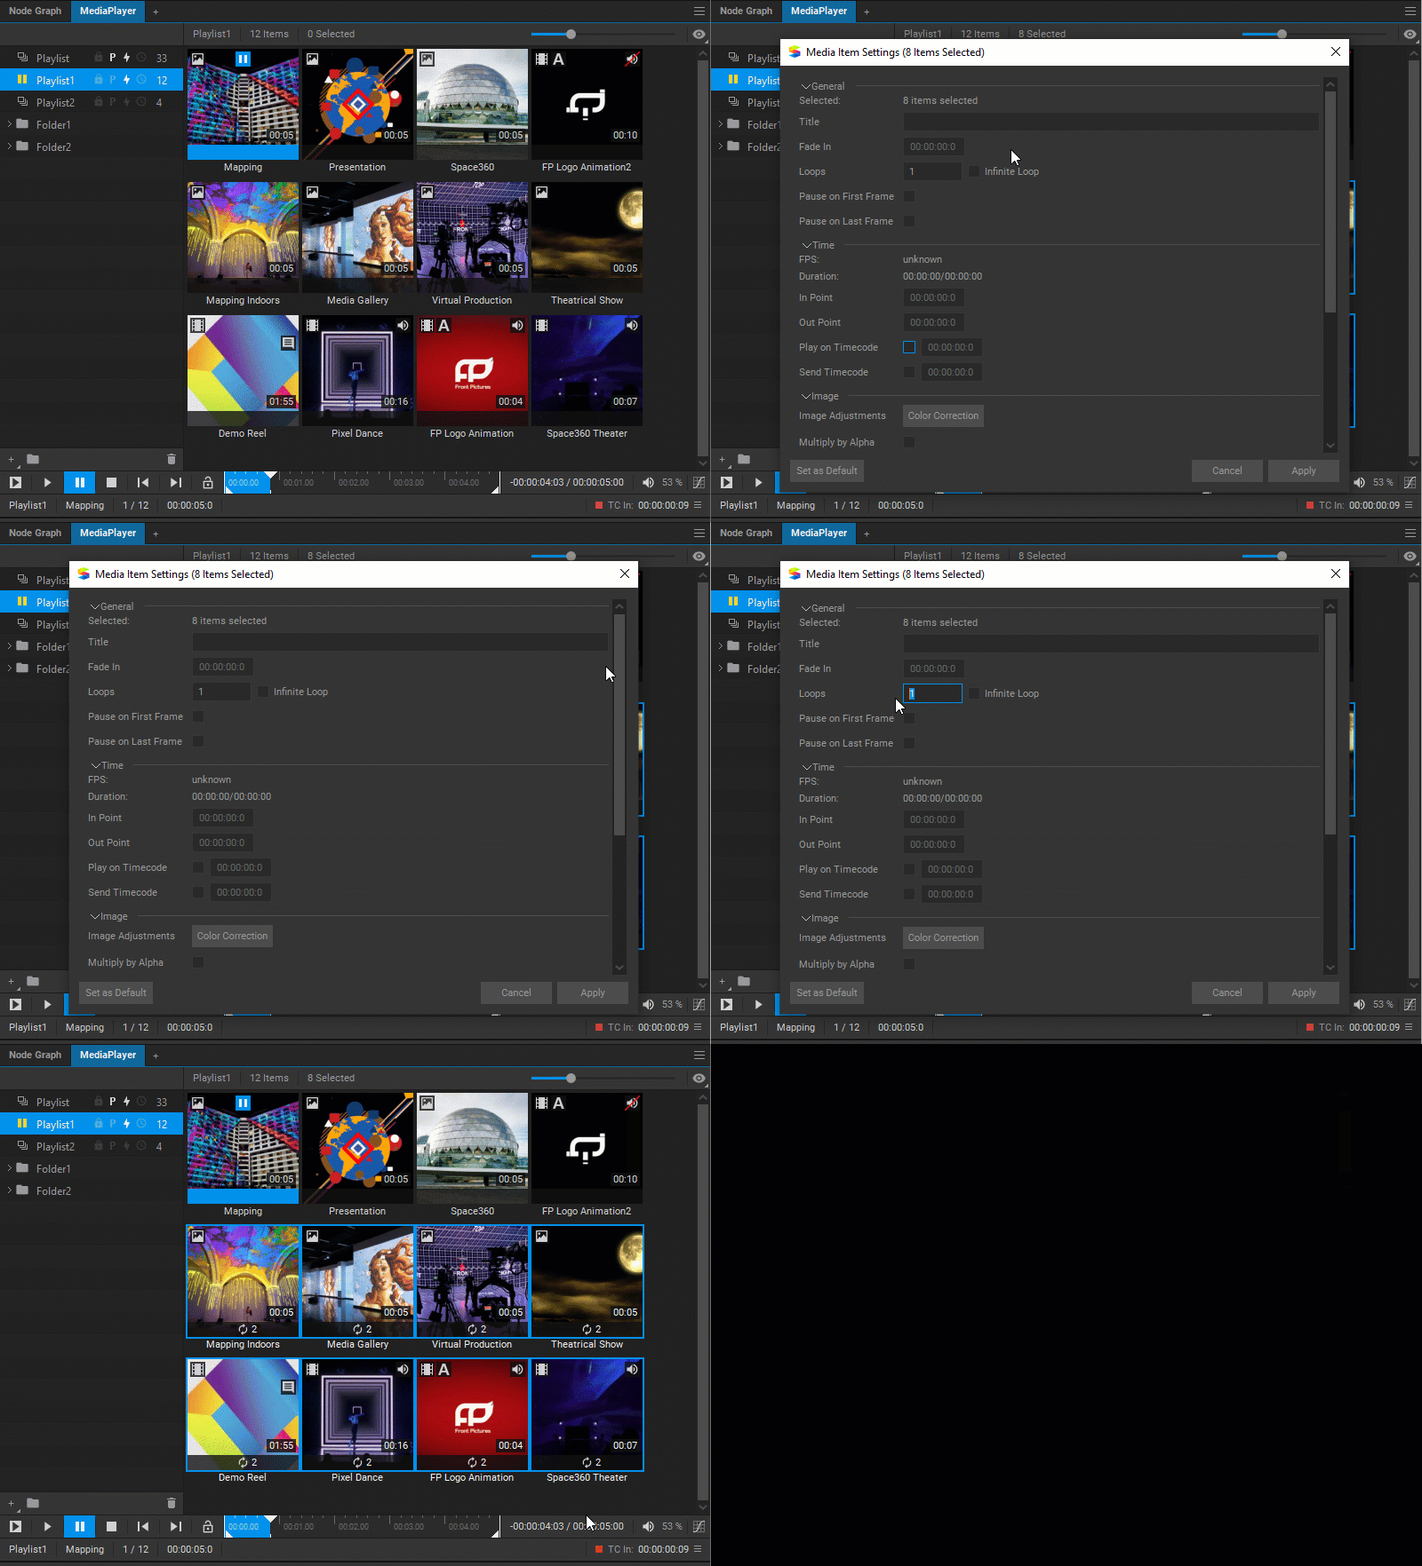
To change settings of more than one media item at once, select the media items, right-click on the selection and choose Item Settings from the dropdown menu, or press the S key. Only the settings common to all selected media items will be available for editing in the Settings dialog window.
Media Item Indicators
Media item indicators are displayed over a media item thumbnail and provide information about its current settings and status.
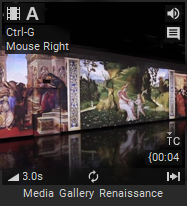
A media item with indicators
Media Item Type
![]() Image
Image
![]() Video
Video
![]() Stereoscopic video
Stereoscopic video
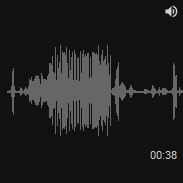
Audio-only media items do not have a specific indicator, instead, the poster frame is generated based on its audio histogram.
Playback State
![]() Playing
Playing
![]() Paused
Paused
![]() Stopped
Stopped
See Media Items Playback.
Audio
![]() A media item contains one or more audio tracks.
A media item contains one or more audio tracks.
![]() Audio output is muted. (See Adjusting the Audio Level of a Media Item.)
Audio output is muted. (See Adjusting the Audio Level of a Media Item.)
Duration
![]() Media item duration. When an In Point and / or Out Point are set, brackets are added to indicate that a media item is trimmed, and the updated duration is displayed in the brackets
Media item duration. When an In Point and / or Out Point are set, brackets are added to indicate that a media item is trimmed, and the updated duration is displayed in the brackets ![]() . (See Trimming a Media Item.)
. (See Trimming a Media Item.)
Playback Behavior
![]() Fade-in of a specified duration is applied. (See Crossfading Media Items.)
Fade-in of a specified duration is applied. (See Crossfading Media Items.)
![]() The media item is played in a loop. The number indicates the number of repetitions. If no number is displayed, the media item will loop continuously. (See Playing a Media Item in a Loop.)
The media item is played in a loop. The number indicates the number of repetitions. If no number is displayed, the media item will loop continuously. (See Playing a Media Item in a Loop.)
![]() Playback of the media item is set to pause on the first frame. (See Pausing Media Item Playback at the Start or End.)
Playback of the media item is set to pause on the first frame. (See Pausing Media Item Playback at the Start or End.)
![]() Playback of the media item is set to pause on the last frame. (See Pausing Media Item Playback at the Start or End.)
Playback of the media item is set to pause on the last frame. (See Pausing Media Item Playback at the Start or End.)
![]() Playback of the media item is set to pause on the first and last frame. (See Pausing Media Item Playback at the Start or End.)
Playback of the media item is set to pause on the first and last frame. (See Pausing Media Item Playback at the Start or End.)
Color Correction
![]() Сolor correction has been applied to the media item. (See Media Item Color Correction.)
Сolor correction has been applied to the media item. (See Media Item Color Correction.)
Timecode
![]() A media item is set to start playback at a specific timecode. (See Starting Media Item Playback at a Timecode.)
A media item is set to start playback at a specific timecode. (See Starting Media Item Playback at a Timecode.)
![]() A media item is set to send a timecode. (See Sending a Timecode.)
A media item is set to send a timecode. (See Sending a Timecode.)
![]() A media item is set to start playback at a specific timecode and send a timecode.
A media item is set to start playback at a specific timecode and send a timecode.
Alpha Channel
![]() A media item contains the alpha channel.
A media item contains the alpha channel.
![]() The alpha channel is disabled. (See Disabling the Alpha Channel of a Media Item.)
The alpha channel is disabled. (See Disabling the Alpha Channel of a Media Item.)
MIDI/Keyboard Events Mapping
![]() A list of keyboard and mouse events mapped to start the playback of a media item. (See Mapping a Media Item to a MIDI/Keyboard Event.)
A list of keyboard and mouse events mapped to start the playback of a media item. (See Mapping a Media Item to a MIDI/Keyboard Event.)
Subtitles
![]() A media item contains subtitles. (See Adding Subtitles to Media Item.)
A media item contains subtitles. (See Adding Subtitles to Media Item.)
Comments
![]() User comments have been added to the media item. They are displayed when you hover over the indicator icon. (See Adding User Comments to a Media Item.)
User comments have been added to the media item. They are displayed when you hover over the indicator icon. (See Adding User Comments to a Media Item.)

