Organizing Media Items
Managing Rows and Columns
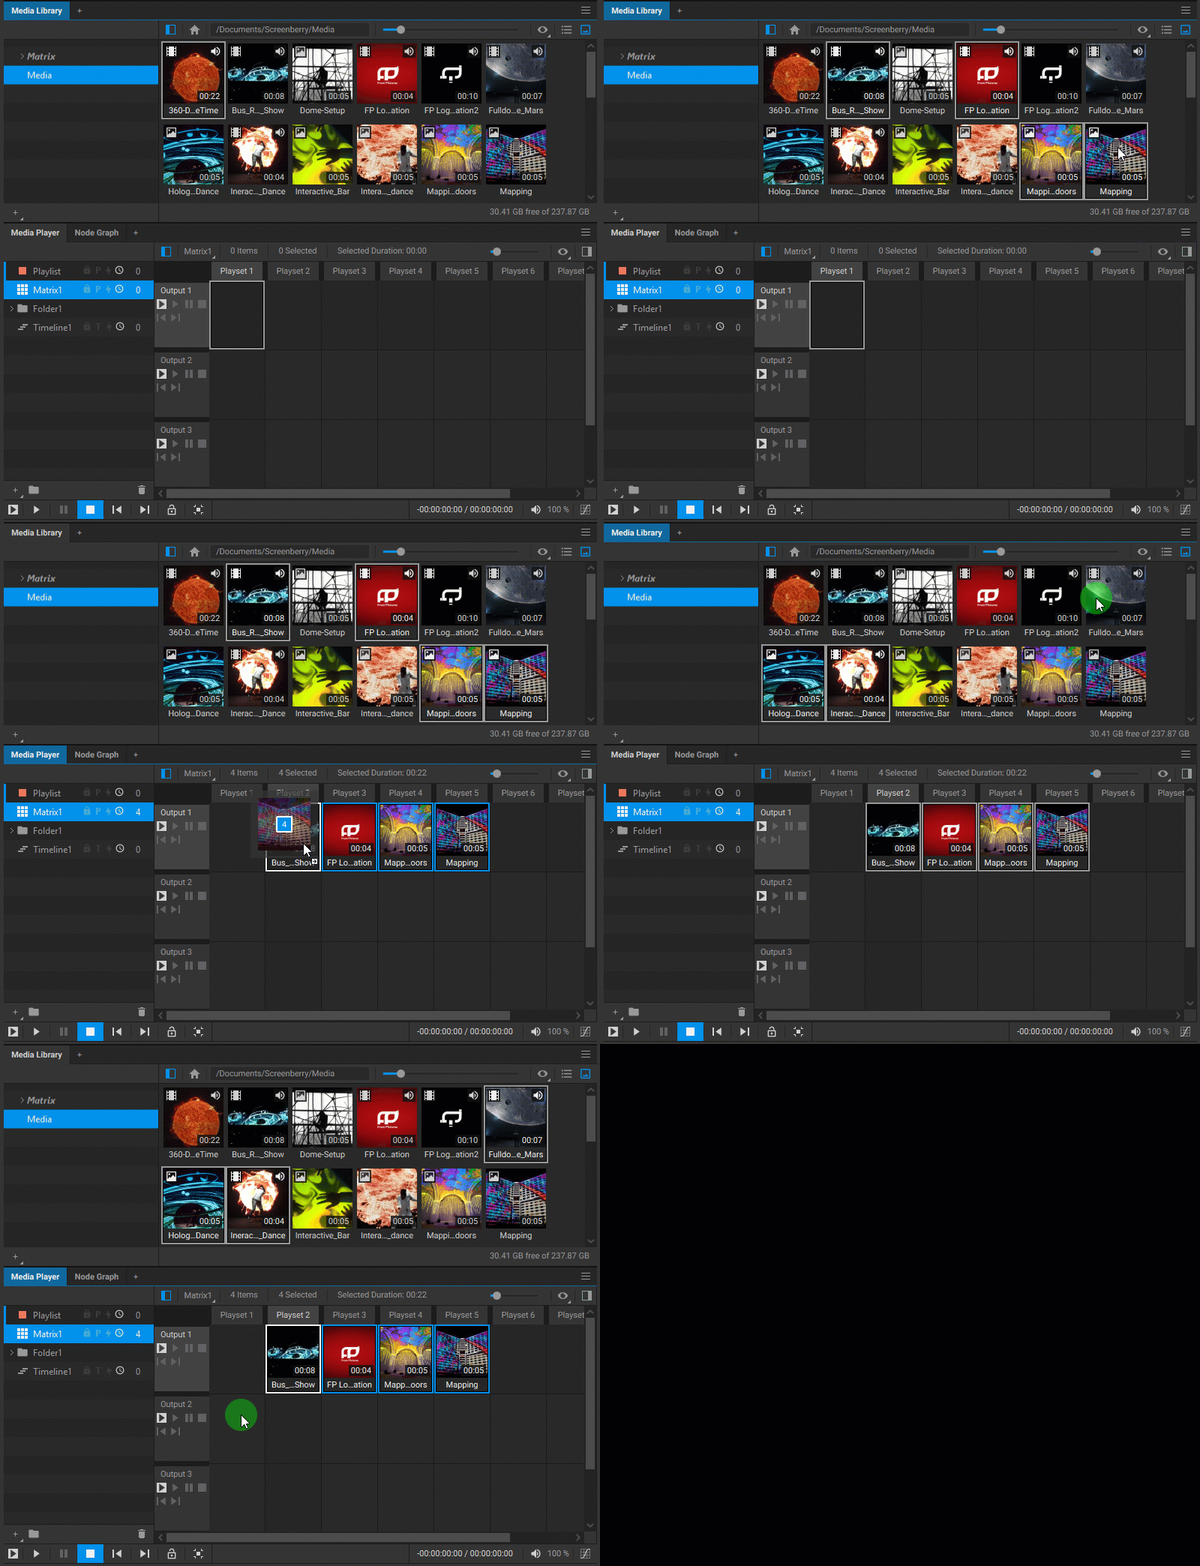
In the event your matrix layout requires more rows and columns than what’s currently available, you can expand the grid by scrolling to its current edge. As you reach its visible limits, additional rows or columns are appended automatically. Please note that any rows and columns not populated with media items will automatically retract upon scrolling back, preserving an orderly and manageable grid.

Adding Media Items
To add media items to a matrix grid, do one of the following:
- Drag-and-Drop Method:
- Drag media items from the Media Library, another Media Player playlist, or a timeline directly into the grid.
- Copy-Paste Method:
- Select the chosen media items in the Media Library, another Media Player playlist, or a timeline.
- Copy these items by right-clicking and choosing Copy from the dropdown menu, or by using the
Ctrl+Ckeyboard shortcut. - Select the starting grid cell for the sequence of copied media items and paste the items there. This can be done by right-clicking and choosing Paste from the dropdown menu or by using the
Ctrl+Vshortcut.
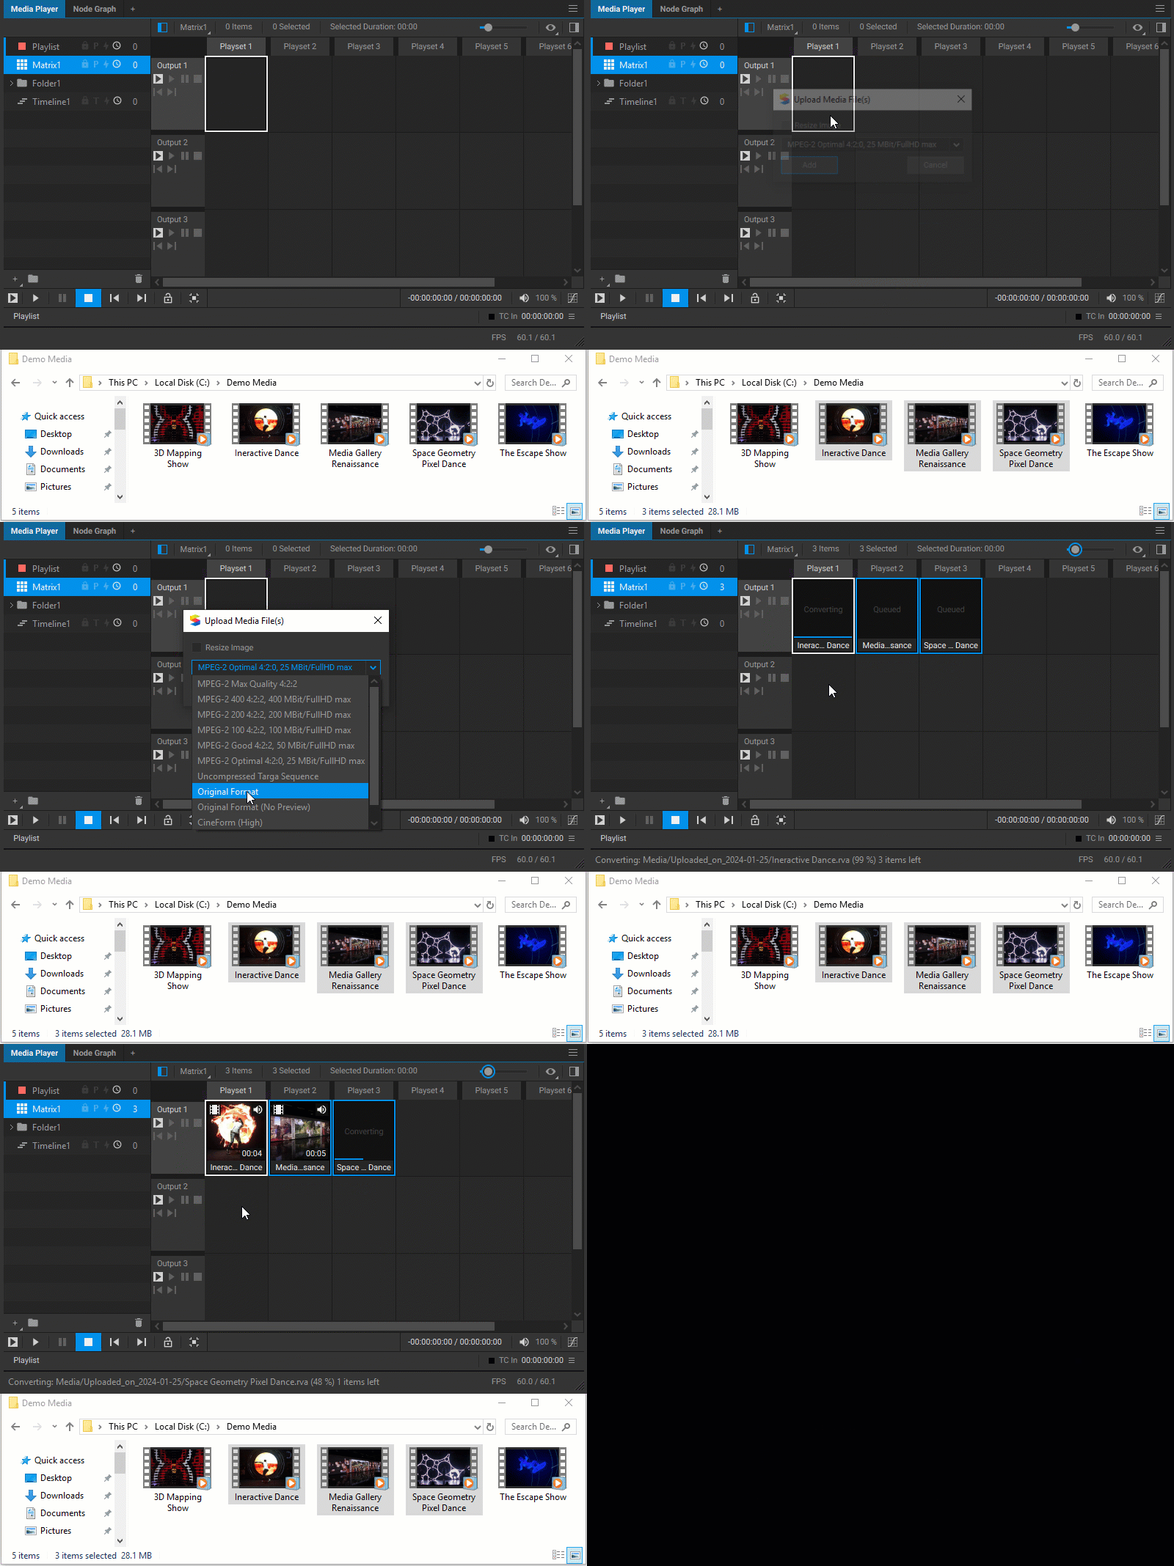
- Direct File Import from System Folders:
- Drag and drop files from a system folder into the grid, or use the
Ctrl+C(Copy) andCtrl+V(Paste) shortcuts to copy-paste them into the grid. - In the Add Media File(s) dialog that appears, select the conversion quality for the media items. The available options are:
- MPEG-2 Max Quality 4:2:2: Represents the MPEG-2 video format encoded at the highest quality setting. This default encoding option provides the optimal balance of quality and performance. In instances where specific media items exhibit playback issues or visual artifacts, re-encoding them using the MPEG-2 Good Quality setting is recommended.
- MPEG-2 Good Quality 4:2:2: Offers a high bitrate while maintaining certain bitrate limits to ensure smooth playback regardless of the image’s visual complexity.
- MPEG-2 Optimal Quality 4:2:0: More suited for encoding videos of extremely high resolution, this option employs stricter bitrate limitations.
- Uncompressed Targa Sequence: Retains the files in a lossless Run-Length Encoding (RLE) uncompressed format. This format requires extensive storage capacity and relies on high-speed disk reading capabilities for optimal playback performance.
- Original file(s): Maintains the media items in their native format. During upload, a low-resolution video preview is created, and audio content is extracted separately. Depending on the original format, playback quality may vary. This format is also applicable for NotchLC and HAP playback.
- CineForm (High): This codec is designed for high image quality and performance. It supports media items with high resolutions, dynamic ranges, and frame rates, but requires significant storage space.
- CineForm (High, 12-bit): This variation of the CineForm codec is specifically engineered to handle videos with higher bit depths, including 10-bit and 12-bit videos.
- If adjustment of the media items' image dimensions is required, select the Resize Image checkbox in the Add Media File(s) dialog, and then input the preferred Width and Height in the corresponding fields.
- Click the Add button to initiate the upload process.
- Drag and drop files from a system folder into the grid, or use the
Note: When media items are dragged or copied into a matrix grid, they are sequentially placed in the cells of the targeted row, starting from the selected cell. It's important to note that any existing media items in this row's cells that are overlapped by the new sequence will be replaced by the newly added media items.
Note: When media items are imported into a matrix grid from system folders, the corresponding media files are uploaded and stored in a folder named Uploaded_on_YYYY-MM-DD within the Media folder.
Note: Users should be aware of two specific scenarios that can lead to the replacement of existing media items in the matrix grid: duplicating and splitting media items.
Duplicating Media Items
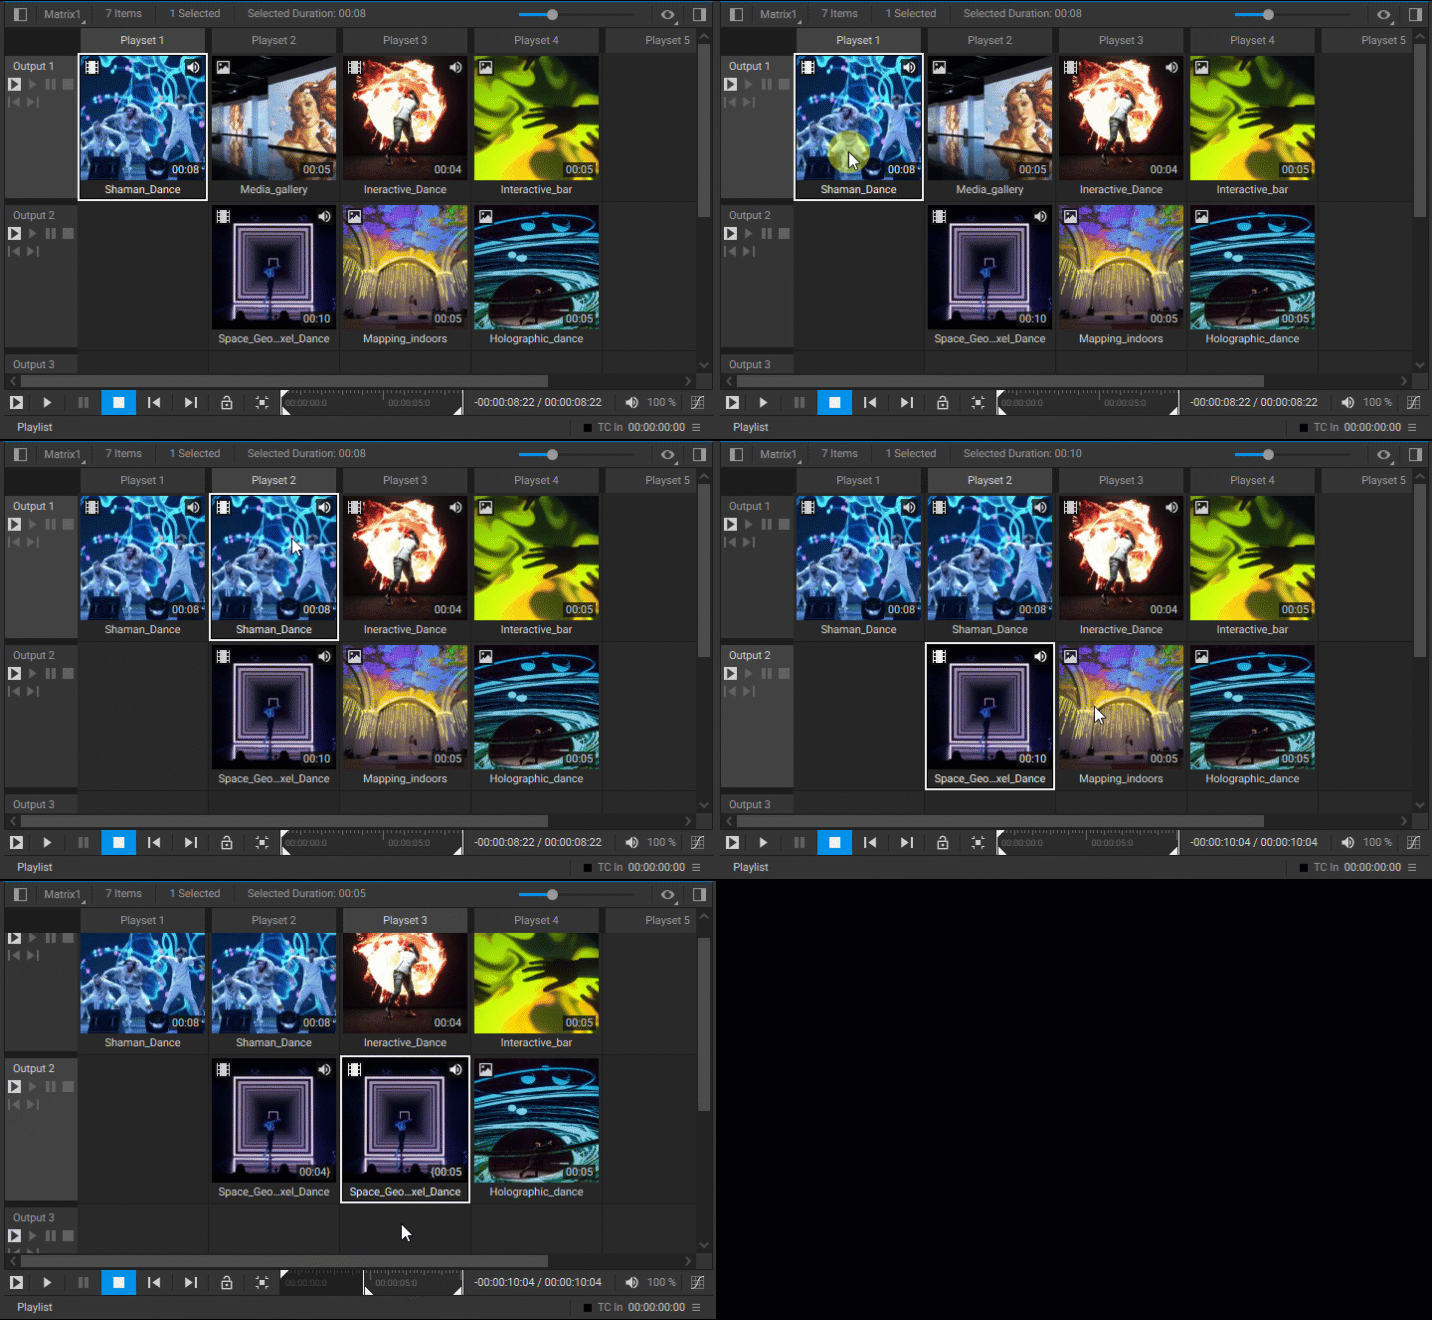
To duplicate a media item, right-click on it and select Duplicate from the dropdown menu. This action creates a copy of the media item in the cell immediately following the original item. Be aware that this will replace any existing media item in the subsequent cell.
Splitting Media Items
To split a media item, first, select the item, right-click on the seek bar, and choose Split at Frame ([Frame Number]) from the dropdown menu. This action divides the media item into two parts: the first one, containing frames up to the specified frame, remains in the current cell, and the second one, containing frames starting from the specified frame, is placed in the subsequent cell, replacing any existing media item there.
Adding AUX Items
The Media Player node is capable of receiving images from nodes within the node graph that produce image outputs. These images can be integrated into matrix-based playlists as specialized AUX items. To achieve this, within the Node Graph widget, link the image outputs from the source nodes to the AUX Image inputs on the Media Player node (e.g., AUX Image 1, AUX Image 2, etc.).
If you require the Media Player to receive multiple image inputs, specify the required count in the Number of AUX Inputs parameter in the Media Player node’s settings.
After setting up the Media Player node to receive these images, navigate back to your matrix-based playlist. Right-click in the grid cell where you wish to add the AUX item and choose Add AUX from the dropdown menu. This will open the Select AUX dialog, where you can choose which AUX media source to insert into the cell.
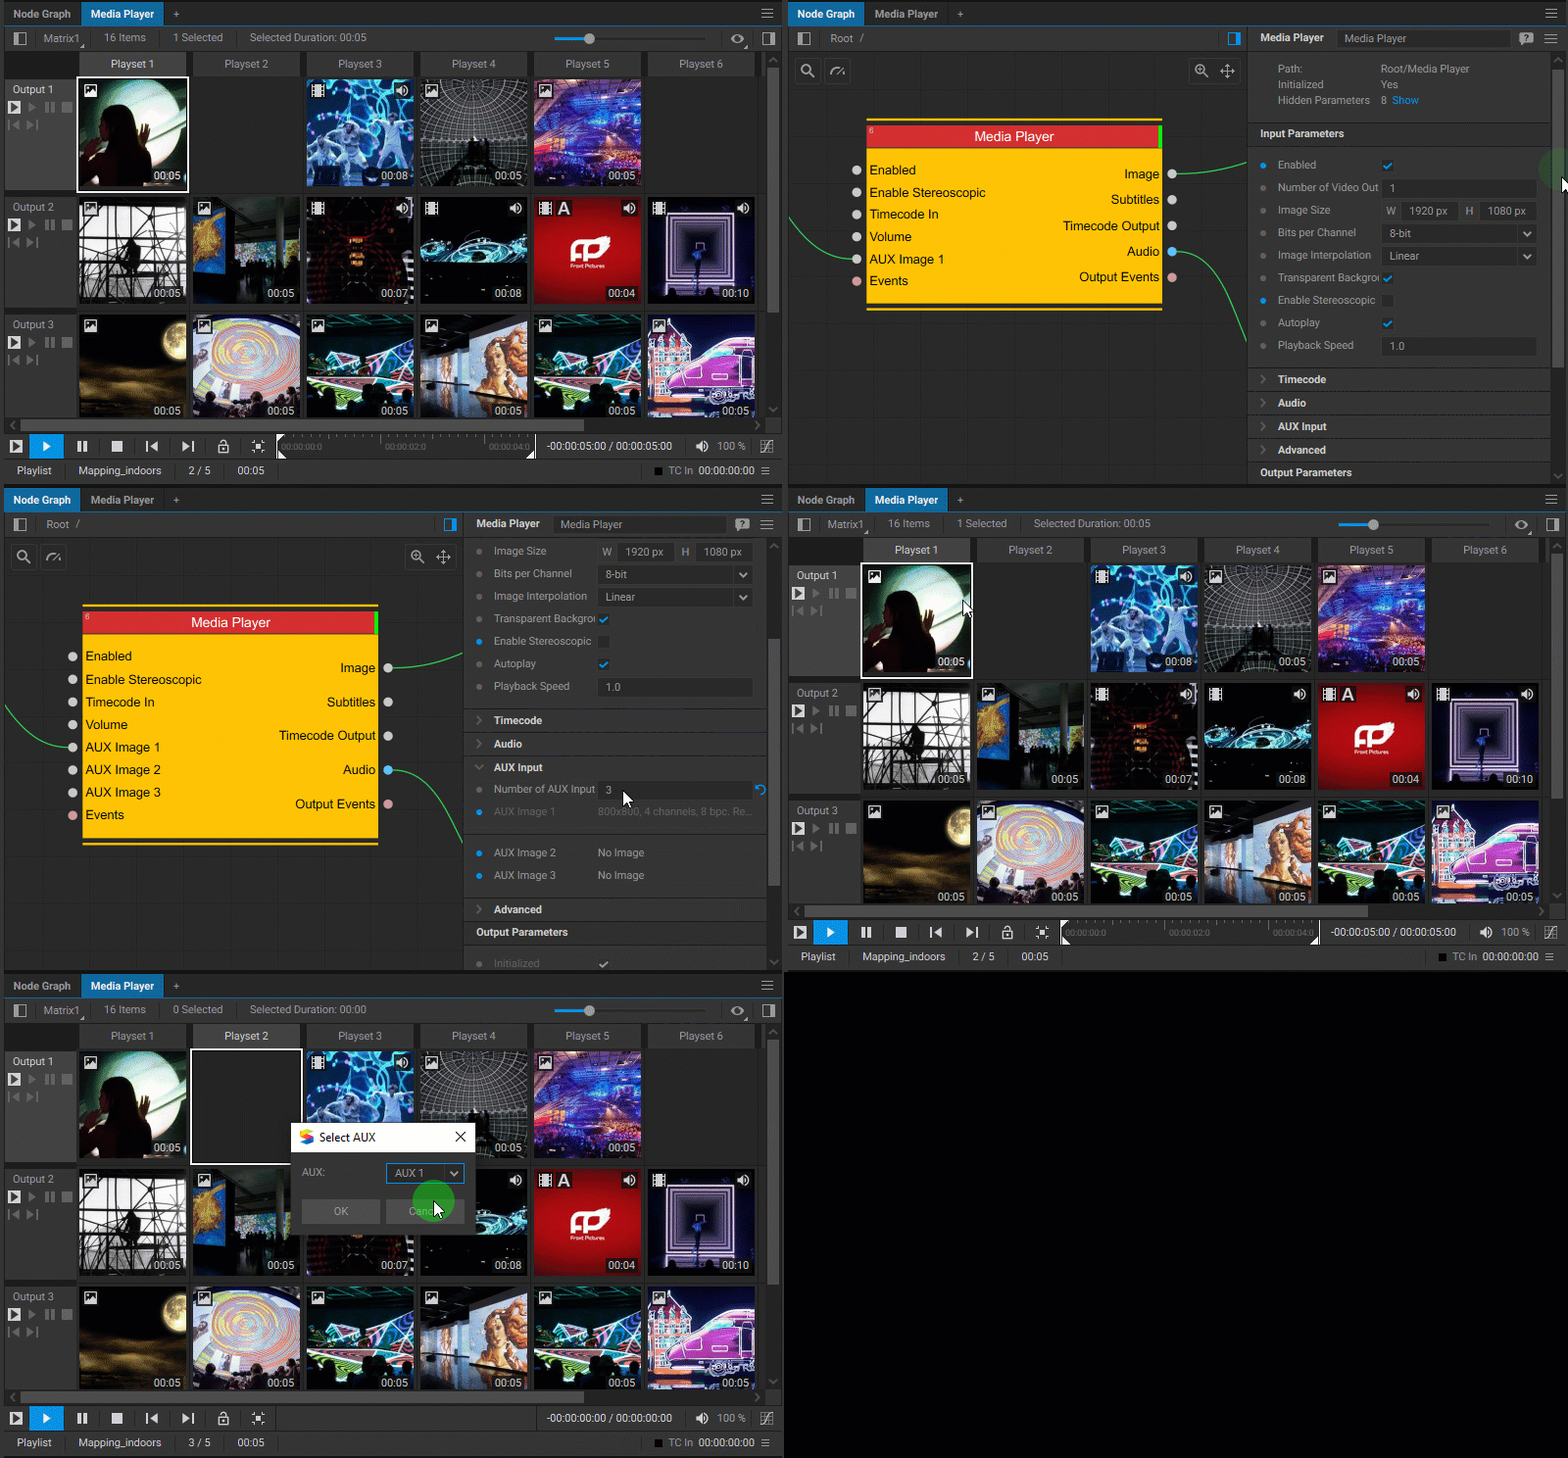
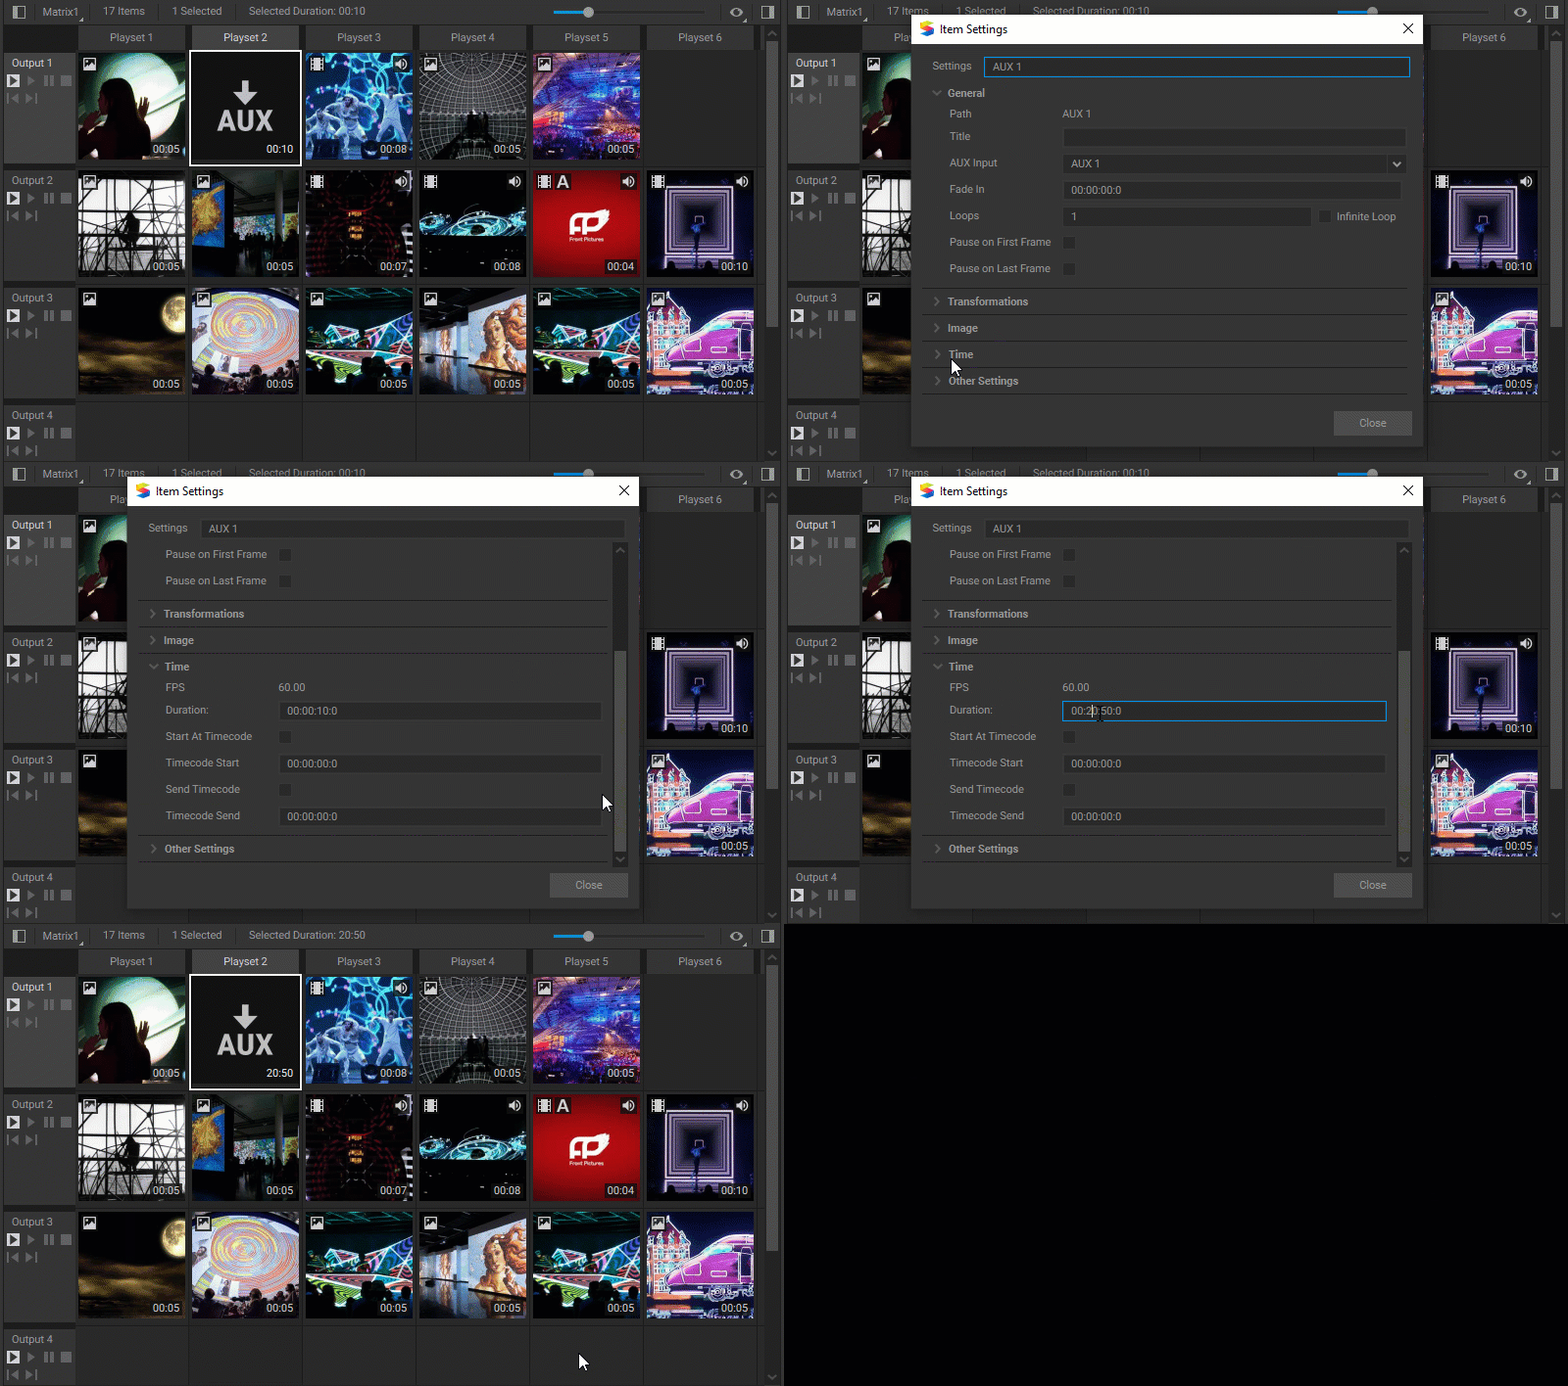
AUX items within the matrix can be customized using the settings panel which appears when the item is selected. One setting you might want to adjust right away is the Duration parameter, which determines the playback length of the inserted image within the playlist.
Adding Data Items
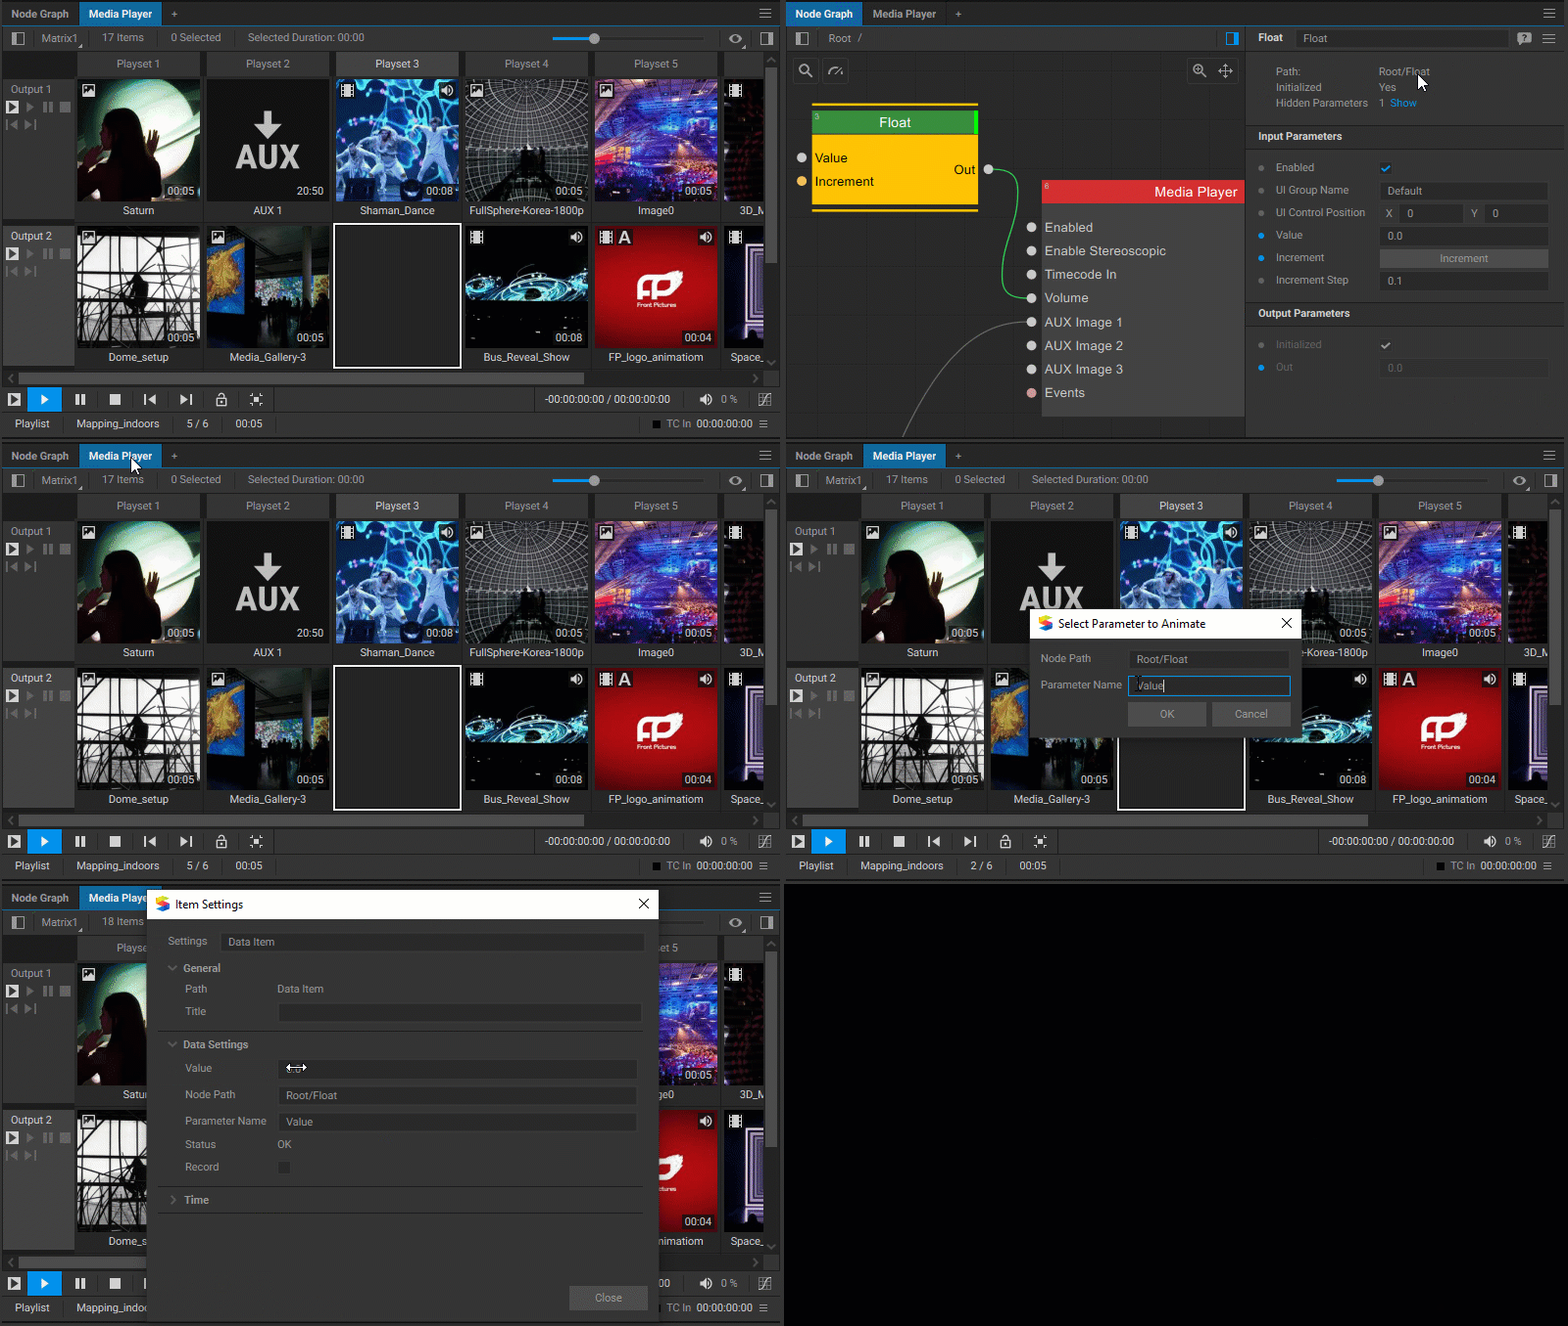
A data item is another type of specialized media item that can be incorporated into the matrix grid. These items provide the functionality to modify any floating-point value parameter of nodes currently active within the node graph and are particularly useful for automation tasks.
To add a data item to the matrix grid, follow these steps:
- Right-click on the grid cell where you want to place the data item.
- Choose Add Data Item from the dropdown menu.
- In the window that appears, enter the Node Path and Parameter Name of the parameter you intend to modify.
- In the settings of the data item, define the value that the parameter will adopt during the playback of this data item in the playlist.
Renaming Media Items
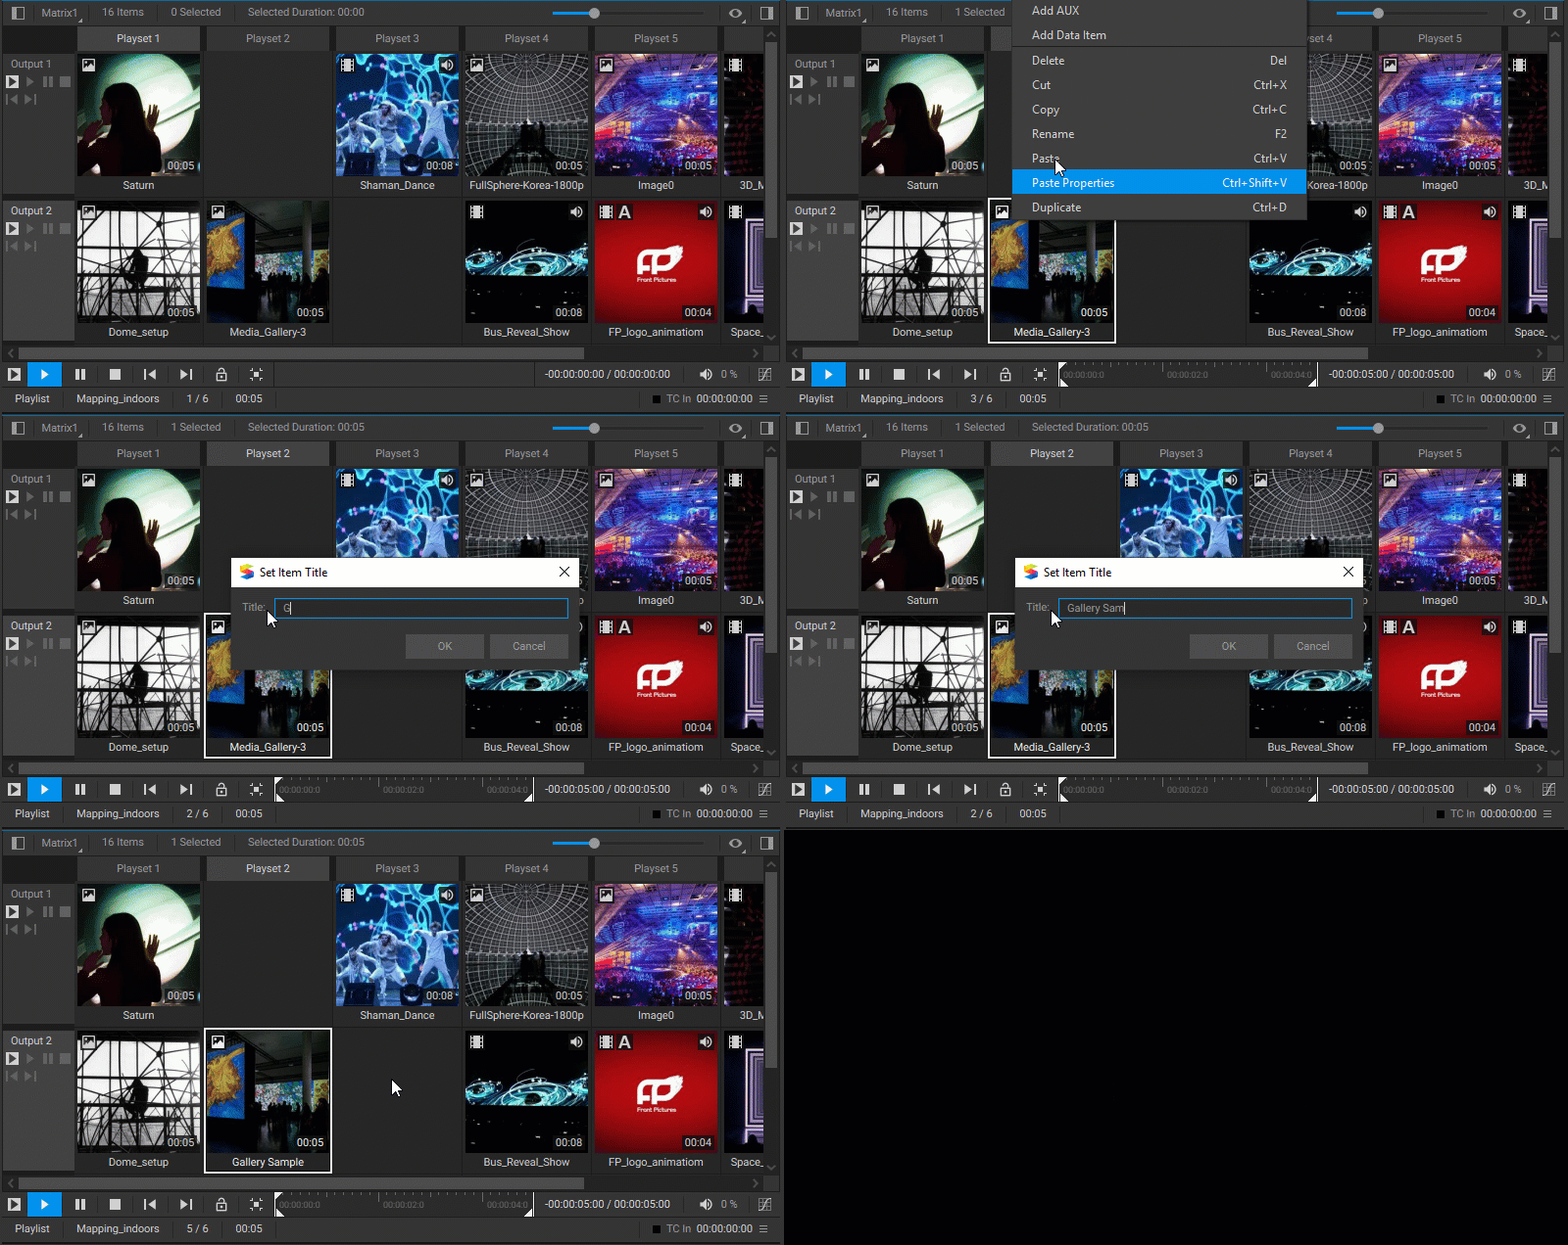
To rename a media item within a playlist, you have the following options:
- Right-click on the media item and select Rename from the dropdown menu (or use the
F2shortcut), then type a new name in the Title field of the opened Set Item Title window. - Alternatively, select the media item to open its settings, and enter a new title in the Title field.
Deleting Media Items
To remove a media item or multiple selected media items from a grid, right-click on the item(s) and choose Delete from the dropdown menu, or press the Del key.
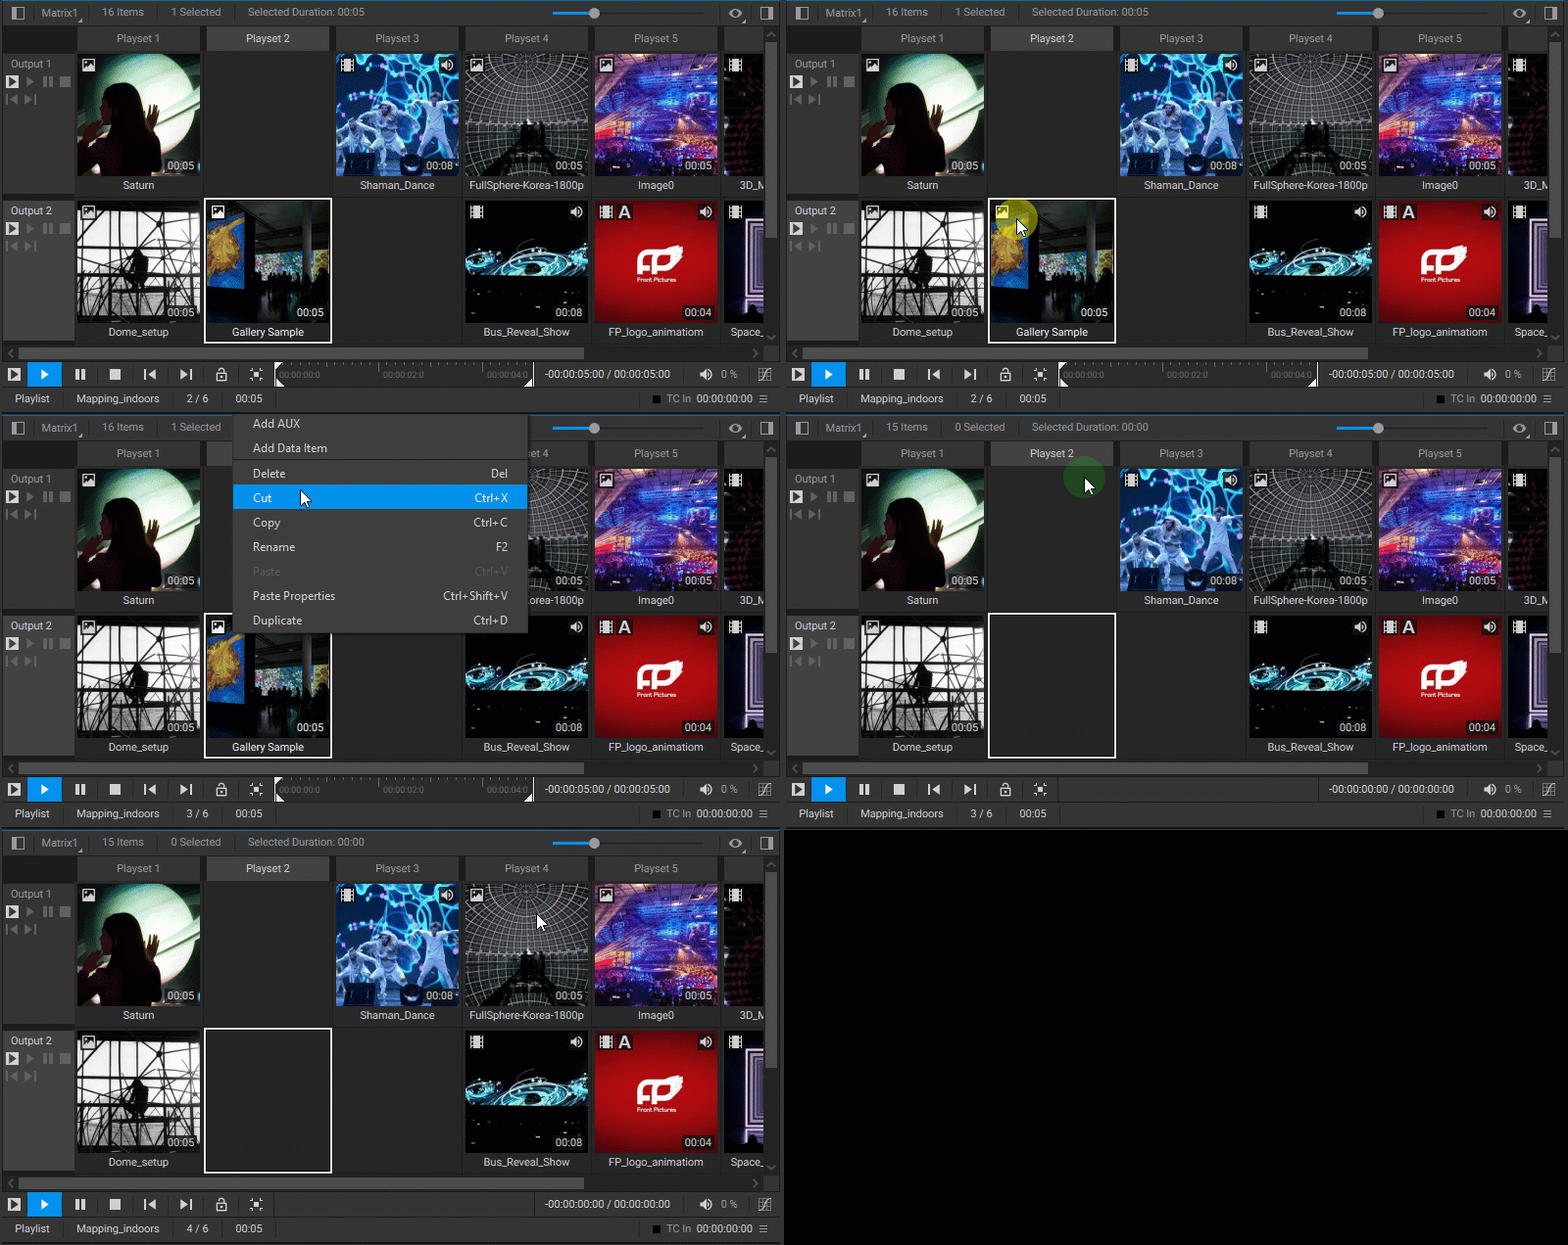
Selecting Media Items
Items in the matrix grid can be selected using any of the following methods:
- Click on a media item to select it.
- Hold
Ctrland click on multiple items for multiple selections. - Select one item, hold
Shift, and click on another to select all items within the rectangular grid area between these items. - Click a column header to select every item in that column.
- Click a row header to select every item in that row.
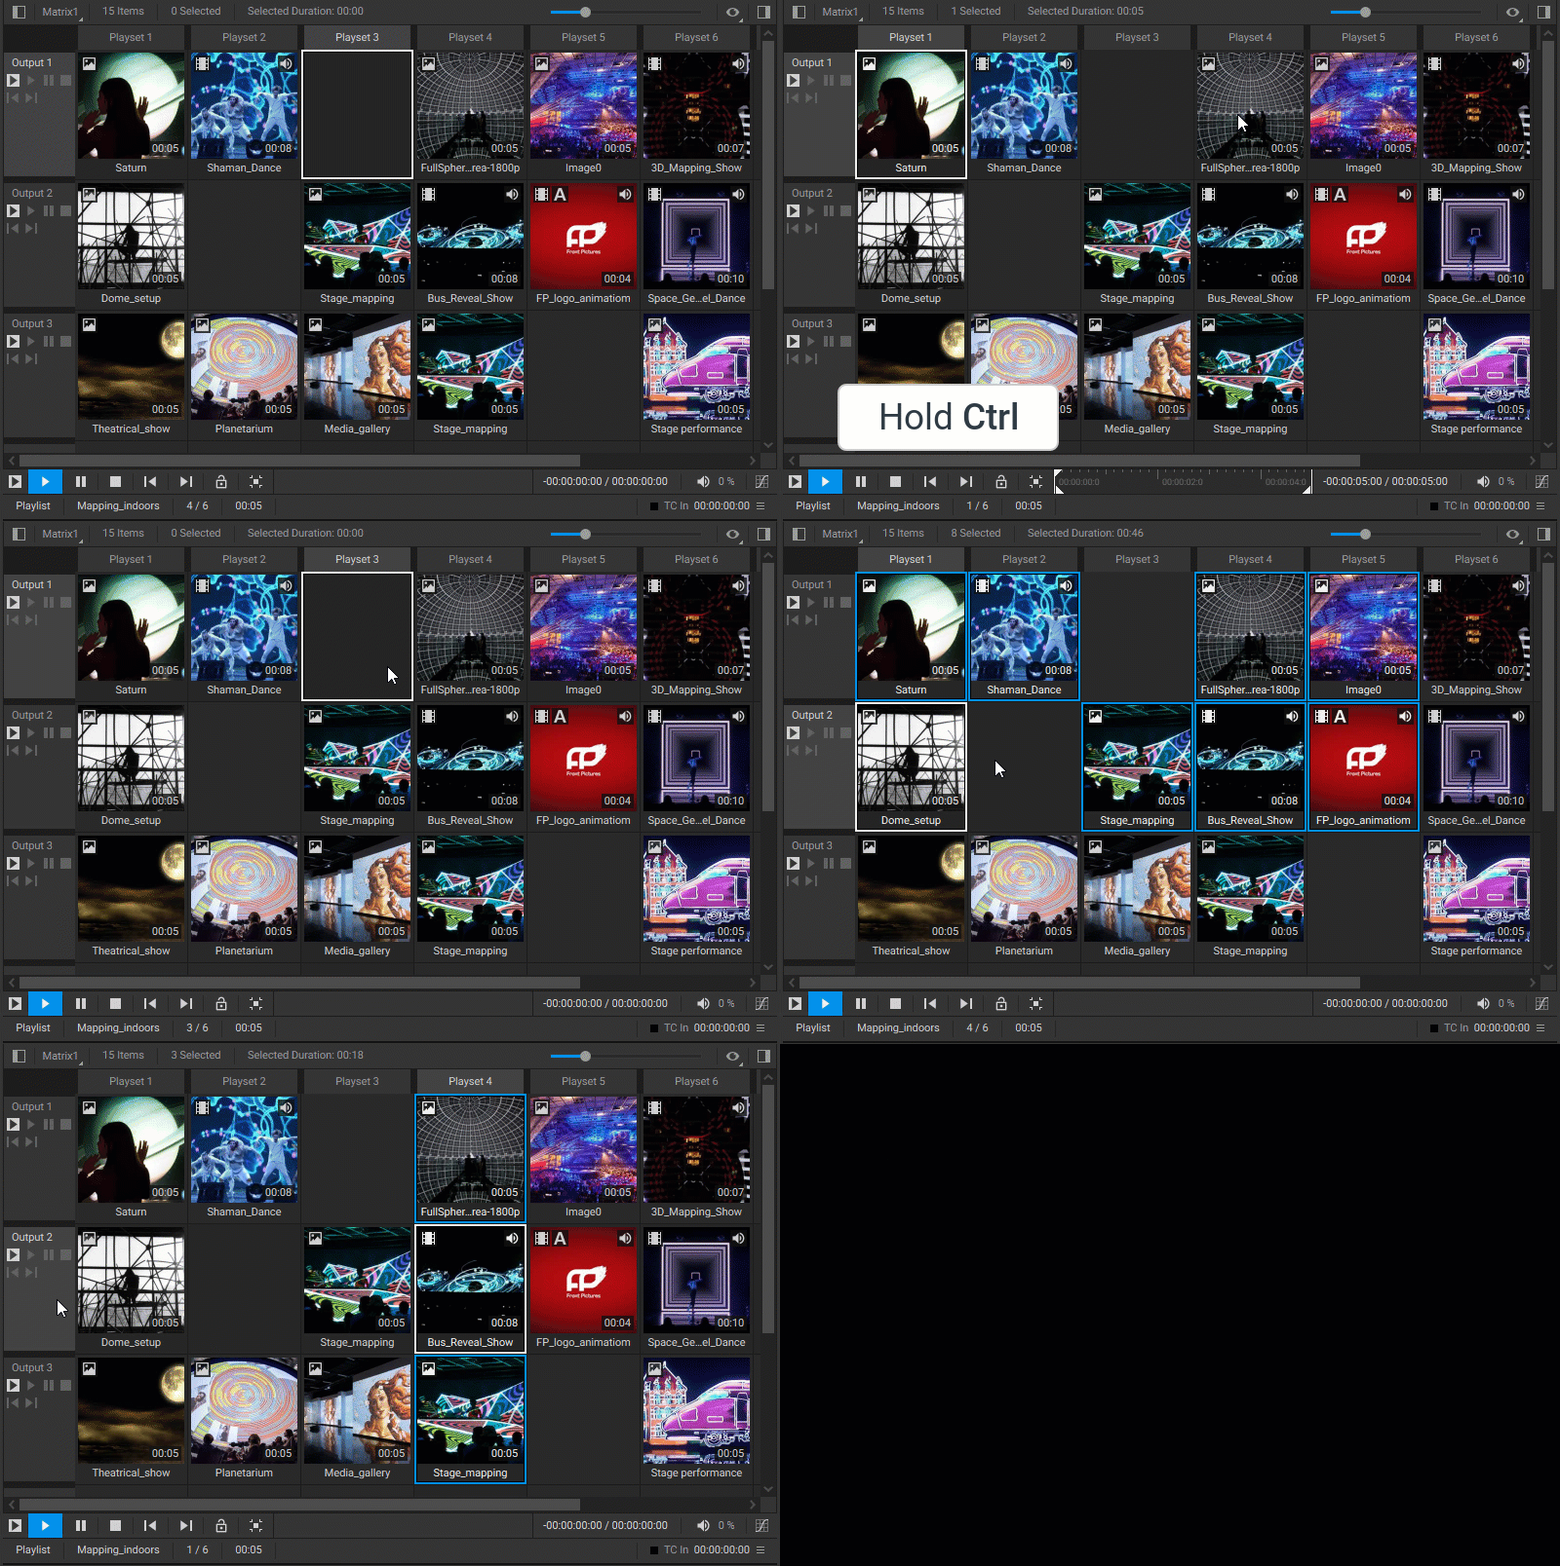
Arranging Media Items within the Matrix Grid
You can arrange media items by selecting one or more items and dragging them to the preferred location in the grid.
When moving multiple items simultaneously, their relative positioning is preserved. As you drag these items, the target cells in the grid are highlighted, indicating where they will be placed upon release. It's crucial to be aware that any existing media items in these cells will be overwritten by the newly placed items.
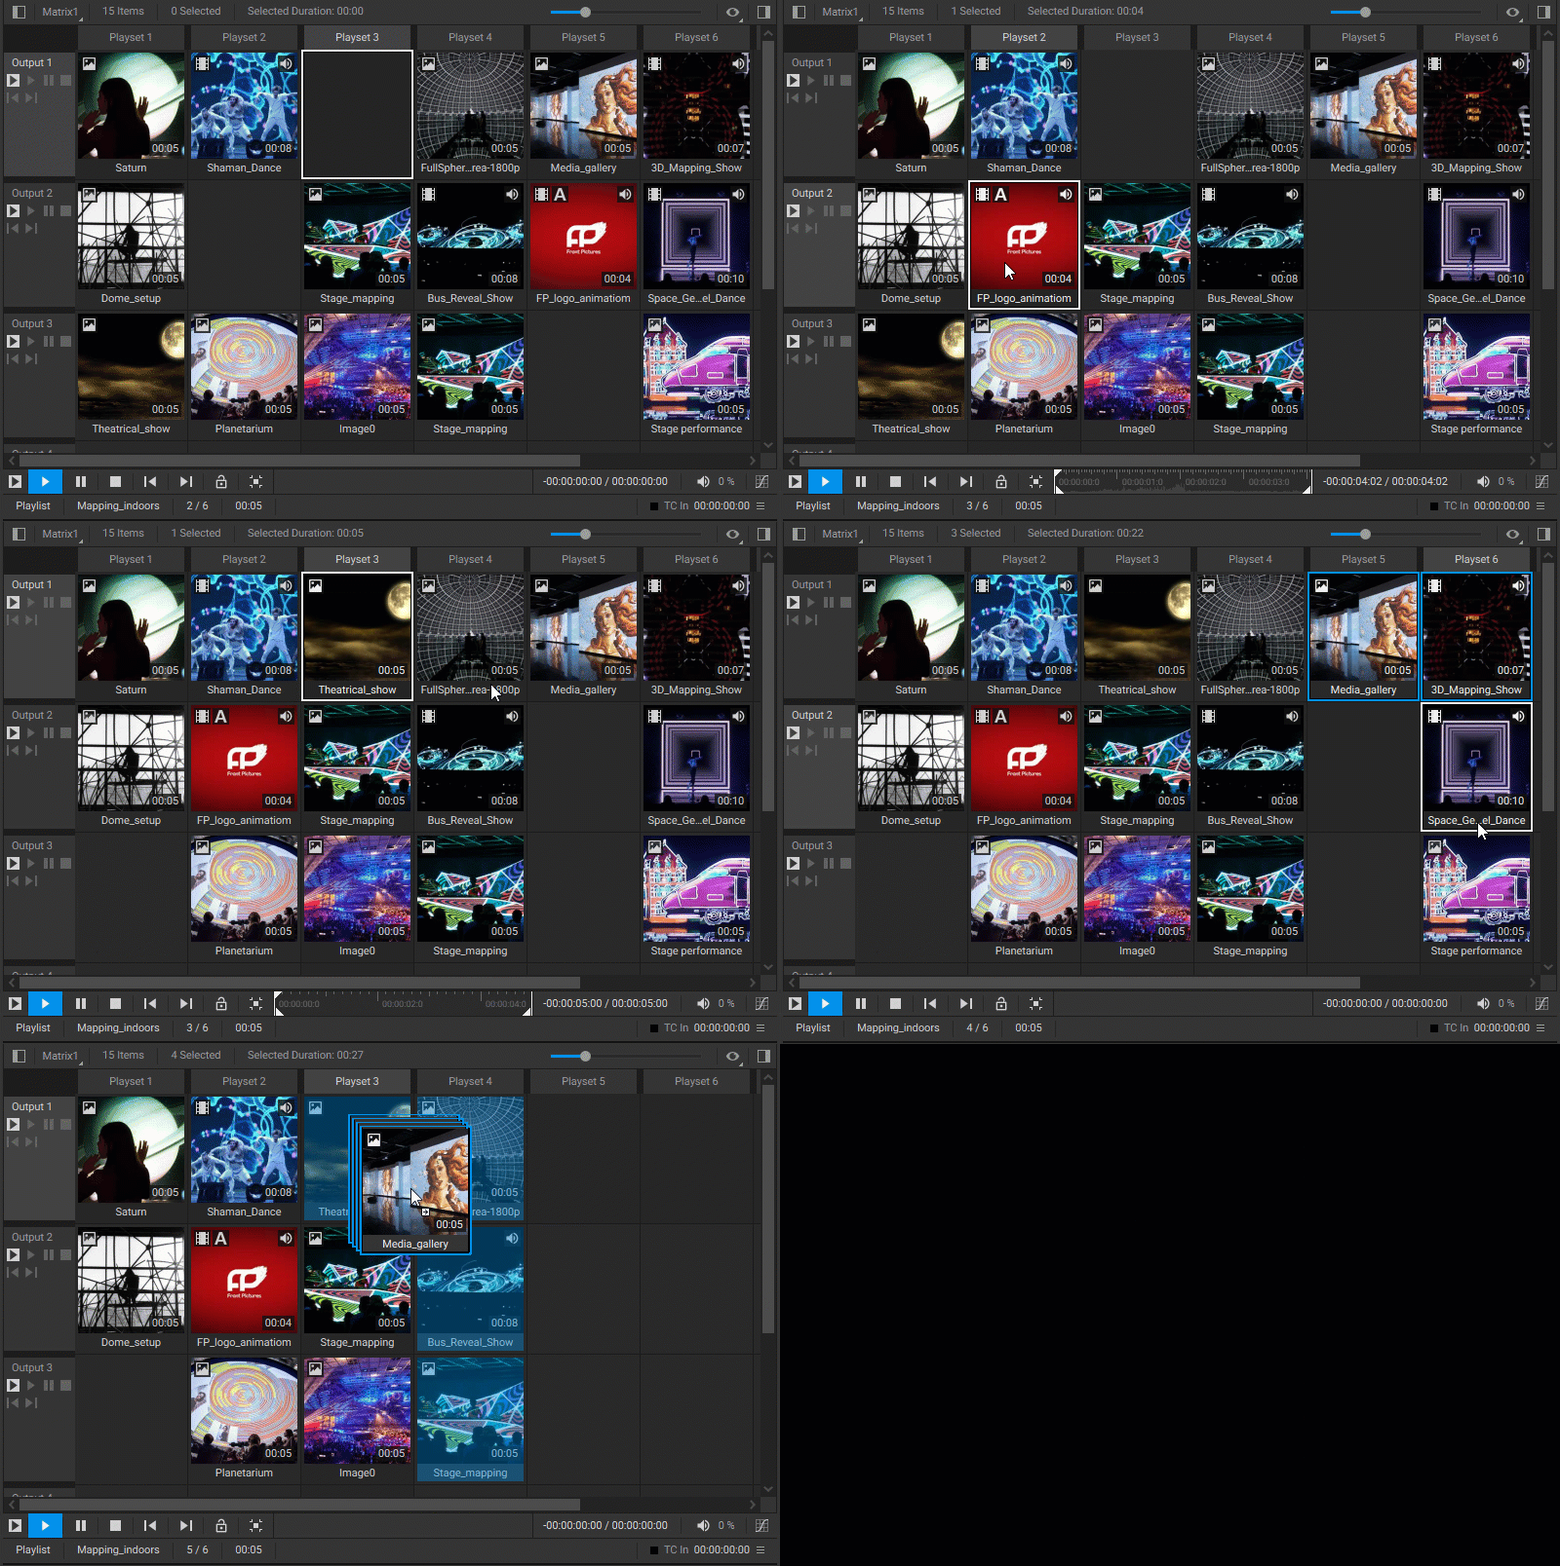
Media Item Settings
Each media item in the Media Player widget is an instance or reference pointing to a source file in the Media Library. It's important to note that modifying a media item's settings in the playlist does not alter the original source file.
To access and adjust the settings for a media item, do one of the following:
- Either right-click on the item within the matrix grid and choose Item Settings from the dropdown menu, or with the media item selected, press
Sto open the Settings dialog. - Alternatively, select the media item to have its settings displayed in the Settings Panel.
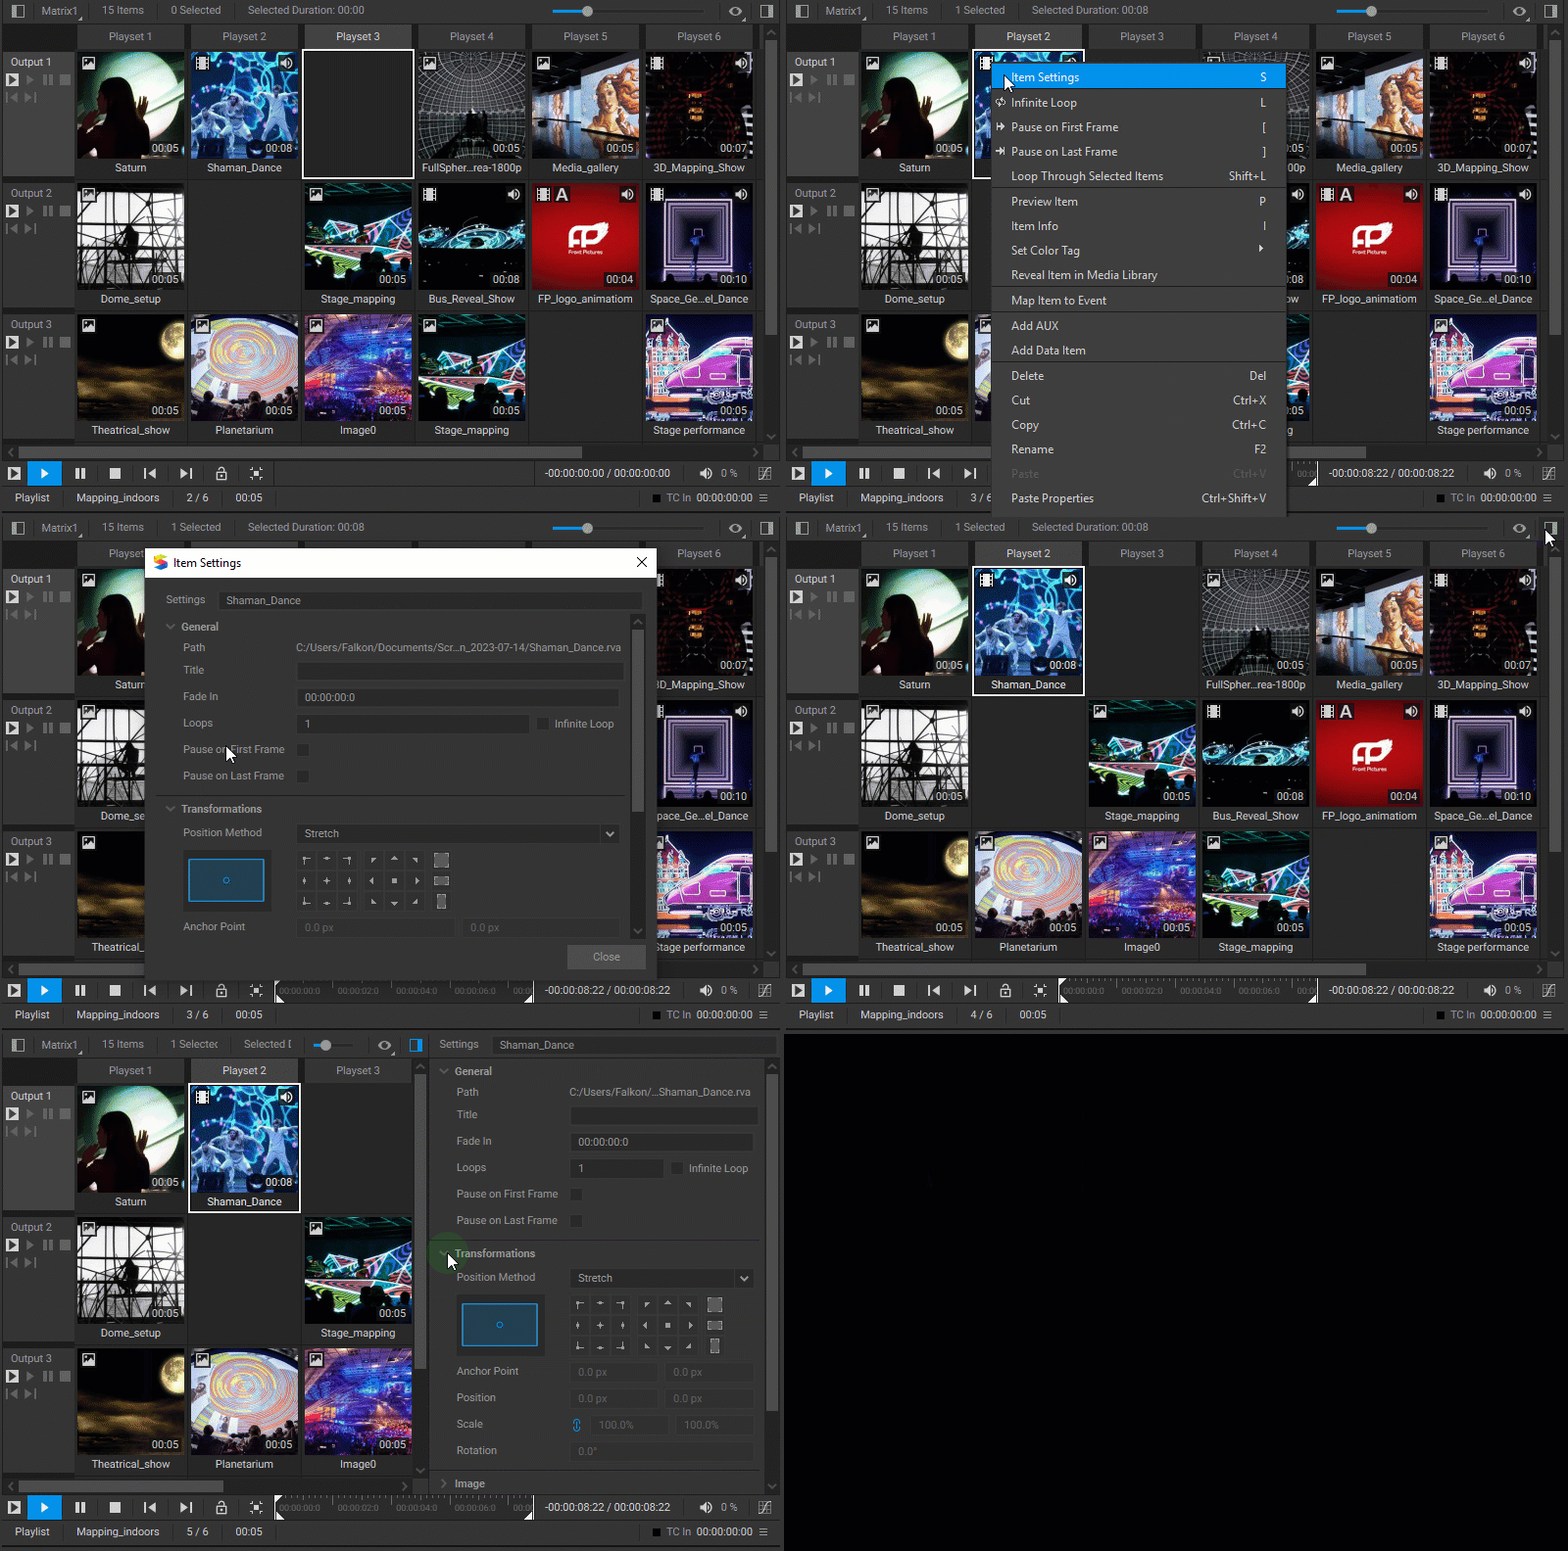
The settings available for media items in matrix-based playlists are consistent with those in simple playlists. For a comprehensive overview of all the available settings options, please refer to the Media Item Properties section.
Customizing Thumbnail Appearance
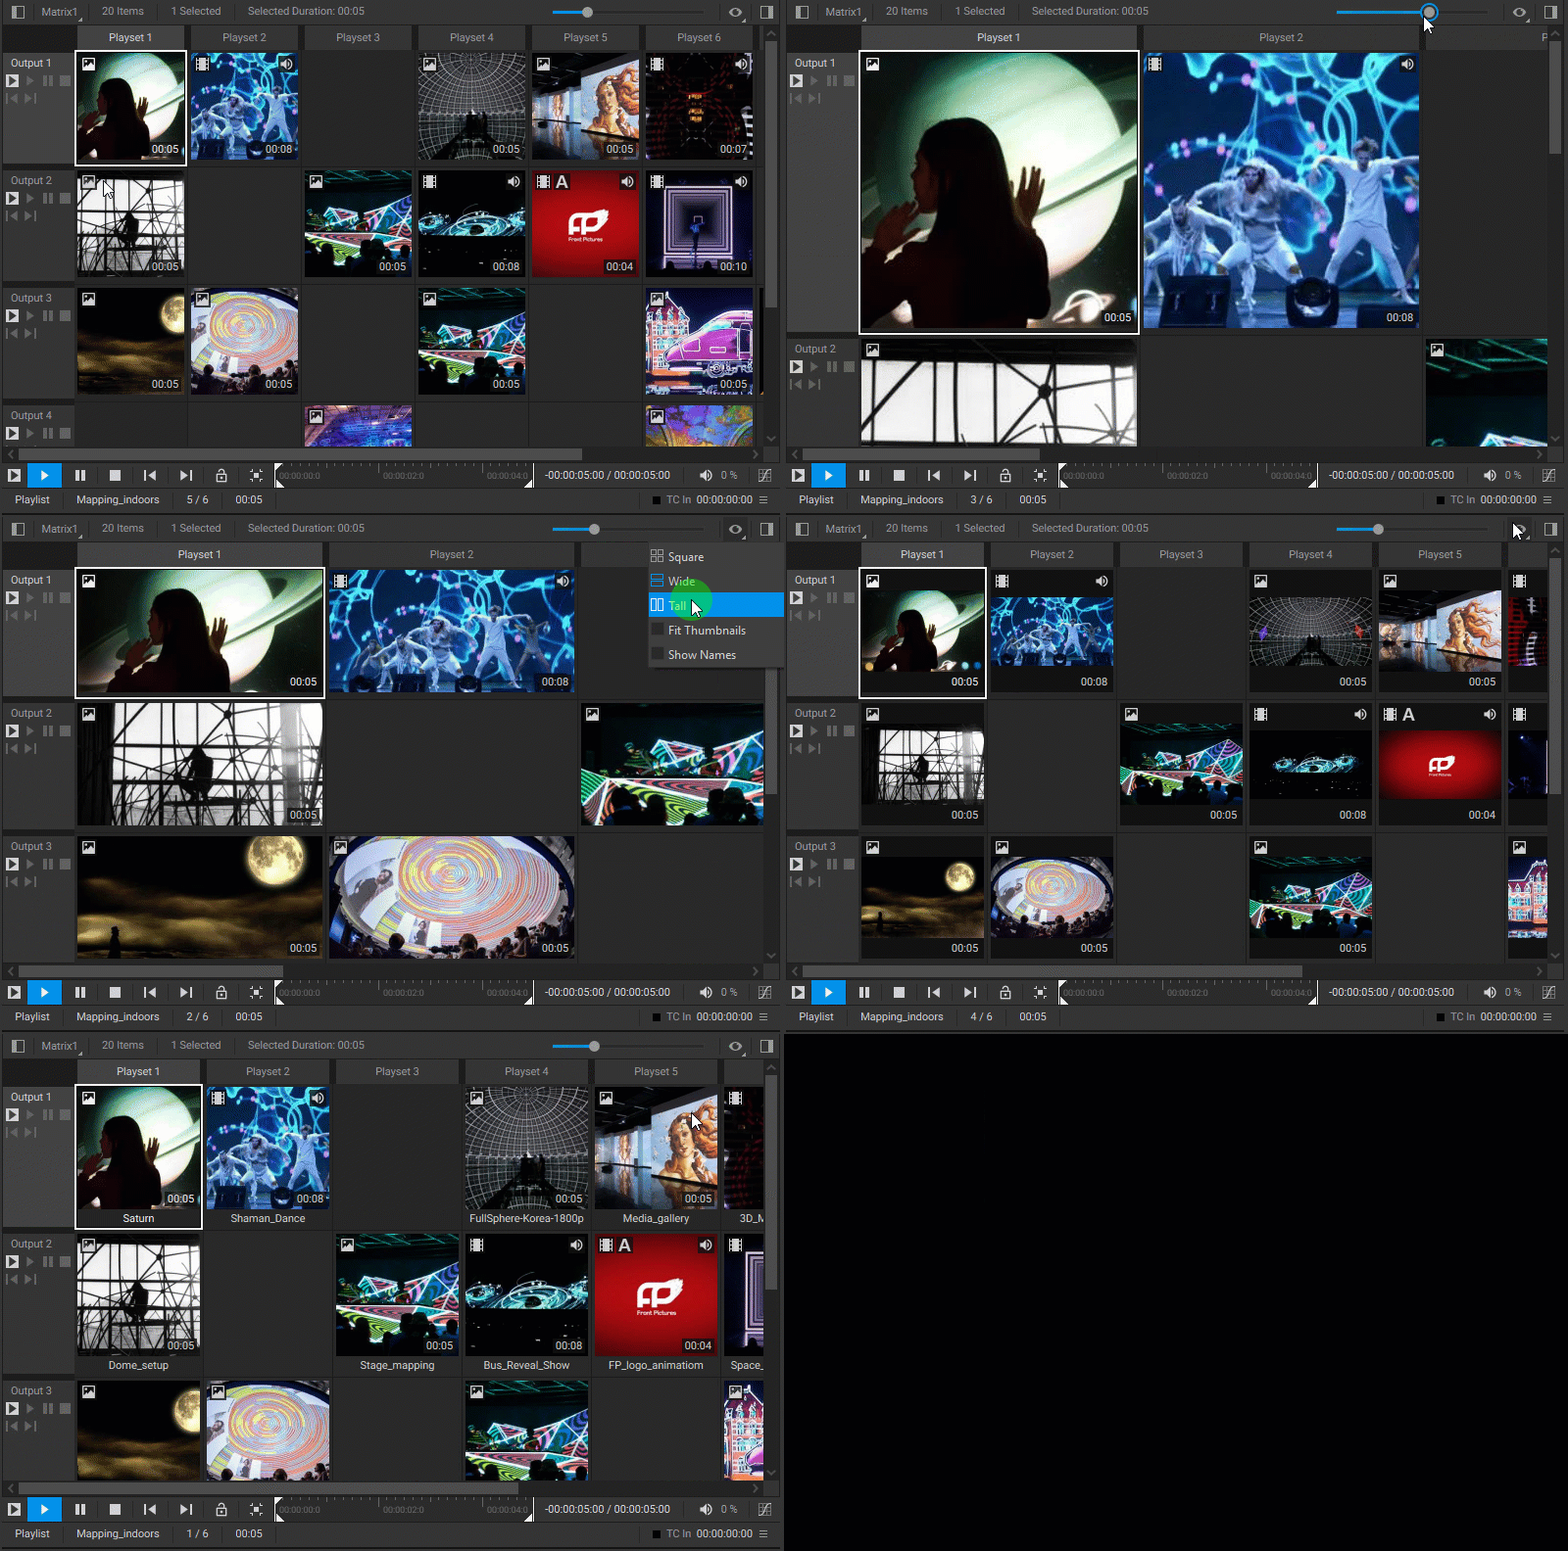
You can adjust thumbnail sizes and display settings to suit your visual preferences and playlist presentation requirements.
Resizing Thumbnails:
To change the size of thumbnails, use the slider located in the playlist's top-right section. Drag it to increase or decrease the thumbnails' dimensions.
Thumbnail View Customization:
Access additional thumbnail display settings by clicking the eye icon ![]() , which opens the options menu. Within this menu, you can configure the following:
, which opens the options menu. Within this menu, you can configure the following:
Orientation: Choose a suitable aspect ratio for your thumbnails:
- Square
 : Sets a 1 x 1 ratio, the default setting.
 - Wide
 : Adjusts the view to a 2 x 1 ratio, accommodating landscape-oriented media.
 - Tall
 : Changes the view to a 1 x 2 ratio, suitable for portrait-oriented media.
Fit Method: Determine how thumbnails will fit within their frames:
- With Fit Thumbnails selected, thumbnails are cropped to fill the frame by the shorter dimension, providing a consistent, centered look.
- Uncheck Fit Thumbnails to scale images to fit the frame by the longer dimension, allowing the full image to be displayed without cropping.
Title Visibility:
- Uncheck Show Names to hide the titles for a cleaner view with a focus on the visual content.
- Keep Show Names checked to maintain title visibility, ensuring efficient navigation and media item identification.
These settings provide you with the flexibility to set up the media item thumbnails according to the specific requirements of your project.
