Organizing Media in Timelines
Adding Tracks
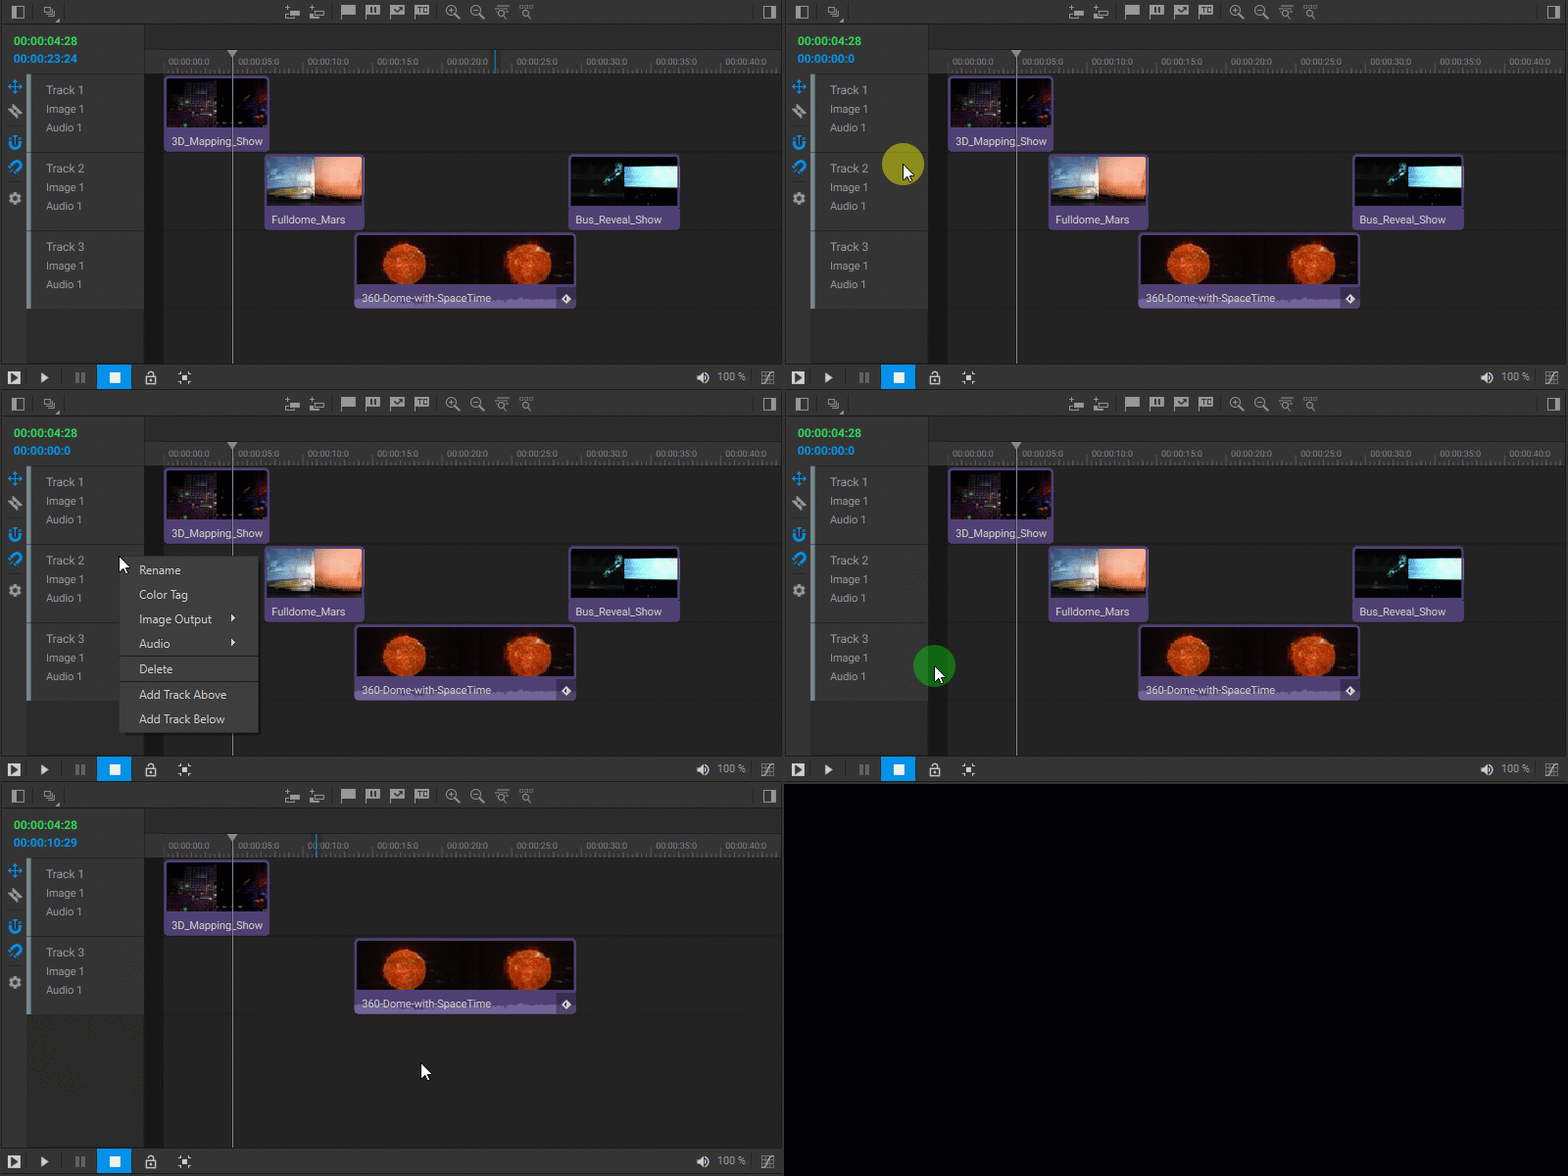
To add a new track to the timeline, do one of the following:
- Select an existing track and click either the Add Track Above
 or the Add Track Below
  buttons located in the top toolbar.
 - Right-click on the track header and select either the Add Track Above or the Add Track Below options from the dropdown menu.
- Drag and drop media items from the Media Library, a playlist, or another timeline onto the timeline tracks area. When you drop media items onto an empty area of the timeline tracks, additional timeline tracks will be created automatically to accommodate their placement.
- Copy and paste media items from the Media Library, a playlist, or another timeline. When you paste media items onto a timeline, you must specify the target track by clicking on the track header. Media items will be pasted at the current playhead position on the track, and additional timeline tracks will be created to accommodate them if needed.
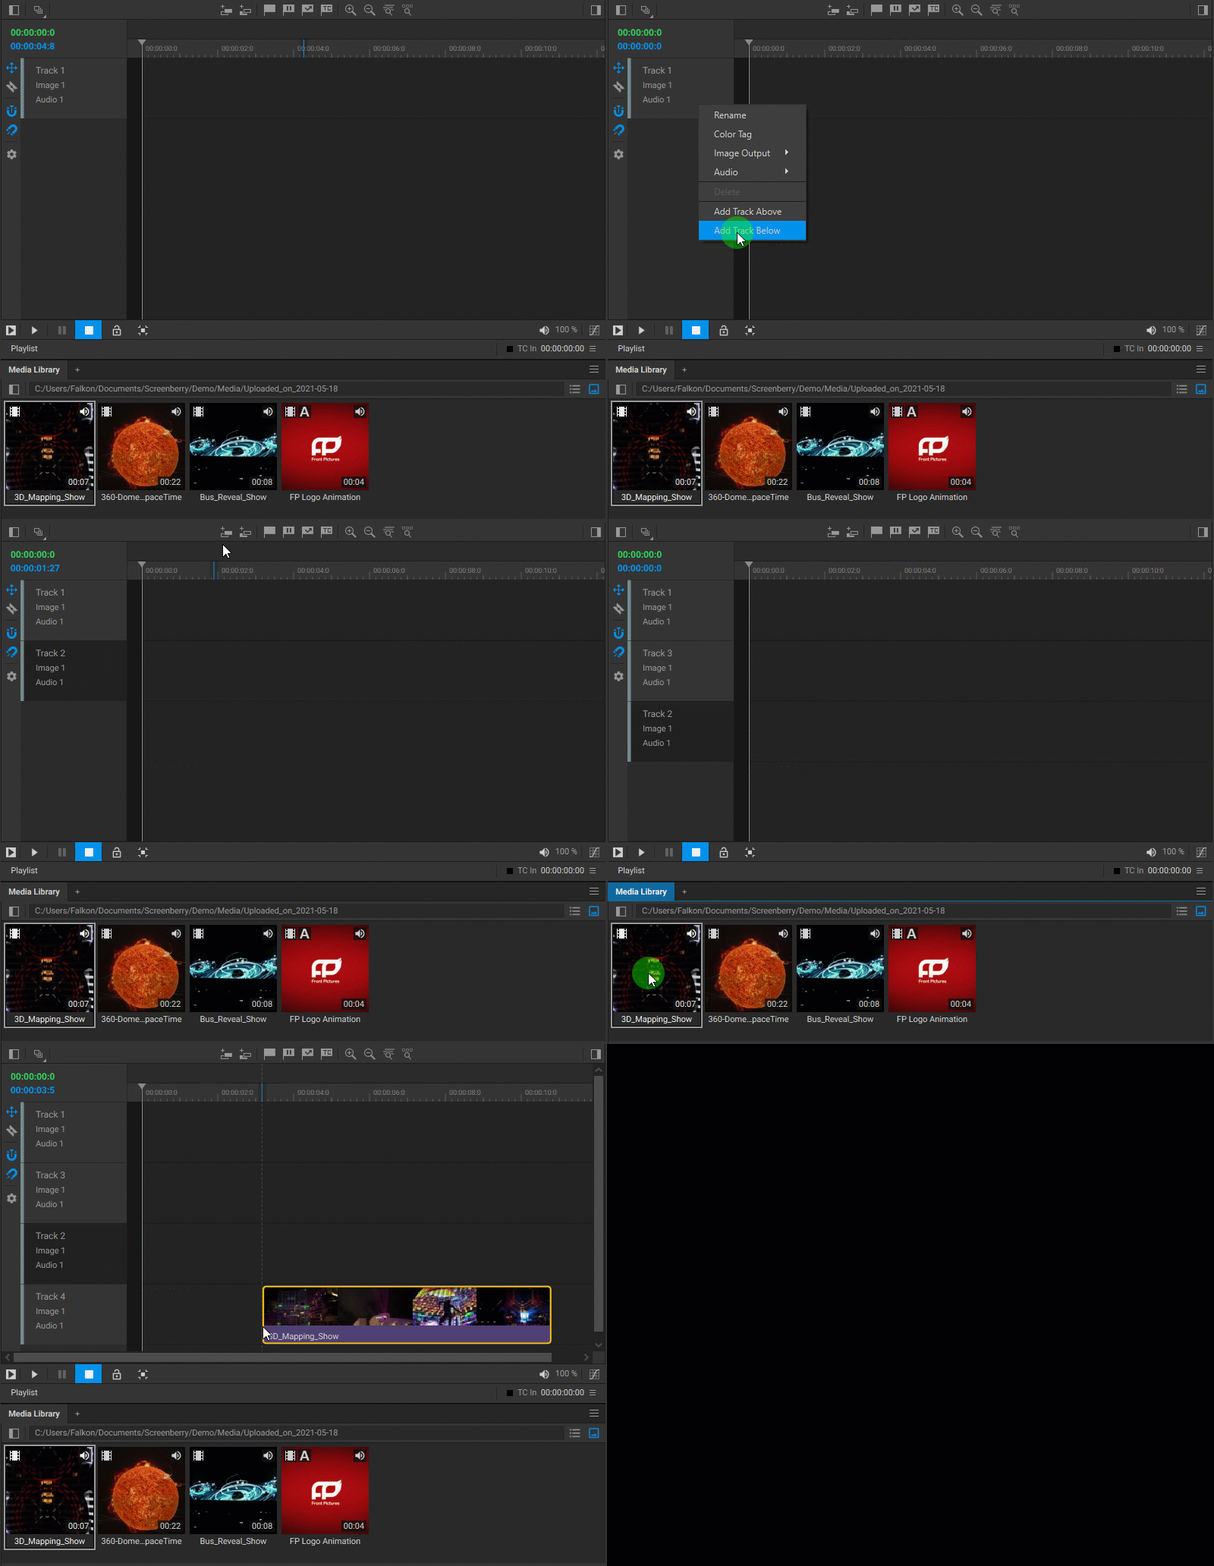
Note: The tracks in the timeline are stacked from bottom to top, meaning that higher tracks will overlay lower ones.
Renaming Tracks
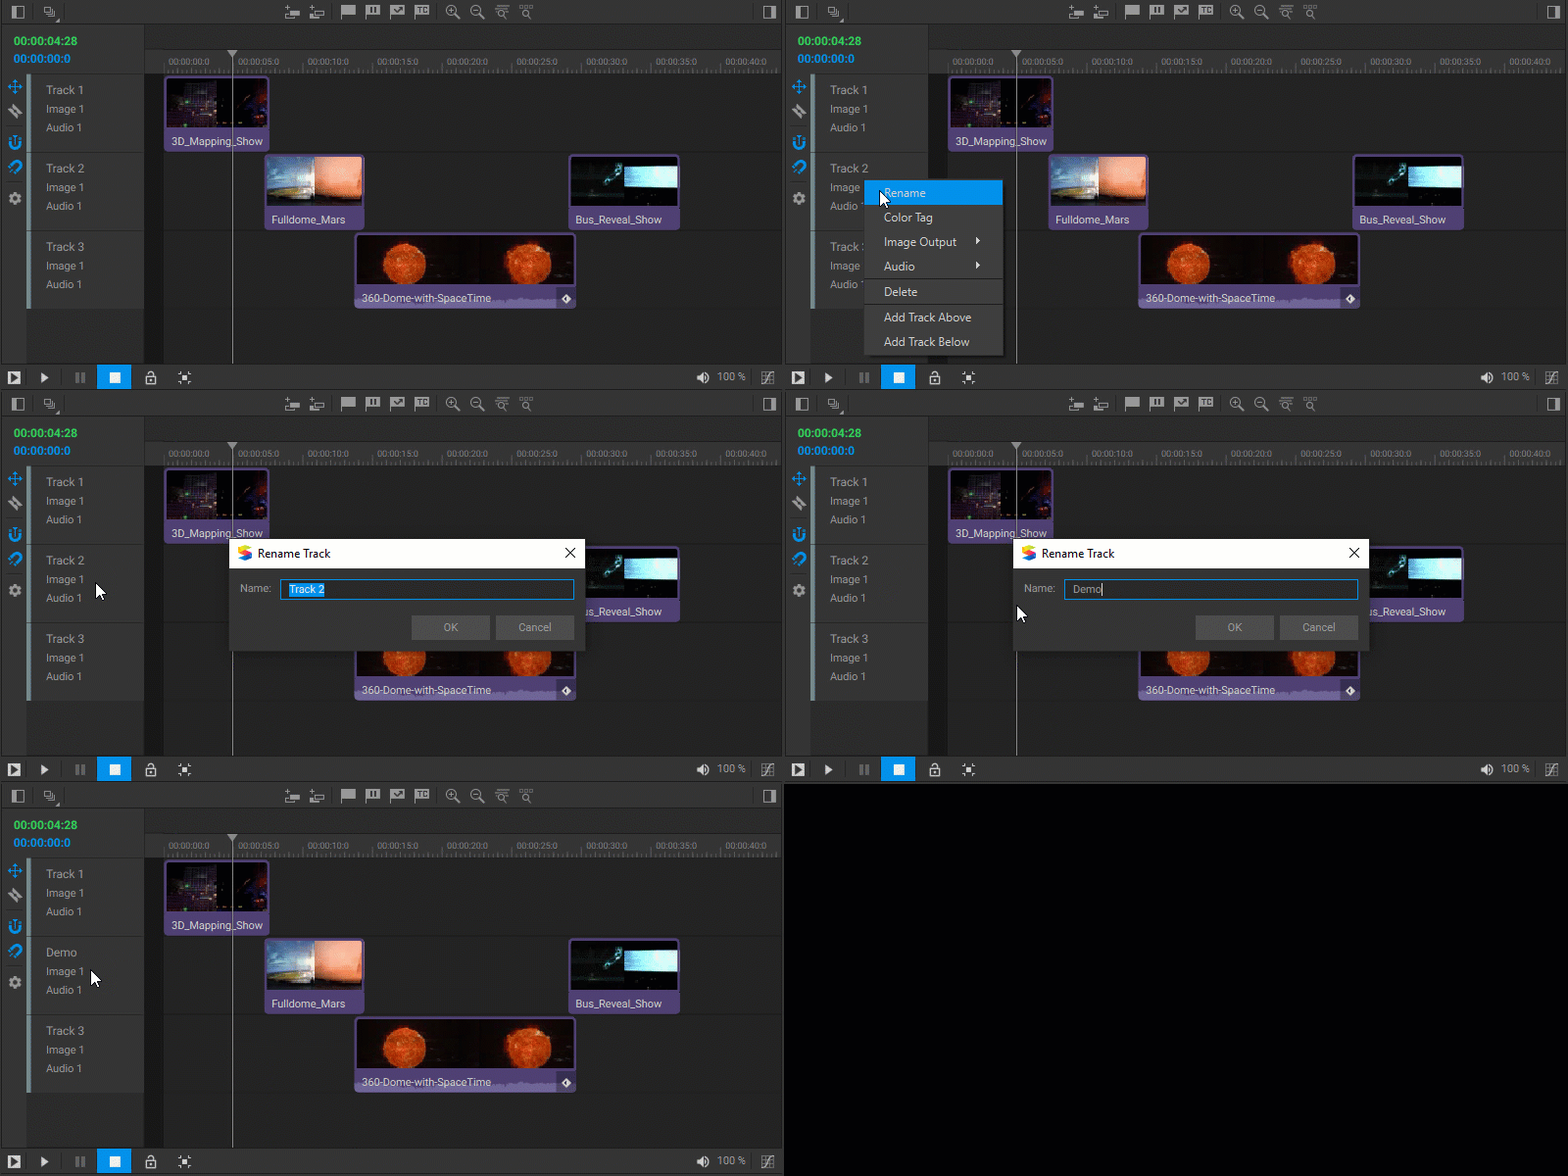
To rename a timeline track, right-click on its header, select Rename from the dropdown menu, and enter a new name for the track in the opened dialog window.
Deleting Tracks
To remove a timeline track, right-click on its header and select Delete from the dropdown menu.
Tracks Color Coding
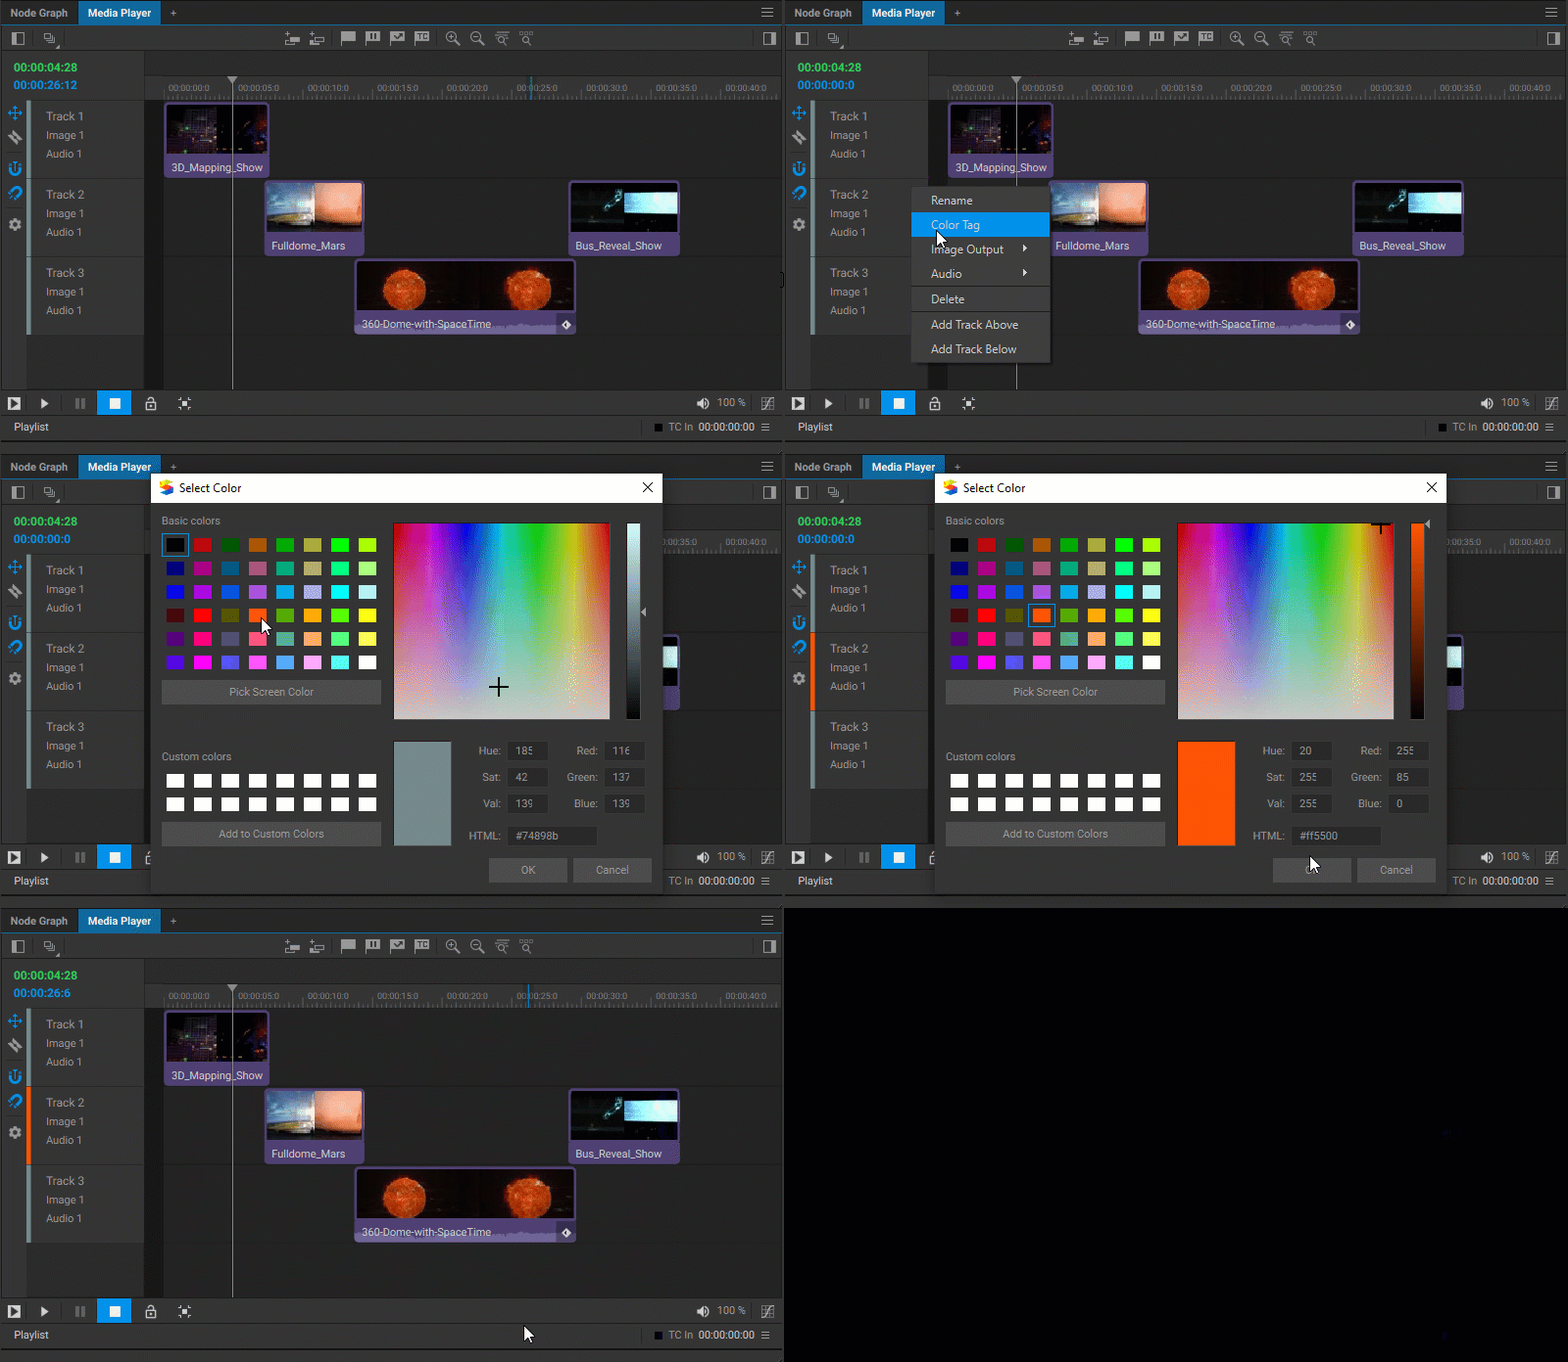
To apply a color label to a timeline track, right-click on its header, select Color Tag from the dropdown menu, then choose a color from the color picker window that appears. The selected color will then be applied to the color label line on the track’s header.
Adding Media Items to Timeline Tracks
To place media items onto a timeline track, do one of the following:
- Drag media items from the Media Library, another Media Player playlist, or a timeline to the timeline tracks.
- Select media items in the Media Library, another Media Player playlist, or a timeline, then copy them by either right-clicking and selecting Copy from the dropdown menu or using the
Ctrl+Ckeyboard shortcut. Next, select the target track on a timeline, and use Paste (Ctrl+V) from the dropdown menu to place media items onto the timeline track. The media items will be pasted to the selected track at the current playhead position. - Drag and drop media files directly from a system folder, or use the Copy (
Ctrl+C) and Paste (Ctrl+V) commands. This action opens the Add Media File(s) dialog window, where you can choose the preferred conversion quality for the media items. Options include:- MPEG-2 Max Quality 4:2:2 corresponds to the MPEG-2 video format, encoded at the highest quality. This is the default encoding option that preserves a higher level of quality. In most cases, it provides optimal quality and performance. However, if you encounter playback issues or visual artifacts in certain media items, consider re-encoding them using MPEG-2 Good Quality encoding.
- MPEG-2 Good Quality 4:2:2 provides a high bitrate but does have certain bitrate restrictions to ensure smooth video playback, regardless of the image’s visual complexity.
- MPEG-2 Optimal Quality 4:2:0 is a more suitable option for managing videos of exceptionally high resolution. It employs stricter bitrate limitations.
- Uncompressed Targa Sequence represents lossless RLE compression. Since the files remain uncompressed, they require significant storage space and high-speed disk reading capabilities for optimal playback performance.
- Original file(s) preserves the format of the original file. Additionally, during the conversion, a low-resolution video preview is generated, and the audio content is extracted separately. The playback of media items may not be optimal, depending on their original format. This format is also used for NotchLC and HAP playback.
- CineForm (High) refers to the CineForm codec designed to offer both high image quality and performance. It provides high-resolution, high-dynamic-range, and high-frame-rate media items that also demand substantial storage space.
- CineForm (High, 12-bit) similarly refers to the CineForm codec, with the only difference being that this encoding is designed to handle videos of higher bit depth, specifically 10- and 12-bit videos.
- You can also choose to adjust the image dimensions of the media items if necessary before clicking the Add button to initiate the upload process and complete the addition of the media files to the timeline track.
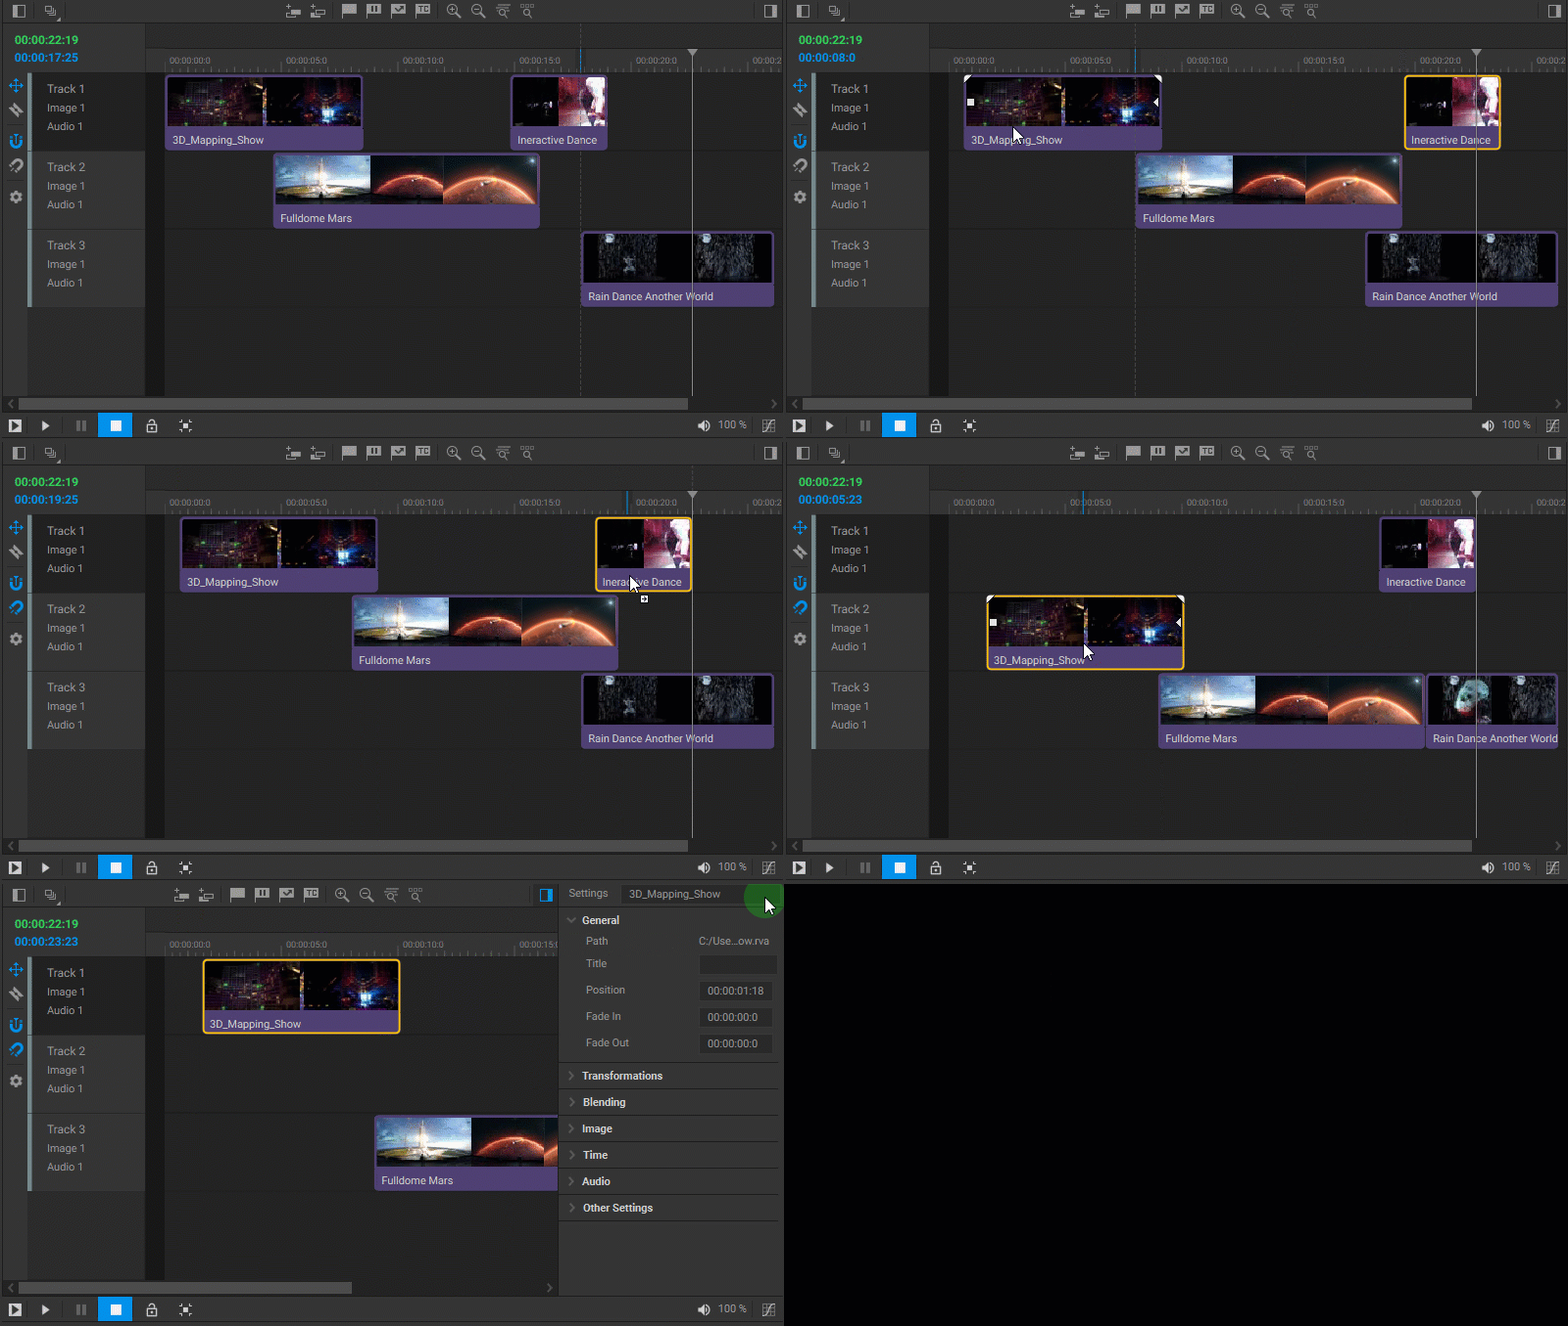
Whenever media items are dragged onto or rearranged within a timeline track, overwrite editing is employed. This means that sections of existing media items on the track will be overwritten if newly placed media items overlap with them.
Note: When media items are added to timelines directly from a system folder, the corresponding media files are uploaded to the Media Library folder and labeled Uploaded_on_YYYY-MM-DD.
Adding External Image Sources as AUX Media Items
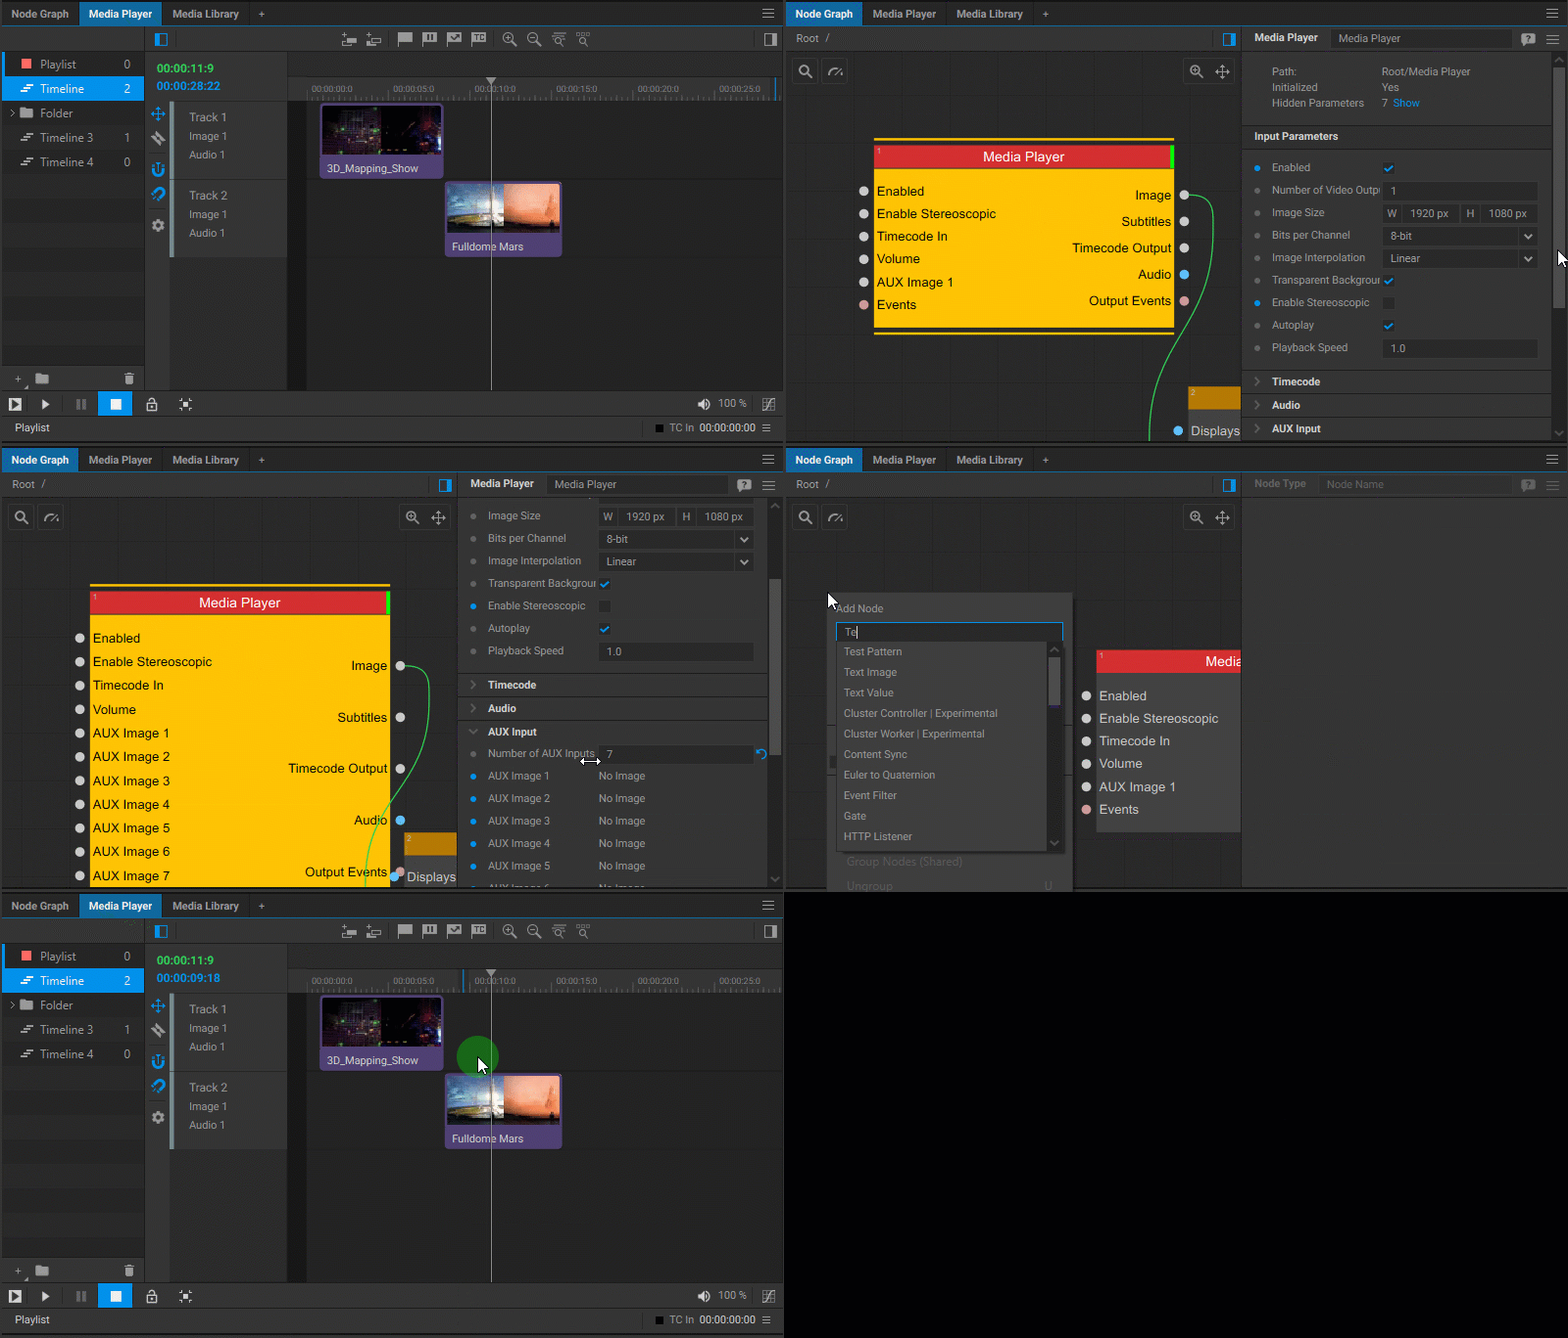
The Media Player is capable of receiving external image sources, which can be placed on the timeline track as specialized AUX items. To enable the reception of such inputs by the Media Player, you need to connect the image output parameter from the relevant image-generating node to the AUX Image [N] input parameter of the Media Player node in the node graph.
To set up more than one external image input, simply specify the desired number in the Number of AUX Inputs parameter field in the Settings panel of the Media Player node. This will add additional AUX Image input parameter pins to the Media Player node.
Once you have configured the Media Player to receive external image sources, navigate to the timeline panel and click on the header of the desired timeline track where you want the AUX item to be placed. Then, right-click on the track to open a dropdown menu and select the Add AUX option. A window will appear where you can choose the desired AUX media source from a dropdown list.
All the settings and transformations that are applicable to any media item on the timeline track are also applicable to AUX items. Typically, after placing an AUX media item, you may want to adjust its duration to specify how long the external image source should play back on the timeline track.
Adding a Data Item
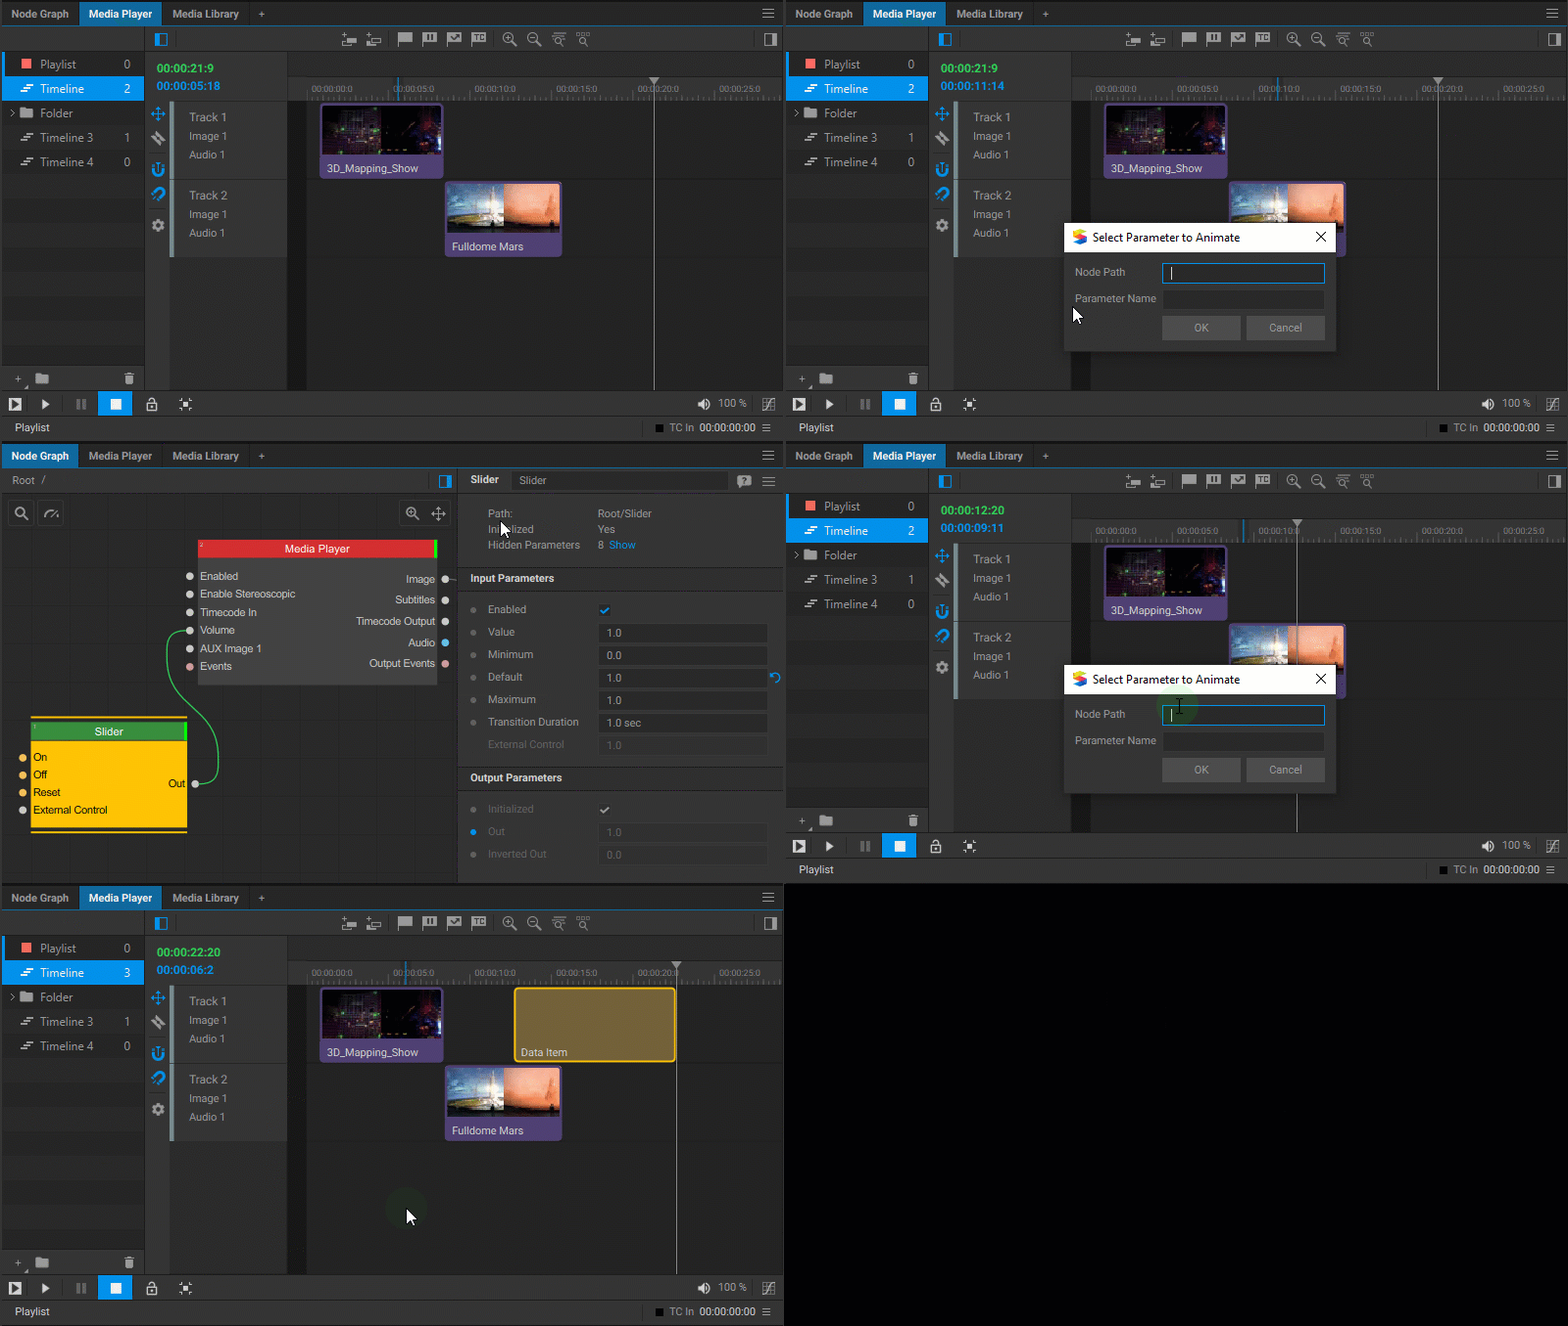
Another type of specialized media item that can be placed on the timeline track is a Data Item. This type of media item allows you to animate any floating-point value parameter of a node that has been added to the node graph.
To add a Data Item to a timeline track, select the desired track by clicking on its header. Then, right-click on the track to open a dropdown menu and select Add Data Item. In the window that appears, enter the Node Path and Parameter Name of the value parameter that you want to animate.
For more information on Data Items, refer to the section that describes working with keyframes, as they are essential for describing this feature.
Deleting Media Items
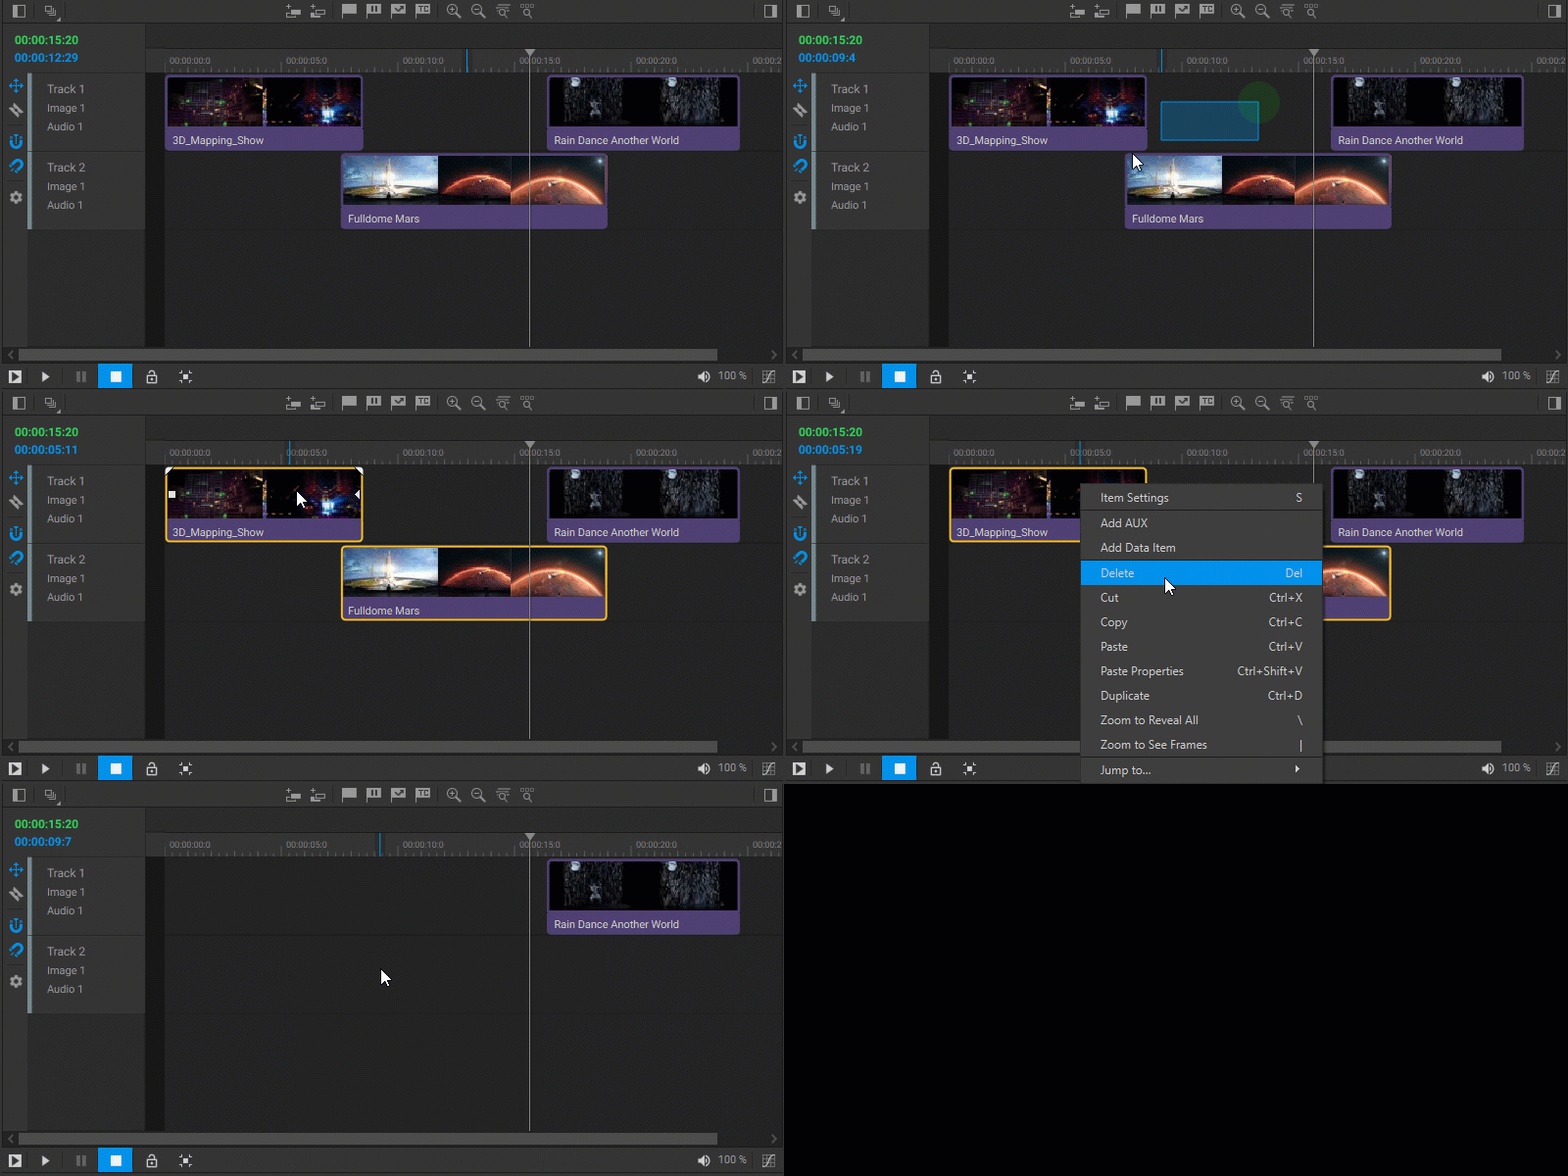
To remove a single or multiple media items from a timeline, right-click on the media item or group of selected media items and choose Delete from the dropdown menu. Alternatively, you can select media items and press the Del key.
Arranging Media Items on Timeline Tracks
You can arrange media items on the timeline tracks to change their playback order or overlay during playback. This can be done by selecting one or more media items and dragging them to the desired location on the same track or on a different track of a timeline.
When media items are dragged and dropped onto or within a timeline track, overwrite editing is employed. This means that any portion of an existing item on the track that the new item overlaps with will be replaced by the new item. The frame of the new item is colored orange to indicate that it will overwrite the corresponding part of the existing item.
As you drag media items onto the tracks, they will automatically snap to other media items’ edges, playhead position, markers, etc. You can activate or deactivate the Snap feature by clicking on the Snap On/Off toggle ![]() located in the side toolbar or by using the
located in the side toolbar or by using the N keyboard shortcut.
To restrict the dragging of media items exclusively to vertical movement, hold down the Shift key.
If you want to place a media item precisely at a specific time position on the same timeline track, enter the desired time value into the Position field in the media item’s Settings panel.

Note:
There are two different ways to access media item settings:
- The side Settings panel, which can be made visible or hidden by clicking on the toggle in the top right corner of the timeline panel.
- The separate Settings window, which can be accessed by right-clicking on the media item and selecting Item Settings from the dropdown menu.
Splitting Media Items
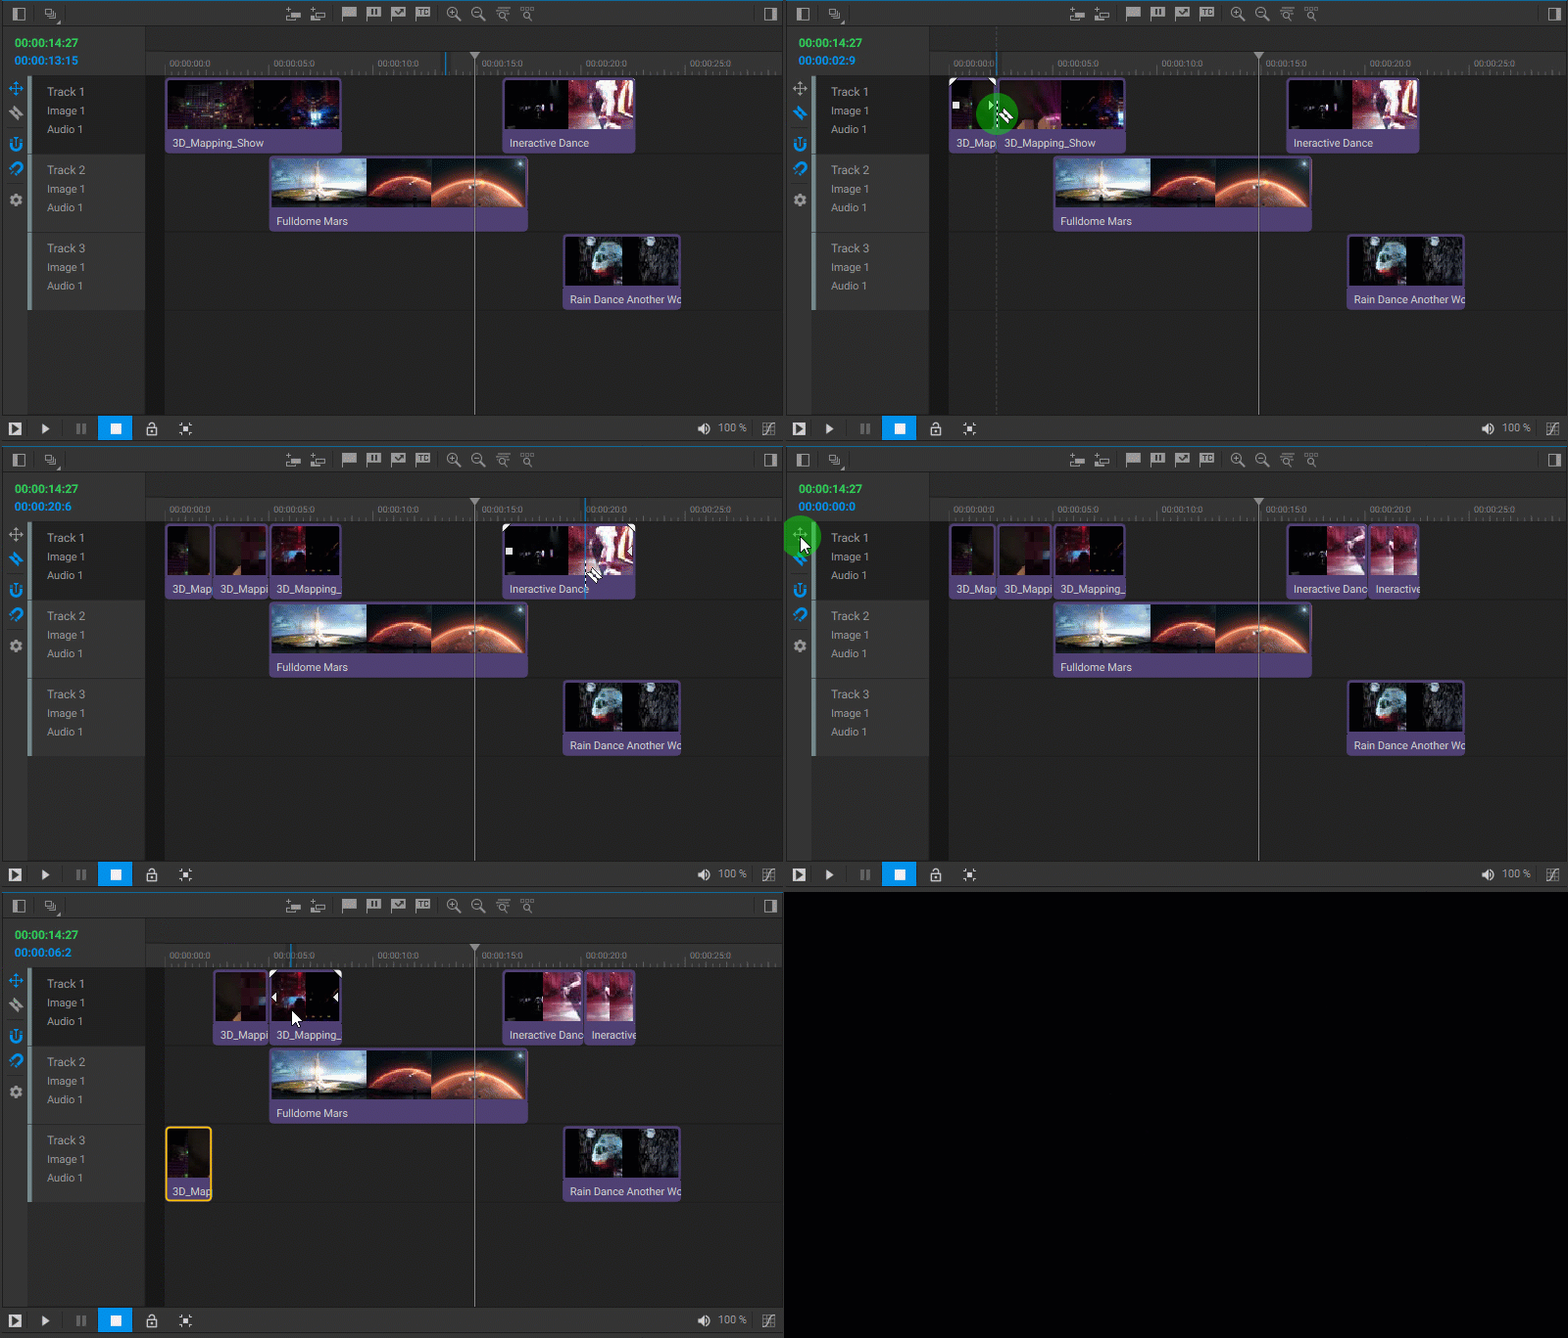
If necessary, you can split a media item into two parts using the Razor tool. This action creates two separate instances of the media item, each being a full version of the original but with different In and Out points. To split a media item, select the Razor tool ![]() from the side toolbar (or use the
from the side toolbar (or use the C keyboard shortcut), then click on the point within the media item where you wish to split it. To resume editing by dragging, select the Move tool ![]() from the side toolbar or use the
from the side toolbar or use the V or Esc keyboard shortcuts.
Changing the Duration of Media Items
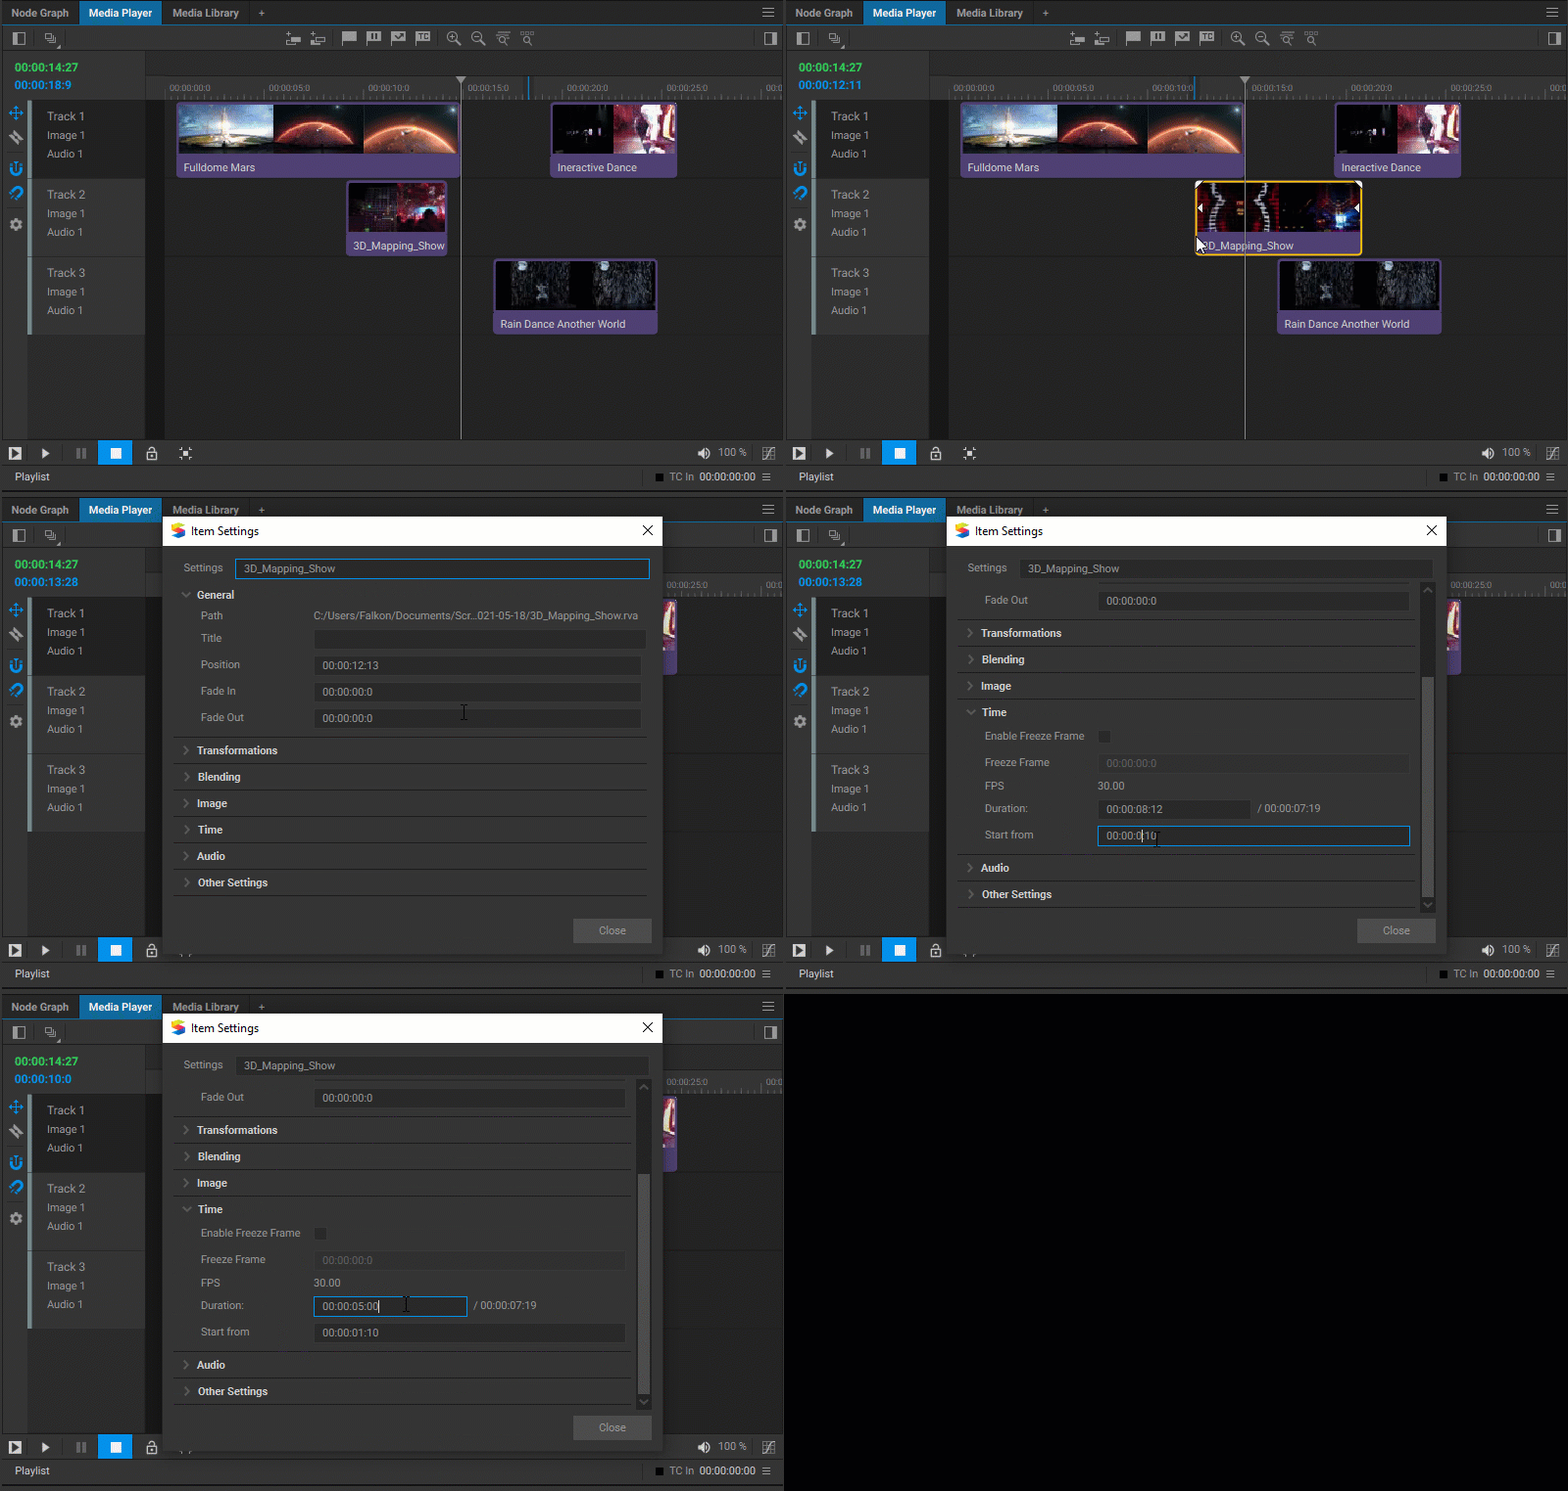
To adjust the duration and starting time of a media item, you can trim or expand it by dragging the white square handles located on either side of the media item’s thumbnail. The left handle changes the starting time while the right handle adjusts the duration. Alternatively, you can right-click on the media item, select Item Settings from the dropdown menu, and then input values into the Start from and Duration fields. To indicate that the media item has been trimmed or expanded, the square handles will be replaced with triangle ones.
Fading Media Items In and Out
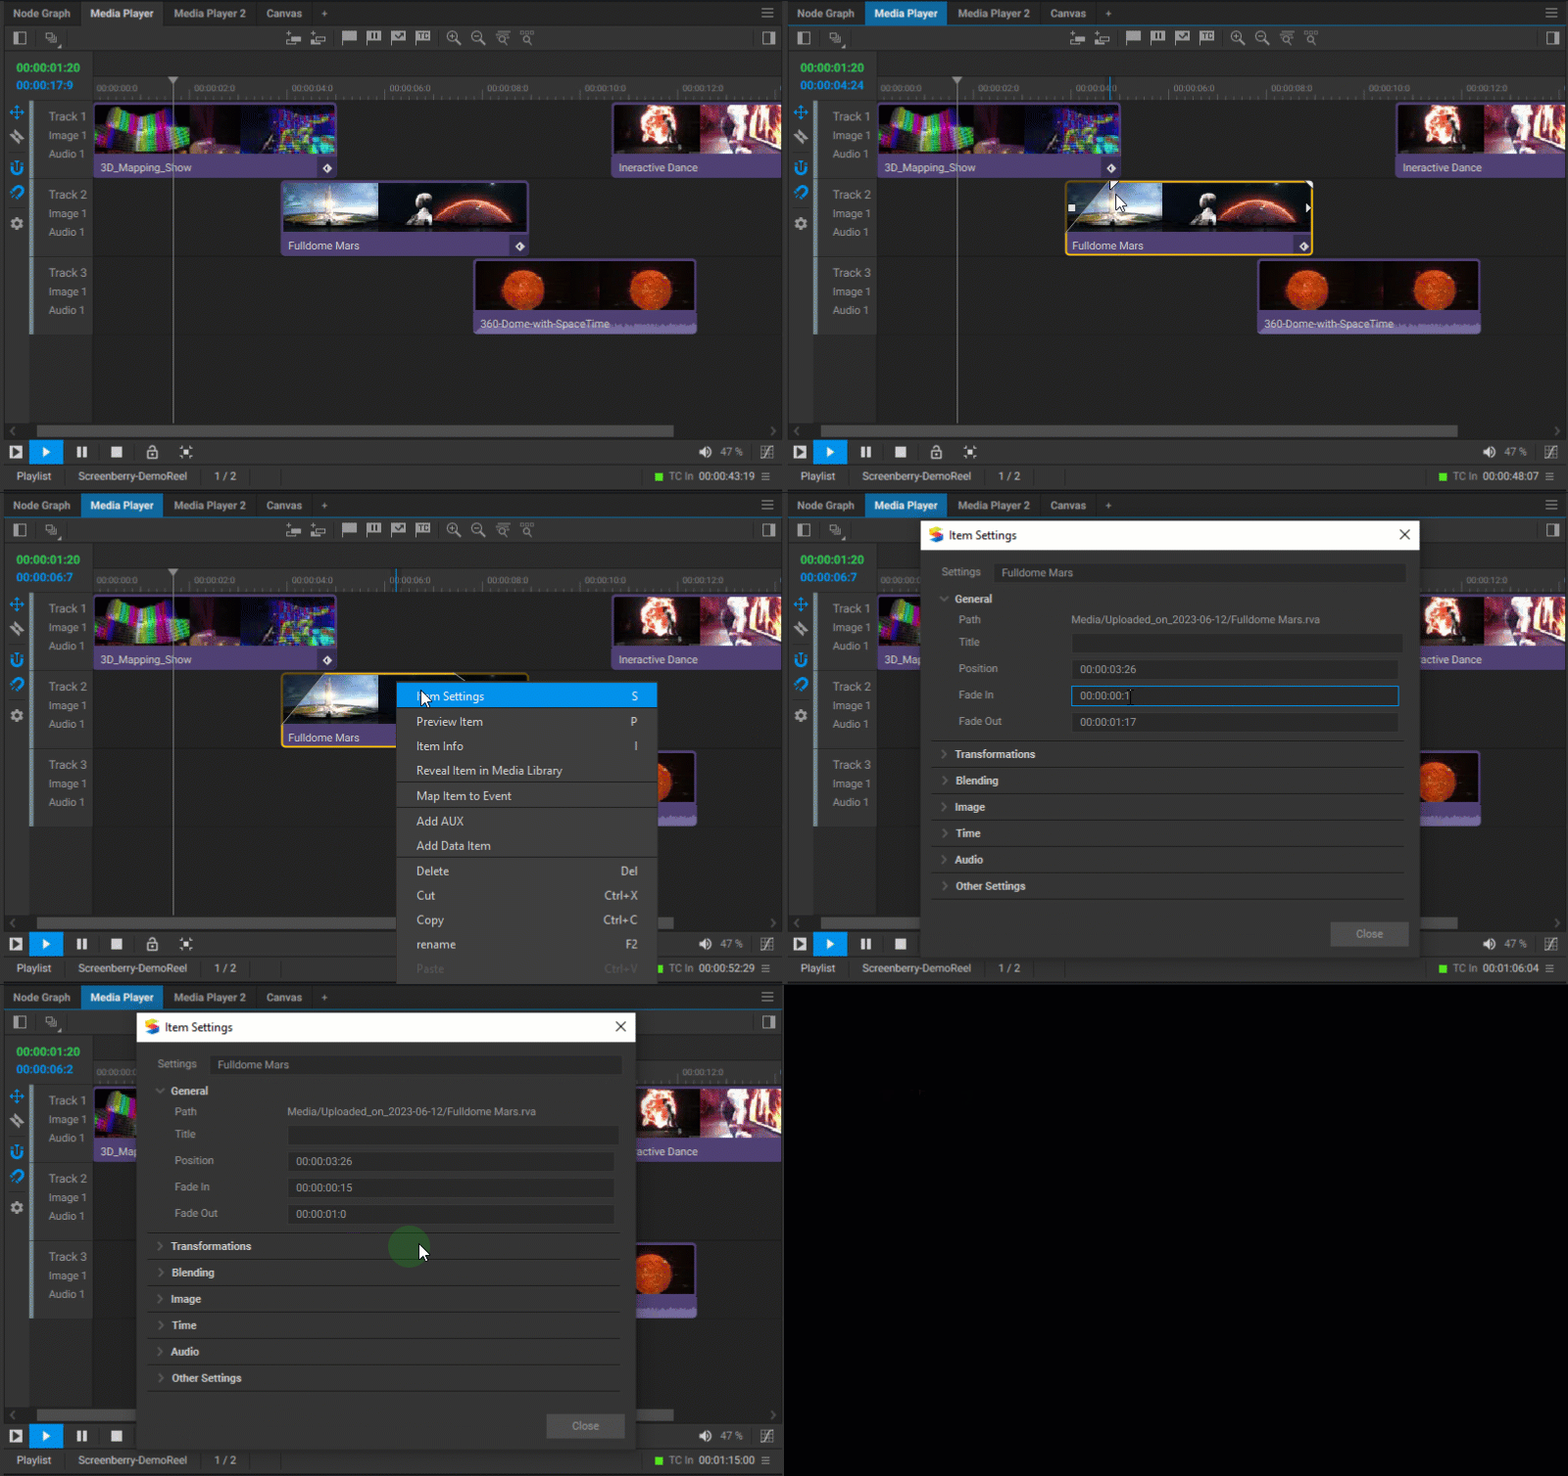
To set fade in and fade out for a media item, either drag the white triangular handles located at the top corners of the media item thumbnail or right-click on the media item, select Item Settings from the dropdown menu, and enter the required values into the Fade In and Fade Out fields.
Freezing a Frame of a Media Item
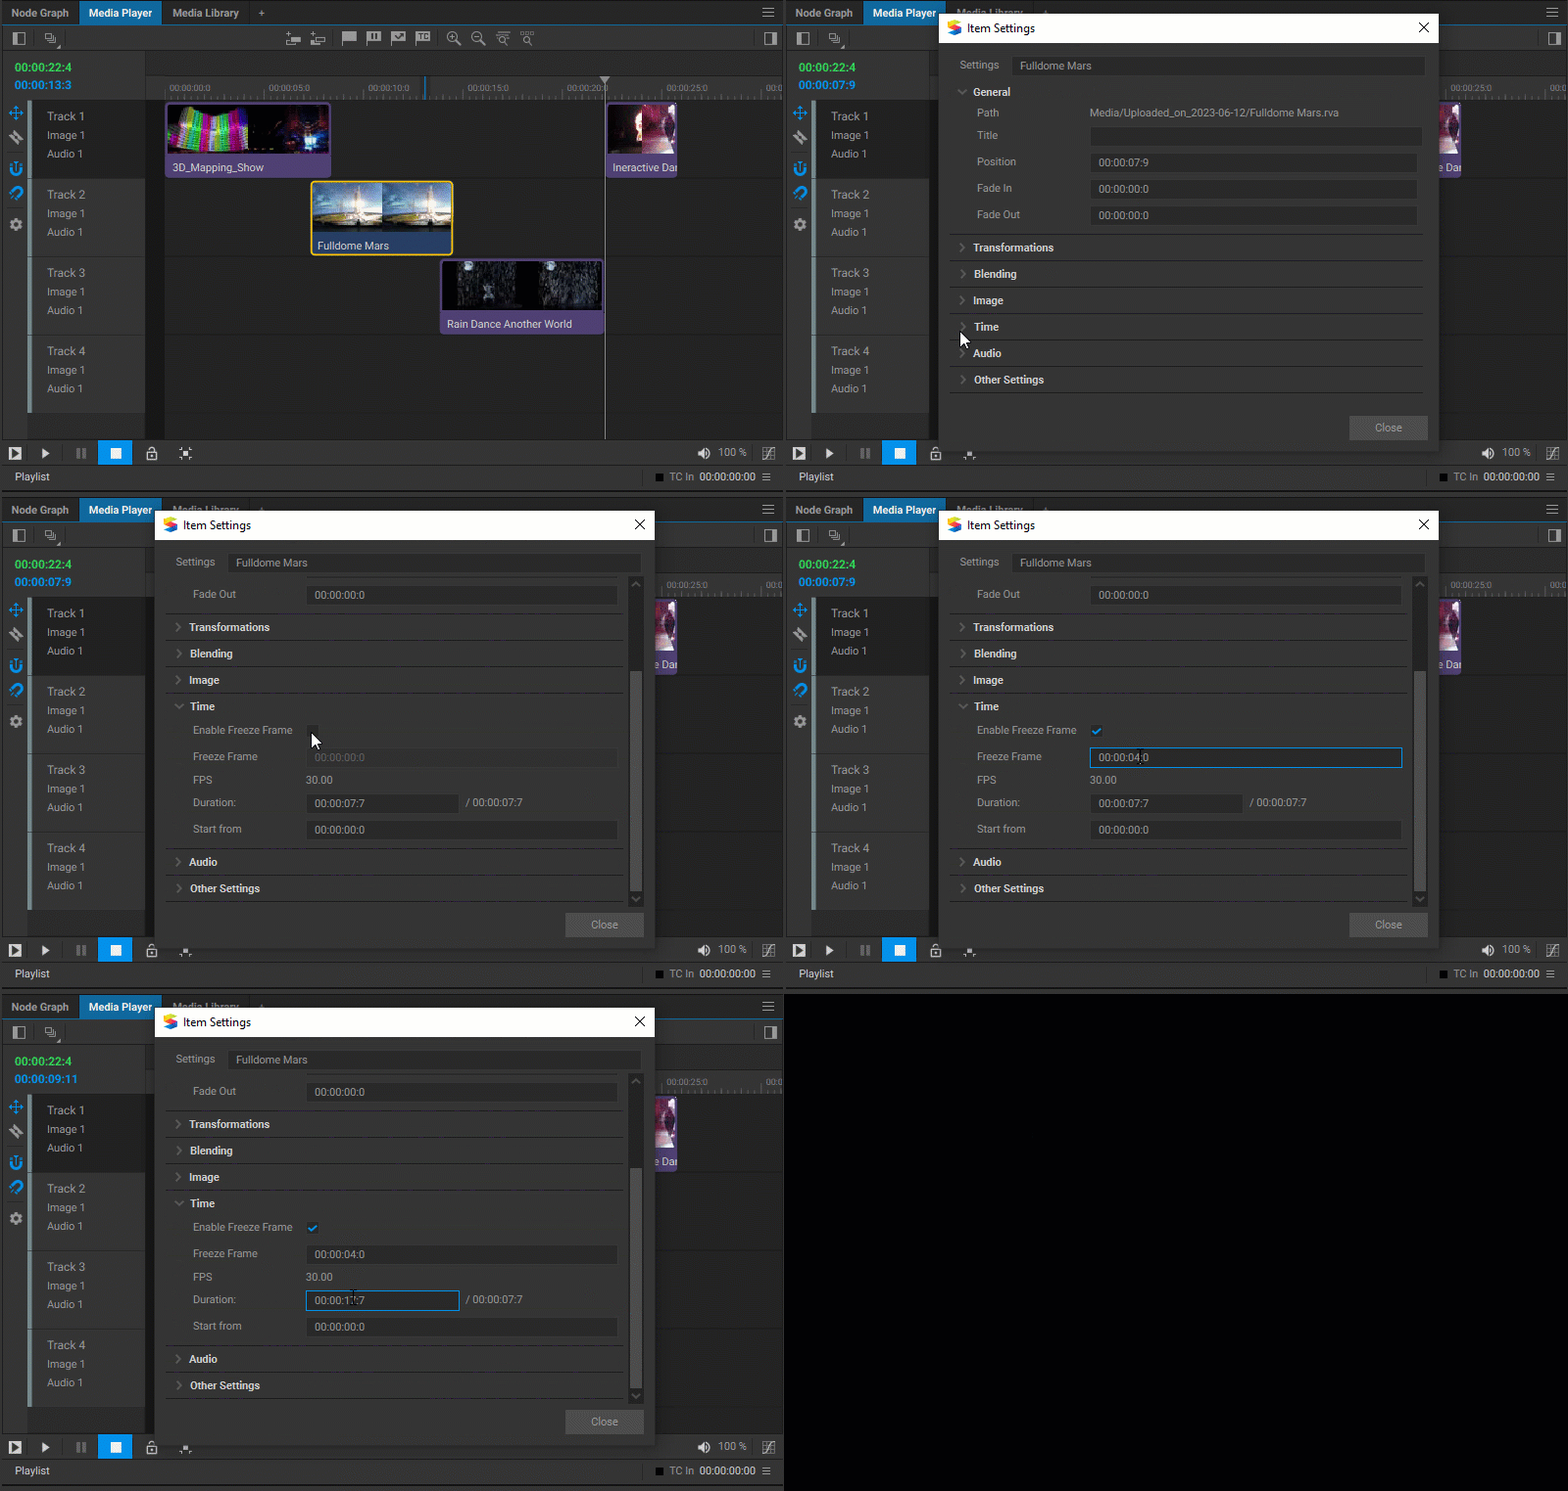
To enable the continuous playback of any still frame of a media item, right-click on the media item, select Item Settings from the dropdown menu, and select the Enable Freeze Frame checkbox in the window that appears. Next, define the specific frame of the media item that you wish to hold by inputting the desired value into the Freeze Frame field. To specify how long you want to play back the still frame, input the value into the Duration field.
