Web Control Panel
Overview
The web control panel provides a platform-independent web interface powered by HTML 5 that enables multiple users to operate the Screenberry server simultaneously via the web browser from a computer, tablet, or smartphone.
Accessing Web Panel
To access the web panel, do the following:
- In the Node Graph, add the WebServer node. Notice that the default Port 8081 is selected in the settings of the node. You can choose another port if port 8081 is already in use.
- Enter the URL http://127.0.0.1:8081 (opens in a new tab) (or http://localhost:8081 (opens in a new tab)) in your web browser if you’re accessing the web panel from the same machine that hosts the Screenberry server. When accessing from a mobile phone or another computer on the same computer network, you can enter any of the IP addresses associated with the Screenberry server computer. For example, the URL may look like http://192.168.31.218:8081 (opens in a new tab).
Note: The web panel provides access to the media players, playlists, and widgets currently created in Screenberry.
Note: A known issue affects some builds of the Screenberry version 2.8.x, in which the web server components are not copied into the Resources folder of the newly created Screenberry project. In case you get an empty page after completing the above steps, please copy the files from this archive into the Resources/webServer folder of the project manually.
Media Playback
The web panel provides control over media playback and playlist management for the Media Players created in Screenberry.
Playlist Selection
To access the desired playlist, do the following:
- Click on the Screenberry Web Panel menu button
 located at the top left corner and select Media Player.
 - Click on the Settings button
 located at the bottom right corner to open the right sidebar.
 - Select the Media Player in the dropdown menu.
- Select the playlist in the dropdown menu.
Playback Controls
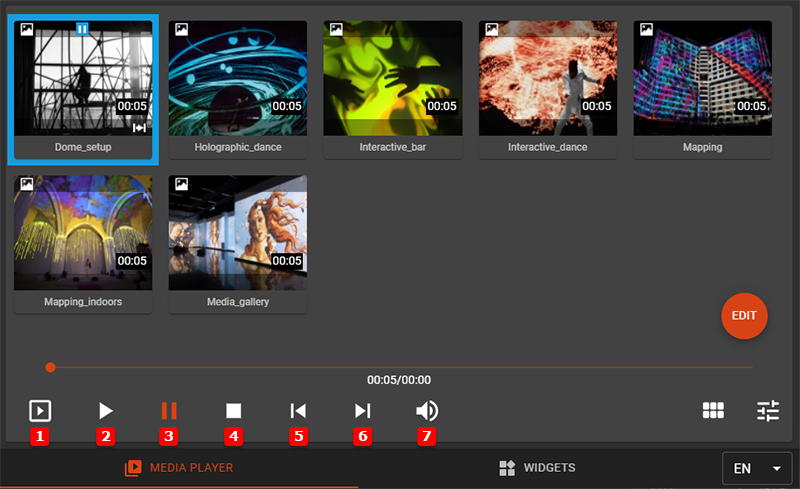
 Play Selected Item starts playback of a selected media item.
 Play starts playback from the current playhead position.
 Pause freezes playback at the current playhead position.
 Stop ends playback.
 Previous Item jumps to the previous media item in the playlist.
 Next Item jumps to the next media item in the playlist.
 Volume Control adjusts the overall audio volume for the Media Player output.
Media Items Playback
To start playback of a media item in the playlist, do one of the following:
- Press the Play button to start playback from the current playhead position.
- Select the media item in the playlist and press the Play Selected Item button .
Media Item Settings
To access media item settings, select a media item and press the Settings button ![]() located at the bottom right corner.
located at the bottom right corner.
The following media item settings are available for editing:
- Title changes the name of a media item.
- Fade In defines fade in time for a media item in seconds (crossfades a media item with a previous one).
- Pause on First Frame / Pause on Last Frame specifies whether the media item’s playback should be paused on the first or last frame.
- Loops and Infinite Loop specify whether the media item should be played in a loop.
- Volume adjusts the volume of a selected media item’s audio output.
Managing Playlists
To manage playlists, click on the Settings button ![]() located at the bottom right corner to open the right-sidebar, and then click on the playlist dropdown menu. You can perform the following actions:
located at the bottom right corner to open the right-sidebar, and then click on the playlist dropdown menu. You can perform the following actions:
- To add a new playlist, click on the Add New Playlist button.
- To rename a playlist, click the Edit icon
 next to the playlist name, and enter a new name in the opened dialog box.
 - To delete a playlist, click the Trash icon
 next to the playlist name.
Organizing Media Items in Playlists
To manage media items in the playlists, click on the Edit floating button ![]() . You can perform the following actions:
. You can perform the following actions:
- To add media items, click on the button
 if the playlist is empty or the icon
  on the particular media item after which media items should be added. Select media items in the opened Media Library window and press the Add button
  .
. - To delete a media item, click the icon
 on the media item.
 - To change the order of media items, drag the media item to the desired position.
When you have finished editing the playlist, click on the Edit floating button ![]() again to exit the editing mode.
again to exit the editing mode.
Working with Widgets
The web panel allows access to the widgets added in Screenberry.
To access the desired widget, do the following:
- Click on the Screenberry Web Panel menu button located at the top left corner and select Widgets.
- Select the widget in the dropdown menu.